Precision and Progress: A Comprehensive Guide to Stereotaxic Surgery for Neural Electrode Array Implantation
This article provides a comprehensive resource for researchers and scientists performing stereotaxic surgery for electrode array implantation.
Precision and Progress: A Comprehensive Guide to Stereotaxic Surgery for Neural Electrode Array Implantation
Abstract
This article provides a comprehensive resource for researchers and scientists performing stereotaxic surgery for electrode array implantation. It covers foundational principles, from historical context to the critical role of stereotaxic apparatuses in modern neuroscience. Detailed methodological guidance is provided for surgical procedures in both rodents and primates, highlighting key anatomical and technical differences. The content addresses common challenges and presents advanced optimization strategies, including robotic systems and hypothermia prevention. Finally, it explores validation techniques for implantation success and discusses future directions, including AI integration and next-generation high-density arrays, offering a complete roadmap from planning to execution and analysis.
The Bedrock of Brain Interfacing: Principles and Applications of Stereotaxic Electrode Implantation
Stereotaxic surgery is a neurosurgical technique that enables precise, three-dimensional targeting of specific brain structures in both humans and animals. The fundamental principle involves using a coordinated system, based on a stereotaxic atlas, to guide instruments to deep brain sites with minimal damage to surrounding tissue. This approach is indispensable for a wide range of neuroscientific and clinical applications, including the implantation of microelectrode arrays for recording neural activity, the creation of localized lesions to study brain function, and the delivery of therapeutic agents or radiation. The evolution of this field is marked by a continuous quest for greater precision, driven by advancements in imaging, instrumentation, and computational planning. Within research, it provides the foundation for investigating brain function in awake, freely behaving animals, offering invaluable insights into neural circuits, behavior, and the mechanisms of neurological diseases [1] [2].
Quantitative outcomes from recent studies demonstrate the significant impact of technological advancements on surgical precision and efficiency. The table below summarizes key performance metrics from contemporary research.
Table 1: Quantitative Outcomes of Advanced Stereotaxic Procedures
| Procedure / Technology | Key Metric | Result | Context / Implication |
|---|---|---|---|
| Remote-Controlled Digiscope [3] | Reduction in Average Surgical Time | Significant reduction | Improved workflow efficiency in simulated and real surgical cases |
| Remote-Controlled Digiscope [3] | Improvement in Surgical Accuracy | >15% improvement | Enhanced precision in visualization and targeting |
| Remote-Controlled Digiscope [3] | Error Rate | Characterized by significant reduction | Increased procedural safety and reliability |
| Mouse SCN Lesion [4] | Total Surgical Time | ~30 minutes per animal | Streamlined protocol for high-throughput studies |
| High-Resolution Brain Atlas (STAM) [5] | Image Resolution | Isotropic 1-μm | Enables single-cell level spatial localization and mapping |
Advanced Stereotaxic Atlas and Coordinate Systems
The stereotaxic atlas is the cornerstone of any precise procedure, serving as a detailed map of the brain. Traditional two-dimensional reference atlases, composed of annotated coronal sections spaced hundreds of micrometers apart, have long been the standard. However, these are limited in their ability to show continuous changes and precise three-dimensional topography of brain structures, hindering accurate determination of anatomical boundaries [5]. A landmark advancement is the development of the Stereotaxic Topographic Atlas of the Mouse Brain (STAM), which provides a three-dimensional, whole-brain dataset with an isotropic 1-μm resolution. This resolution, achieved through micro-optical sectioning tomography of Nissl-stained tissue, allows for the visualization of cytoarchitectural details, including the shape and size of individual neurons and glial cells [5].
This single-cell resolution is crucial for modern neuroscience, which increasingly focuses on mapping neural circuits and spatial transcriptomics at the cellular level. The STAM atlas delineates 916 brain structures and supports the generation of image slices at arbitrary angles, overcoming the limitations of traditional atlases when brain slices are cut at different orientations. It is interoperable with widely used stereotaxic atlases like the Allen Reference Atlas, facilitating cross-atlas navigation and providing a versatile informatics tool for large-scale brain mapping projects [5]. The coordinate system for such atlases is typically defined using datum marks, which can be cranial reference points like bregma and lambda (the intersections of the skull sutures), or intracranial points [5] [4]. For successful surgery, the animal's head must be securely positioned in the stereotaxic instrument, and the skull must be leveled so that the dorsal-ventral coordinates of bregma and lambda are equal, ensuring a standardized horizontal plane [4].
Application Notes and Protocols for Electrode Array Implantation
The following protocols detail specific applications of stereotaxic surgery, emphasizing the methodology for electrode implantation and other interventions.
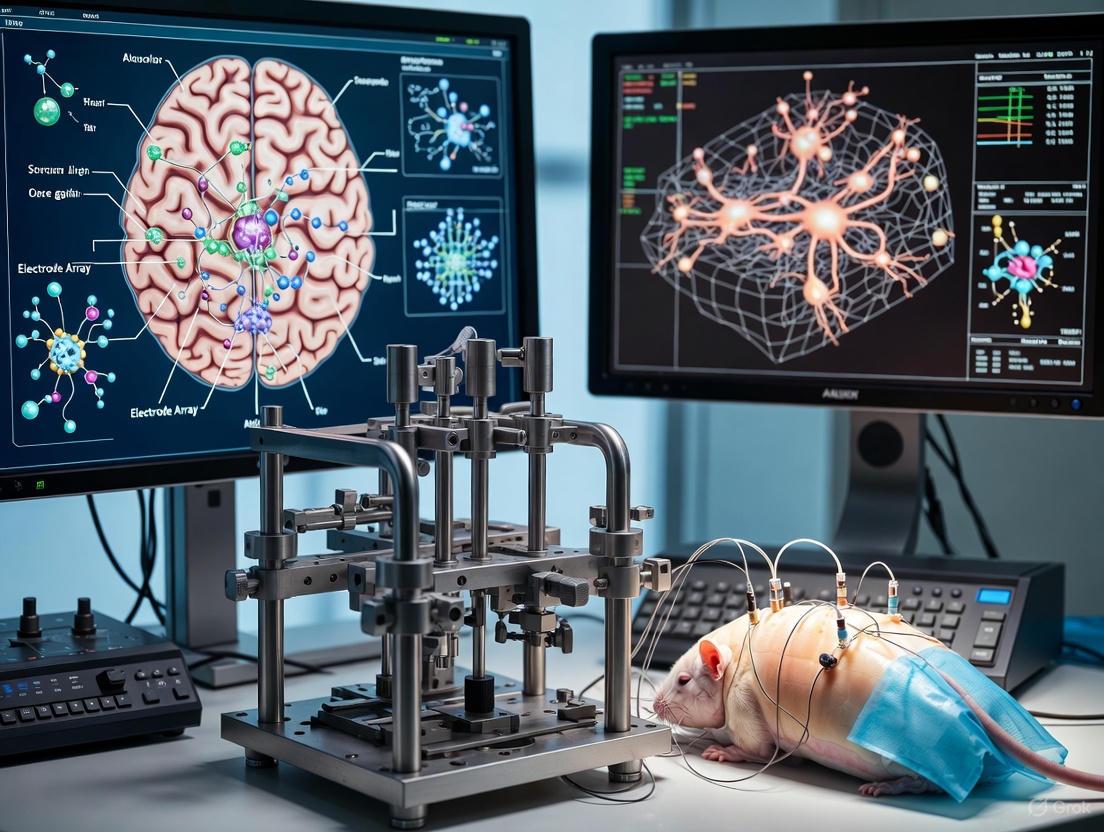
Protocol 1: Implantation of Microelectrode Arrays in the Common Marmoset
The common marmoset (Callithrix jacchus) is a valuable non-human primate model in neuroscience due to its phylogenetic proximity to humans and complex social behaviors. This protocol describes the chronic implantation of microelectrode arrays for electrophysiological recordings in freely behaving animals [6] [2].
A. Preoperative Preparation
- Animal Model: Common marmoset (Callithrix jacchus).
- Surgical Setup: Assemble and sterilize the microelectrode arrays and their holders, along with the stereotaxic apparatus, using ultraviolet (UV) light for at least two hours [6].
- Coordinate Planning: Predefine the craniotomy coordinates based on a stereotaxic atlas. The circumference of the craniotomy should be approximately 200 μm larger than the anterior-posterior and medial-lateral coordinates of the target site. Attach a stereotaxic needle to a micromanipulator to determine the precise location of the craniotomy on the skull relative to the zero coordinates [6].
B. Surgical Procedure
- Anesthesia and Positioning: Induce anesthesia and securely mount the animal in the stereotaxic frame using ear bars and an incisor bar. The head must be centered and fixed symmetrically [6] [4].
- Skull Exposure and Leveling: Make a midline scalp incision, expose the skull, and clear the periosteal tissues. Measure the dorsal-ventral height at bregma and lambda using the stereotaxic manipulator. Adjust the incisor bar until both points are on the same horizontal plane [4].
- Targeting and Craniotomy: Set the stereotaxic instrument to zero at bregma. Move the instrument to the target coordinates relative to bregma (e.g., 0.2 mm caudal, 0.23 mm bilateral for a mouse SCN). Mark the location and drill small burr holes at the marked targets [4].
- Implantation: Lower the microelectrode array to the target depth below the skull surface. The coordinate for the entire array can be calculated from a single microelectrode, as the relative distances between electrodes are fixed [6].
- Closure: After implantation, suture the incision closed [4].
C. Postoperative Care and Validation
- Keep the animal warm on a heating pad (~38 °C) during recovery [4].
- Functional validation can include recording local field potentials and neuronal spike activity from the freely behaving marmoset one week after surgery [2].
- Histological verification of the implant location can be performed post-mortem using Nissl staining [4].
Protocol 2: Electrolytic Lesion of the Suprachiasmatic Nucleus (SCN) in Mice
This protocol provides a strategy for fast, localized ablation of the master circadian clock in mice using an electrolytic lesion, which is useful for studying circadian rhythm outputs [4].
A. Specialized Equipment and Reagents
- Lesion-Making Device: A device capable of delivering a controlled electrical current (e.g., 0.8 mA for 3 seconds) [4].
- Electrode: A fine electrode (e.g., 100 μm diameter), insulated except for a small exposed tip (e.g., 200 μm) [4].
- Anesthesia: A mixture of ketamine (7 mg/ml) and xylazine (0.44 mg/ml) dissolved in bacteriostatic saline, administered via intraperitoneal injection [4].
B. Surgical and Lesioning Steps
- Follow the general surgical steps for anesthesia, mounting, skull exposure, leveling, and drilling as outlined in Protocol 3.1 [4].
- Electrical Circuit Setup: Connect the electrode to the positive (+) binding post of the lesion device. Connect one clip of a plug connector cable to the nose clamp (negative, -) and the other clip to the animal's tail (ground, G) [4].
- Lesion Delivery: Lower the electrode to the target depth for the SCN. Deliver the predefined electrical current (e.g., 0.8 mA for 3 seconds) to create the bilateral lesion. For a sham operation, perform the same procedure without delivering current [4].
C. Confirmation of Lesion
- Behavioral Confirmation: Monitor the locomotor activity rhythm of the mouse in constant darkness. A successful SCN lesion will result in arrhythmic behavior, which can be analyzed using software like ClockLab. A sham-operated mouse will maintain a normal circadian rhythm [4].
- Histological Confirmation: Post-mortem, perform Nissl staining (e.g., with cresyl violet solution) on coronal brain sections. A successful lesion will show a bilateral loss of the SCN, often with some tissue debris, compared to an intact SCN in sham-operated controls [4].
Diagram 1: Stereotaxic Surgical Workflow for Electrode Implantation & Lesioning
The Scientist's Toolkit: Essential Research Reagents and Materials
Successful stereotaxic surgery relies on a suite of specialized instruments, reagents, and software. The table below catalogs the key components required for the procedures described in these protocols.
Table 2: Essential Research Reagents and Materials for Stereotaxic Surgery
| Item Category | Specific Examples | Function & Application |
|---|---|---|
| Stereotaxic Apparatus | Stereotaxic frame (e.g., NARISHIGE SR-6M-HT), stereotaxic micromanipulator (e.g., NARISHIGE SM-15R/L) [4] | Provides a rigid, adjustable platform to securely hold the animal's head and precisely guide instruments in 3D space. |
| Surgical Instruments | Forceps, scissors, scalpel, hemostats, surgical needle with suture [4] | Used for the dissection and handling of tissues, as well as closing the surgical incision. |
| Anesthesia & Analgesia | Ketamine/Xylazine mixture, Isoflurane [4] [7] | Induces and maintains a state of unconsciousness and analgesia during the surgical procedure. |
| Drilling System | Hand drill with engraving cutter (e.g., DREMEL) [4] | Creates a small opening (craniotomy) in the skull to allow access to the brain. |
| Electrophysiology Implants | Microelectrode arrays, grounding wires [6] | Chronic implants for recording neural activity (spikes, local field potentials) in freely behaving animals. |
| Lesioning/Stimulation | Lesion-making device (e.g., Ugo Basile 53500), fine-tip electrodes [4] | Generates controlled electrical currents for creating localized electrolytic lesions or for brain stimulation. |
| Validation Software | ClockLab software [4] | Analyzes locomotor activity data to confirm functional success of procedures like SCN ablation. |
| Histological Stains | Cresyl violet acetate solution for Nissl staining [4] | Stains neuronal cell bodies to verify anatomical location of lesions or implants post-mortem. |
| Advanced Atlas & Planning | STAM informatics platform, surgical planning software [5] | Provides high-resolution brain maps and computational tools for precise target planning and data registration. |
Signaling Pathways in the Neurovascular Unit Following Stereotaxic Radiosurgery
Stereotaxic techniques are also pivotal in modeling and treating brain pathologies. Stereotactic radiosurgery (SRS) delivers a high-dose, targeted fraction of radiation, but can induce adverse effects like brain radiation necrosis, largely mediated by vascular injury [7]. Research using a mouse SRS model has revealed a coordinated stress response within the neurovascular unit (NVU)—comprising endothelial cells, astrocytes, and microglia—that leads to blood-brain barrier (BBB) disruption. Spatial transcriptomics has identified key differentially expressed genes and cell-cell communication pathways involved in this process, which share features with cerebral cavernous malformations (CCM) pathophysiology [7]. The implicated pathways include those governing immune modulation, barrier integrity, and tissue remodeling.
Diagram 2: Key Signaling Pathways in NVU Stress Response to SRS
The field of brain-computer interfaces (BCIs) rests upon the fundamental principle that the brain's functions are mediated by electrical activity. The journey to understand this bioelectricity began over two centuries ago, launching a scientific revolution that continues today [8]. Modern BCI development, particularly for sensorimotor applications, directly builds upon these early discoveries, aiming to restore independence for individuals impacted by neurological disease or injury [8]. This document frames these technological advancements within the specific context of stereotaxic neurosurgery for electrode array implantation, providing a detailed historical and technical resource for researchers and drug development professionals.
Key Historical Experiments and Discoveries
The evolution of BCIs has been marked by pivotal experiments that progressively uncovered the relationship between electricity and neural function.
The Galvani-Volta Debate
The scientific debate between Luigi Galvani and Alessandro Volta in the late 18th century laid the very foundation for modern electrophysiology and BCI technology [8].
- Galvani's Animal Electricity (~1780-1791): Luigi Galvani, a physician and professor, discovered that a frog's leg muscle would twitch when touched with a metal scalpel during an electrical spark from an electrostatic machine [9]. Through systematic experiments involving capacitors ("Franklin Squares") and metallic arcs connecting nerves to muscles, he concluded that the nerve and muscle tissue itself generated a form of inherent "animal electricity" [9]. His seminal work, De Viribus Electricitatis in Motu Musculari Commentarius, was published in 1791 [9].
- Volta's Metallic Electricity (1792-1800): Alessandro Volta, a physicist, contended that the electricity originated from the contact between two dissimilar metals, not from the animal tissue itself [8]. His experiments with bimetallic arcs led him to develop the "Voltaic Pile" in 1800—the first battery—which provided a continuous and controllable source of electrical current [9]. This invention was pivotal, enabling countless subsequent electrical experiments.
This debate was ultimately resolved in the mid-19th century with the observation of electrical impulses in nerves, validating that both scientists were partially correct: Volta's metals could generate electricity, and Galvani's nerves generated and used internal electricity for function [9].
Foundational Modern Experiments
Building on this foundation, 20th-century research established the principles for directly interfacing with the brain.
- Cortical Recording and Directional Tuning (1960s-1980s): Work with indwelling electrodes in non-human primates (NHPs) demonstrated that electrical patterns in the motor cortex correlated with wrist movements [8]. This was followed by the key concept of "directional tuning," where a motor neuron’s firing rate changes based on the direction of movement [8].
- First Human Implanted BCI (1998): A pivotal clinical demonstration involved a person with ALS who received an implanted electrode with one recording site and learned to modulate her neural signals for binary communication, envisioning future control of muscle stimulators [8].
- Cortically-Controlled Robotic Arms (2012-2013): Breakthrough studies showed that individuals with paralysis could control multi-degree-of-freedom robotic arms using signals from implanted microelectrode arrays [8].
Table 1: Evolution of Key BCI Concepts and Technologies
| Time Period | Key Figure/Entity | Core Discovery/Technology | Impact on BCI Development |
|---|---|---|---|
| ~1780-1791 | Luigi Galvani | "Animal Electricity" from biological tissue [9] | Established the concept of bioelectricity; foundation of electrophysiology. |
| 1792-1800 | Alessandro Volta | Metallic electricity; Invention of the battery (Voltaic Pile) [9] | Created first reliable electrical source for stimulation and experimentation. |
| 1920s | Hans Berger | Human electroencephalogram (EEG) [8] | Enabled non-invasive recording of brain activity. |
| 1960s-1980s | Evarts, Georgopoulos, et al. | Cortical recording in NHPs; Directional tuning of neurons [8] | Provided the scientific basis for decoding movement intent from motor cortex signals. |
| 1998 | Kennedy & Bakay | First human implanted BCI (single electrode) [8] | Initial proof-of-concept for chronic, implanted BCI in humans. |
| 2000s-Present | Multiple Companies & Labs | Development of sophisticated electrode arrays (Utah, Michigan, SEEG) and miniaturized electronics [8] [10] | Enabled high-fidelity recording and stimulation from large populations of neurons, making complex BCI control possible. |
Modern BCI Electrode Technologies and Surgical Protocols
Current BCI approaches are characterized by a fundamental trade-off between the high signal quality of invasive methods and the accessibility of non-invasive methods [10].
Comparative Analysis of Modern BCI Platforms
Table 2: Comparison of Modern Invasive BCI Electrode Platforms and Surgical Approaches
| Company/ Platform | Electrode Technology | Surgical Implantation Method | Key Advantages | Notable Limitations |
|---|---|---|---|---|
| Utah Array (Blackrock Neurotech) | 96 (or more) rigid silicon "spikes" metalized with electrodes [8] [10] | Craniotomy (skull opening); array is pushed into cortical tissue [8]. | Long clinical history; high-quality signals for single-unit recording [10]. | Invasive; can trigger immune response, scarring; poor "butcher ratio" (many neurons killed per recorded neuron) [10]. |
| Michigan Array | Flexible thin-film electrodes [8] | Craniotomy for placement on or in the brain [8]. | Flexible; various geometric layouts possible [8]. | Requires craniotomy with associated surgical risks [8]. |
| Stentrode (Synchron) | Electrode array mounted on a stent-like mesh [10] [11] | Minimally invasive; inserted via blood vessel (jugular vein) and guided to a vein adjacent to the brain [10]. | Avoids open-brain surgery; lower adverse event rate; "butcher ratio" of zero [10]. | Signal quality may be fundamentally limited compared to intracortical electrodes [10]. |
| N1 Implant (Neuralink) | Flexible threads with many electrodes [10] [11] | Craniotomy; implanted by a specialized surgical robot [11]. | High channel count; miniaturized, fully implanted device [11]. | Highly invasive; long-term biological compatibility and stability are subjects of ongoing research [10]. |
| SEEG Electrodes | Stereo-electroencephalography depth electrodes [8] | Minimally invasive craniostomy; electrodes are inserted to depth through small burr holes [8]. | Lower adverse event rate than ECoG; well-established surgical practice from epilepsy monitoring; good performance for decoding [8]. | Typically used for recording, less for stimulation in BCI applications; spatial resolution lower than microelectrodes. |
Stereotaxic Surgical Protocol for Microelectrode Array Implantation
The following protocol details the stereotaxic implantation of microelectrode arrays, a cornerstone technique for preclinical BCI research, as adapted for the common marmoset (Callithrix jacchus) [12]. This small NHP model is valuable due to its phylogenetic proximity to humans and lissencephalic brain, which simplifies targeting.
Protocol Title: Stereotaxic Implantation of Microelectrode Arrays in the Common Marmoset
Objective: To chronically implant microelectrode arrays in targeted brain regions of freely behaving marmosets for electrophysiological recording.
I. Pre-Surgical Planning and Preparation
Imaging and Targeting:
- Perform structural MRI to identify neuroanatomical landmarks.
- Align with fMRI scans acquired while the animal performs or imagines specific tasks (e.g., hand movements) to functionally localize target regions (e.g., primary motor cortex) [8].
- Using stereotaxic atlases, calculate the Anteroposterior (AP), Mediolateral (ML), and Dorsoventral (DV) coordinates for the target implantation site relative to the interaural line [12].
Equipment and Sterilization:
- Attach the microelectrode array to a stereotaxic-compatible electrode holder.
- Set the holder on the stereotaxic micromanipulator and align one microwire to the interaural zero point to establish the coordinate system.
- Sterilize the electrode-holder assembly using an ultraviolet (UV) light cabinet for a minimum of 2 hours [12].
- Gather and sterilize all surgical instruments, titanium bone screws, and ground wires.
II. Preoperative Procedures
Anesthesia and Analgesia:
- Administer pre-anesthetics: Atropine (0.05 mg/kg, IM) to reduce secretions.
- After 5 minutes, induce anesthesia with Ketamine (10-20 mg/kg, IM).
- Administer a general analgesic such as Tramadol (2 mg/kg, IM) [12].
Intubation and Maintenance:
- Shave the animal's head. Intubate the marmoset with an uncuffed endotracheal tube.
- Maintain deep anesthesia using Isoflurane (1-3%) delivered in oxygen via the endotracheal tube, using a ventilator [12].
Stereotaxic Fixation:
- Secure the animal's head in the stereotaxic frame using ear bars inserted into the auditory canals and an orbital bar/mouthpiece to stabilize the skull, ensuring horizontal alignment [12].
Vital Monitoring:
- Monitor heart rate (target: 154-180 bpm) and oxygen saturation (target: >95%) throughout the procedure using a pulse oximeter. Maintain body temperature with a homeothermic heating pad [12].
III. Surgical Implantation Procedure
Aseptic Preparation and Incision:
- Thoroughly scrub the shaved scalp with alternating povidone-iodine and alcohol swabs. Make a midline incision to expose the skull.
Craniotomy:
- Use a high-speed surgical drill to perform a craniotomy at the predefined AP and ML coordinates. The craniotomy perimeter should be approximately 200 µm larger than the array's footprint [12].
Dura Mater Incision:
- Carefully incise the dura mater to expose the underlying brain tissue.
Array Implantation:
- Re-attach the sterilized electrode holder with the array to the stereotaxic manipulator.
- Slowly lower the microelectrode array into the brain to the predetermined DV coordinate [12].
Fixation and Closure:
- Secure the array and holder to the skull using dental acrylic. Anchor the assembly firmly with multiple titanium bone screws placed in the skull surrounding the craniotomy. Solder a ground wire to one of these screws [12].
- Close the incision around the implant base with sutures.
IV. Postoperative Care
- Continue analgesic administration (e.g., Tramadol) for a minimum of 3 days post-surgery.
- Monitor the animal closely until fully recovered from anesthesia and routinely thereafter for signs of pain, infection, or neurological deficit [12].
- Allow at least one week for recovery before initiating electrophysiological recordings.
The Scientist's Toolkit: Research Reagent Solutions
Table 3: Essential Materials and Reagents for BCI Implantation Research
| Item | Function/Application | Specific Examples / Notes |
|---|---|---|
| Microelectrode Array | Records neural activity (single-unit, multi-unit, LFP) and/or provides electrical stimulation. | Utah Array, Michigan Array, custom floating microelectrode arrays [8]. |
| Stereotaxic Frame | Provides a rigid coordinate system for precise targeting of brain structures during surgery [12]. | Models compatible with NHP or rodent species. |
| Surgical Drill | Creates a craniotomy in the skull to access the brain for array implantation [12]. | High-speed drill with fine bits. |
| Dental Acrylic | Used to create a head cap that permanently fixes the implant and connector to the skull [12]. | |
| Titanium Bone Screws | Anchor the dental acrylic head cap to the skull; can also serve as a ground connection [12]. | |
| General Anesthetic | Renders the animal unconscious and immobile during the surgical procedure. | Ketamine, Isoflurane [12]. |
| Analgesic | Manages post-surgical pain for animal welfare and improved recovery. | Tramadol [12]. |
| Anticholinergic Agent | Reduces salivation and bronchial secretions during anesthesia to maintain airway patency. | Atropine [12]. |
Experimental Workflow and Signaling Pathways
The following diagrams, generated using Graphviz, illustrate the core workflow of a BCI experiment and the fundamental bioelectrical signaling pathway discovered by Galvani.
Workflow of a Modern BCI Experiment
The Bioelectrical Signaling Pathway
Stereotaxic apparatus is a foundational technology in neuroscience research, enabling precise targeting within the brain for electrode array implantation. These systems provide the three-dimensional coordinate framework essential for accessing specific brain regions in animal models, a critical requirement for studying neuronal activity and behavioral relationships [13]. The evolution from simple mechanical frames to integrated digital and robotic platforms has significantly enhanced the accuracy, reproducibility, and efficiency of neurosurgical procedures in preclinical research [14].
The core principle of stereotaxy involves stabilizing the subject's head within a rigid frame and using a standardized coordinate system (such as bregma and lambda landmarks in rodents) to guide instruments to precise intracranial targets [15]. For chronic electrophysiological recordings, this precision is paramount, as implants must maintain signal quality over weeks or months while minimizing tissue damage [13]. Modern stereotaxic systems now incorporate advanced features including robotic assistance, real-time navigation, and integration with preoperative imaging data, collectively supporting more complex experimental designs in drug development and basic neuroscience research [14] [16].
Comparative Analysis of Stereotaxic System Types
Technology Comparison Table
Table 1: Comparative analysis of stereotaxic system technologies for research applications.
| System Type | Key Features | Target Accuracy | Best Applications | Limitations |
|---|---|---|---|---|
| Traditional Frames | Mechanical manipulators, manual coordinate adjustment [14] | ~1.43mm entry point error [17] | Basic electrode implantation, CCI models [15] | Limited by manual operation, user-dependent variability |
| Frameless Systems | Guidance via patient-specific templates [17] | ~2.45mm entry point error [17] | Procedures requiring rapid setup | Lower accuracy compared to frame-based or robotic |
| Robotic Platforms | Robotic arms, preoperative planning, real-time tracking [16] [18] | Sub-millimeter accuracy [18], reduced operative time [18] | High-throughput studies, multiple implantations, complex trajectories [16] | High cost, requires significant training [14] |
Performance Metrics Table
Table 2: Quantitative performance metrics across stereotaxic methods.
| Performance Metric | Frame-Based | Frameless | Robot-Guided |
|---|---|---|---|
| Mean Entry Point Error | 1.43 mm [17] | 2.45 mm [17] | 1.17 mm [17] |
| Mean Target Point Error | 1.93 mm [17] | 2.89 mm [17] | 1.71 mm [17] |
| SEEG Procedure Time | Baseline | Not specified | 3.7 hours faster [18] |
| Symptomatic Hemorrhage Risk | 1.5-2.2% [17] | Not specified | Comparable or reduced [17] |
Application Notes for Electrode Array Implantation
Modular Chronic Implant Systems for Rodent Research
Recent advances in chronic implant design have focused on modular systems that accommodate various electrophysiological recording technologies. These systems prioritize vertical adjustability with micron precision, allowing researchers to optimize electrode positioning post-implantation to maintain signal quality as tissue response evolves [13]. Modern implant kits are designed with 3D-printed components that can be fabricated in-house, significantly reducing costs while maintaining precision [13].
A key innovation in chronic implantation is the integration of precision drive mechanisms that enable controlled electrode movement. These systems utilize fine-pitch screws (e.g., 0.3mm pitch) that, when coupled with specialized drivers, can achieve micron-scale adjustments [13]. This capability is crucial for chronic recordings where tissue changes over time may necessitate electrode repositioning to maintain optimal signal-to-noise ratios. The modular nature of these systems allows compatibility with various recording technologies including Neuropixels, tetrodes, and optogenetic probes [13].
Robotic Systems for Complex Implantation Procedures
Robotic stereotaxic platforms represent the most advanced technology for electrode implantation, particularly for complex procedures requiring multiple trajectories or deep brain structures. Systems such as ROSA ONE Brain and Cirq offer integrated preoperative planning capabilities, allowing surgeons to plan trajectories days before the actual procedure [16] [18]. These platforms provide multiple registration and head fixation options that accommodate various surgical workflows while maintaining sub-millimeter accuracy [18].
The six degrees of freedom in modern robotic arms enable exceptional dexterity and flexibility to access challenging surgical sites [18]. For stereo-electroencephalography (SEEG) procedures, which often require implantation of multiple depth electrodes, robotic assistance has demonstrated significant advantages, reducing procedure times by an average of 3 hours and 42 minutes compared to traditional frame-based methods [18]. This efficiency gain is particularly valuable in research settings where throughput and consistency are critical.
Experimental Protocols
Protocol for Chronic Electrode Array Implantation in Rodents
Table 3: Essential research reagents and materials for chronic electrode implantation.
| Item | Function | Specific Examples |
|---|---|---|
| Stereotaxic Frame | Head stabilization during surgery | U-frame, animal rail-mounted systems [19] |
| Modular Implant Kit | Holds and positions electrode arrays | 3D-printed shuttle system with drive mechanism [13] |
| Precision Screwdriver | Enables micron-scale electrode adjustment | Kepler screwdriver with planetary gears (25:1 ratio) [13] |
| Active Warming System | Maintains normothermia during anesthesia | Custom PCB heat pad with PID controller [15] |
| 3D-Printed Surgical Guides | Streamlines multiple instrument changes | PLA header mounting CCI device and pneumatic duct [15] |
Preoperative Planning and Preparation
Surgical Planning: Utilize preoperative MRI or CT imaging to identify target coordinates. For robotic systems, upload DICOM images to the planning software days before surgery [16]. For traditional systems, reference a stereotaxic atlas to determine anterior-posterior, medial-lateral, and dorsal-ventral coordinates relative to bregma.
Implant Assembly: Fabricate modular implant components using higher-end consumer-grade 3D printers. Assemble the shuttle component designed to hold specific probe types (e.g., Neuropixels 1.0 or 2.0). Test electrode function before implantation [13].
Animal Preparation: Induce anesthesia using isoflurane (3-4% for induction, 1-2% for maintenance). Administer preoperative analgesics (e.g., buprenorphine). Place animal in the stereotaxic frame using ear bars or a bite bar, ensuring head stability. Apply ophthalmic ointment to prevent corneal drying.
Surgical Implantation Procedure
Skin Incision and Craniotomy: Make a midline scalp incision and retract soft tissue to expose the skull. Identify and mark bregma and lambda landmarks. Adjust the skull position to ensure the horizontal plane is level (bregma and lambda at the same dorsal-ventral coordinate).
Coordinate Setting: Calculate target coordinates relative to bregma. For the modified stereotaxic system with a 3D-printed header, use the same device for coordinate measurement, CCI induction, and electrode implantation without changing headers [15].
Electrode Implantation: Lower the electrode array slowly to the target depth using the stereotaxic manipulator. For chronic implants, initially position the shank above the target depth, then gradually advance to the target area over time to reduce tissue irritation [13].
Implant Fixation: Secure the implant to the skull using dental acrylic. Ensure the headstage interface remains accessible for connection to recording systems. For modular systems, verify that the ZIF connectors are properly seated and protected [13].
Postoperative Care and Adjustment
Recovery Monitoring: Maintain the animal on a warming pad until fully awake from anesthesia. Monitor for signs of pain or distress and administer postoperative analgesics as needed.
Chronic Adjustment: For implants with adjustable mechanisms, use precision screwdrivers (e.g., Kepler screwdriver) to make micron-scale vertical adjustments post-implantation. Record the number of rotations to calculate exact electrode movement (e.g., 0.012mm per full turn with a 25:1 gear ratio) [13].
Intraoperative Management Protocol
Temperature Management: Implement an active warming system throughout the surgical procedure to prevent anesthesia-induced hypothermia. Maintain body temperature at approximately 40°C using a feedback-controlled heating pad. Studies show this intervention can improve survival rates from 0% to 75% in prolonged stereotaxic procedures [15].
Anatomical Targeting Verification: For highest precision in vascular avoidance, utilize Cone Beam CT Angiography/Venography or digital subtraction angiography rather than MR angiography alone. Evidence suggests these methods better identify electrode-vessel conflicts, with one study finding a 7.2% hemorrhage rate for electrodes conflicting with vessels versus 0.37% otherwise [17].
Robotic Stereotaxic Protocol for Multiple Trajectory Procedures
Preoperative Planning: Transfer DICOM-formatted MRI or CT images to the robotic system's planning station. Define trajectories for multiple electrode placements, optimizing angles to avoid vasculature and critical structures. For SEEG procedures, plan 10-15 trajectories in a single session [18].
Patient Registration: Employ automatic image registration using surface landmarks or fiducial markers. Verify registration accuracy before proceeding with the surgical procedure. The ROSA ONE Brain system offers multiple registration options to match surgeon preference [18].
Robotic Alignment: Pre-position the robotic arm close to the entry point. Use robotic alignment modules for automatic trajectory alignment. Leverage software tools and real-time tracking for precise positioning [16].
Instrument Guidance: Utilize drill guides and alignment tubes stabilized by the robotic arm. The rigidity of the robotic arm prevents accidental movements once trajectory is set [18]. For complex trajectories, the system's six degrees of freedom provide exceptional dexterity [18].
The evolution of stereotaxic apparatus from simple mechanical frames to integrated robotic platforms has fundamentally transformed electrode array implantation research. Each technology category offers distinct advantages: traditional frames provide accessibility and cost-effectiveness for basic procedures, while robotic systems deliver unparalleled precision and efficiency for complex experimental designs [14] [18]. The emerging trend toward modular, customizable implant systems further enhances the flexibility of chronic recording preparations, enabling researchers to maintain signal quality over extended experimental timelines [13].
For research applications requiring high-throughput electrode implantation or complex targeting strategies, robotic systems offer compelling advantages in both accuracy and procedural efficiency. The integration of advanced preoperative planning, real-time tracking, and robotic assistance creates a robust platform for sophisticated neuroscience research [16] [18]. As these technologies continue to evolve, with trends pointing toward increased integration of AI-assisted targeting and enhanced imaging compatibility, stereotaxic systems will undoubtedly continue to drive innovation in neuronal recording and stimulation research [14].
The convergence of electrophysiology, brain-computer interfaces (BCIs), and neurological disease modeling represents a transformative paradigm in neuroscience research. This integration is particularly critical within the context of stereotaxic surgery for electrode array implantation, a foundational methodology for investigating neural circuits and developing therapeutic interventions. These approaches provide a comprehensive framework for understanding brain function, from single-cell activity to network-level communication, and for translating these insights into clinical applications. Electrophysiological techniques enable researchers to record and modulate neural activity with high temporal resolution, while BCIs create direct communication pathways between the brain and external devices. Simultaneously, advanced disease models, particularly 3D brain organoids, offer unprecedented opportunities to study neurological disorders in human-derived tissues, bridging the gap between traditional animal models and human clinical studies.
The role of stereotaxic surgery in this ecosystem is fundamental, providing the precision necessary for targeted electrode placement in specific brain regions. This precision enables both the detailed recording of neural signatures and the precise delivery of neuromodulatory therapies. As the field advances, innovations such as flexible neural interfaces, closed-loop neurostimulation systems, and personalized in vitro models are pushing the boundaries of what is possible in both basic neuroscience and translational applications [20]. This document outlines the core applications, quantitative benchmarks, and detailed methodologies that define current best practices in this rapidly evolving field, providing researchers with the practical tools needed to advance stereotaxic electrode implantation research.
Electrophysiology in Clinical Practice and Research
Key Technological Advances and Clinical Applications
Clinical electrophysiology has undergone a significant transformation, driven by technological innovations that enhance precision, safety, and therapeutic efficacy. Pulsed Field Ablation (PFA) has emerged as a particularly disruptive technology, offering significant advantages for cardiac arrhythmia treatment, with principles applicable to neurological applications. Recent clinical trials have demonstrated the successful use of novel PFA systems for treating paroxysmal atrial fibrillation, showcasing their potential for precise tissue ablation with minimal collateral damage [21].
The field has also witnessed a paradigm shift in device implantation strategies, moving toward more physiological and less invasive approaches. Conduction system pacing, particularly left bundle branch area pacing (LBBAP), has shown superior outcomes compared to traditional right ventricular pacing. Evidence from the I-CLAS multicenter registry demonstrates that LBBAP is associated with significantly lower rates of death or heart failure hospitalizations (20.5% vs. 29.5%, p=0.002) and procedural complications (3.5% vs. 6.5%, p=0.004) [21]. These advances in cardiac electrophysiology provide valuable insights for neurological device development, particularly regarding implant precision and tissue interface optimization.
Table 1: Key Quantitative Outcomes from Recent Electrophysiology Clinical Trials
| Trial/Study Name | Technology/Intervention | Key Quantitative Outcomes | Clinical Significance |
|---|---|---|---|
| PULSAR IDE Trial [21] | Globe Pulsed Field System (PFA) | Successful paroxysmal AFib treatment | Establishes PFA safety/efficacy for precise ablation |
| I-CLAS Registry [21] | LBBAP vs. Biventricular Pacing | 20.5% vs. 29.5% death/HF hospitalization; 3.5% vs. 6.5% complications | Superior outcomes with conduction system pacing |
| LEADR LBBAP Study [21] | ICD lead at LBBAP position | 100% DFT success (162/162 patients) | Validates LBBAP as viable site for defibrillation leads |
| BRAVE Trial [21] | Catheter Ablation for Brugada Syndrome | 20% vs. 52% VF events (ablation vs. medical); 83% VF-free after single ablation | Demonstrates ablation efficacy for genetic arrhythmia |
| MADURAI LBBP Study [21] | LBBP + cMRI scar characterization | 6.9% vs. 26.1% composite endpoint (scar <10% vs. ≥10%) | Enables cost-effective CRT via pre-procedure imaging |
Advanced imaging integration has become increasingly critical for procedural success. The use of cardiac CT and MRI for pre-procedural planning allows for precise characterization of anatomical targets and substrate modification. Research demonstrates that shorter distances from the lead tip to the left bundle branch correlate with greater improvements in left ventricular ejection fraction (0.25% LVEF increase per 1mm proximity, p<0.01) [21]. Similarly, the InEurHeart trial showed that CT-guided VT ablation significantly reduced procedure duration compared to conventional ablation (107.1 vs. 148.8 minutes, p<0.001) while maintaining comparable one-year freedom from VT [21]. These findings underscore the importance of image-guidance for stereotaxic surgical planning in neurological applications.
Vascular Access and Closure Management Protocol
Pre-procedural Planning and Patient Assessment
- Objective: Identify potential vascular access challenges and optimize procedural setup.
- Materials: Ultrasound system with linear array transducer (7-15 MHz), sterile probe cover, vascular access kit, selection of needles and guidewires, closure devices.
- Procedure:
- Comprehensive Patient Assessment: Review medical history for peripheral vascular disease, prior vascular access difficulties, dialysis dependence, or anatomical variations [22].
- Pre-procedural Imaging Review: Analyze available CT/MRI studies to evaluate vascular anatomy, calcification, tortuosity, and potential obstacles [22].
- Hydration Management: Allow clear fluids until 2 hours pre-procedure for optimized vascular volume, unless contraindicated [22].
- Risk Stratification: Identify high-risk patients (obesity, coagulopathy, prior radiation) for specialized equipment preparation and scheduling [22].
Ultrasound-Guided Vascular Access Technique
- Objective: Achieve safe and efficient vascular cannulation under direct visualization.
- Procedure:
- Patient Positioning: Position for optimal access site exposure (supine for femoral, Trendelenburg for internal jugular) [22].
- Sterile Preparation: Perform standard skin antisepsis and drape sterile field. Apply sterile probe cover to ultrasound transducer.
- Anatomical Survey: Systematically identify target vessel, adjacent structures, and anatomical variations using B-mode and color Doppler.
- Needle Guidance: Use real-time ultrasound guidance with in-plane or out-of-plane technique to advance needle into vessel lumen.
- Confirm Intraluminal Position: Aspirate blood for confirmation, then advance guidewire under continuous visualization.
- Sheath Placement: Dilate tract as needed and insert vascular sheath over guidewire, securing in place [22].
Vascular Closure and Post-procedural Management
- Objective: Achieve secure hemostasis and minimize complications.
- Procedure:
- Closure Device Selection: Choose appropriate closure device (suture-based, clip-based, or collagen plug) based on vessel size, anticoagulation status, and operator expertise [22].
- Device Deployment: Deploy selected closure device according to manufacturer instructions under fluoroscopic or ultrasound guidance.
- Hemostasis Confirmation: Apply manual pressure as needed and confirm complete hemostasis before patient transfer.
- Post-procedural Monitoring: Implement standardized monitoring protocol for access site complications (hematoma, pseudoaneurysm, retroperitoneal bleed) with early ambulation when appropriate [22].
Brain-Computer Interfaces (BCIs): From Invasive to Non-Surgical Approaches
BCI Modalities and Technological Specifications
BCI technology has evolved into a sophisticated toolkit for bridging neural activity with external devices, with applications spanning from basic research to clinical therapeutics. The field encompasses both invasive approaches, which require surgical implantation, and emerging non-surgical alternatives that leverage novel delivery mechanisms. Invasive BCIs typically offer higher spatial resolution and signal fidelity by placing recording elements in direct contact with neural tissue, while non-invasive approaches provide broader accessibility with reduced risk [20] [23].
Recent technological innovations have significantly advanced BCI capabilities. Flexible neural interfaces have improved biocompatibility and long-term stability by reducing the mechanical mismatch between rigid electrodes and soft neural tissue. Closed-loop neurostimulation systems can now dynamically adjust stimulation parameters based on real-time neural activity, enabling more adaptive therapeutic interventions. Furthermore, the integration of artificial intelligence and machine learning has dramatically enhanced the decoding of neural signals, allowing for more complex control of external devices [20]. These advances are supported by a growing market—projected to expand from $278 million in 2025 to $734 million in 2034—reflecting increased investment and commercial validation [24].
Table 2: Comparative Analysis of Brain-Computer Interface Technologies
| Company/Technology | BCI Modality | Key Technical Specifications | Primary Applications | Development Stage |
|---|---|---|---|---|
| Neuralink [23] | Invasive (Minimally) | Ultra-thin threads, high-channel count | Paralysis, device control, communication | Human trials (FDA approved) |
| Paradromics [23] | Invasive (Fully implanted) | Connexus DDI, ~1,600 channels | ALS, stroke-related speech loss | Early human testing |
| Synchron [23] | Endovascular (Stentrode) | Implanted via blood vessels, no open brain surgery | Paralysis, digital device control | Human trials (FDA feasibility) |
| Precision Neuroscience [23] | Minimally Invasive (Surface) | Layer 7 Cortical Interface, rests on brain surface | Stroke, brain trauma, degenerative diseases | Pre-clinical/Development |
| Circulatronics [25] | Non-surgical (Cell-based) | Subcellular SWEDs (10µm), IV delivery, optical energy | Focal neuromodulation in inflamed regions | Pre-clinical (Animal studies) |
| Blackrock Neurotech [23] | Invasive (Arrays) | NeuroPort Array, high-resolution signals | Paralysis, ALS, spinal cord injury | >30 human implants, FDA clearance seeking |
The emerging field of non-surgical brain implants represents a paradigm shift in BCI approach. The Circulatronics technology utilizes subcellular-sized wireless electronic devices (SWEDs) that can be delivered intravenously and traffic to specific brain regions using immune cells as transport vehicles. These devices, as small as 5-10µm in diameter, harvest optical energy with high conversion efficiency, generating open-circuit voltages of 0.17-0.2V and short-circuit currents of 12.8-18.2nA at optical intensities of 10mW/mm² [25]. This approach enables focal neuromodulation with 30µm precision in inflamed brain regions, potentially offering a surgical alternative for conditions including Alzheimer's disease, multiple sclerosis, and neuropathic pain [25].
Protocol: In Vivo Validation of Circulatronics Focal Neuromodulation
SWED Fabrication and Characterization
- Objective: Manufacture and validate performance of subcellular-sized wireless electronic devices.
- Materials: Organic semiconductors (P3HT, PCPDTBT, PCBM), PEDOT:PSS, titanium substrates, TMAH etching solution, SEM imaging equipment, photovoltaic testing setup.
- Procedure:
- Device Fabrication: Create triple-layer structure (anode, active binary blend, cathode) using photolithography and vapor deposition on silicon wafer with sacrificial aluminum layer [25].
- Wafer-Scale Production: Mass produce devices at 4-inch wafer scale, achieving diameters from 200µm down to 5µm with approximately 200nm thickness [25].
- Device Release: Etch sacrificial aluminum layer using TMAH-based process to release free-floating SWEDs, then collect and suspend in biocompatible solution [25].
- Performance Validation: Characterize current-voltage characteristics and power generation capacity across optical intensities (0-50mW/mm²), confirming VOC = 0.2±0.008V and ISC = 12.8±2.15nA for P3HT-based 10µm SWEDs at 10mW/mm² [25].
Cell-Electronics Hybrid Preparation and Administration
- Objective: Create monocyte-SWED hybrids for targeted delivery to inflamed brain regions.
- Materials: Primary monocytes, SWED suspension, covalent coupling reagents, cell culture media, intravenous injection apparatus.
- Procedure:
- Cell Source Preparation: Isolate primary monocytes from donor matching the target animal model [25].
- Hybrid Formation: Covalently attach SWEDs to monocyte surfaces using biocompatible coupling chemistry, maintaining cell viability and trafficking capabilities [25].
- Quality Control: Validate hybrid function through motility assays and confirm SWED operational status post-attachment.
- Systemic Administration: Administer monocyte-SWED hybrids via intravenous injection, allowing natural trafficking to sites of neuroinflammation [25].
In Vivo Neuromodulation and Assessment
- Objective: Demonstrate focal neural stimulation in target brain regions.
- Materials: Animal model of neuroinflammation, NIR optical stimulation system, electrophysiology recording equipment, behavioral assessment tools.
- Procedure:
- Implantation Verification: Confirm SWED implantation in target region using histological analysis and functional imaging [25].
- Optical Stimulation: Apply transcranial NIR illumination (wavelength matched to SWED absorption spectra) at intensities sufficient to generate therapeutic currents (0.545±0.058nW through whole mouse brain with skull) [25].
- Neural Response Recording: Monitor neural activity changes using extracellular recordings, demonstrating focal stimulation with 30µm precision around implanted devices [25].
- Functional Outcomes: Assess behavioral or physiological changes relevant to the target neurological condition [25].
Neurological Disease Modeling with Brain Organoids
Advancements in 3D Brain Organoid Technology
Brain organoids have emerged as powerful tools for modeling human neurological diseases, overcoming significant limitations of traditional two-dimensional cultures and animal models. These three-dimensional self-organizing tissues recapitulate key aspects of human brain development, organization, and functionality, providing a more physiologically relevant platform for studying disease mechanisms and therapeutic interventions [26] [27]. The technology has evolved substantially since the first generation of cerebral organoids in 2008, with current protocols enabling the specification of distinct brain regions including cortex, midbrain, hippocampus, and cerebellum [27].
The development of brain organoids typically begins with pluripotent stem cells (PSCs), including both embryonic stem cells (ESCs) and induced pluripotent stem cells (iPSCs). These cells are directed toward neural lineages using specific patterning factors and cultured in 3D matrices that support self-organization. The resulting structures exhibit remarkable cellular diversity, containing various neuronal subtypes as well as glial cells, with transcriptional profiles that closely resemble fetal brain development [27]. This complexity makes them particularly valuable for studying neurodegenerative diseases like Alzheimer's and Parkinson's, where species differences and limited access to human tissue have historically impeded research progress.
Despite their promise, brain organoids face several technical challenges that impact their reproducibility and translational potential. Variability in organoid generation remains a significant concern, driven by differences in stem cell lines, culture conditions, and differentiation protocols. The lack of vascularization limits nutrient perfusion and organoid size, potentially affecting maturation and long-term viability. Additionally, the simplified neural circuitry and incomplete representation of brain regions in many current protocols mean that organoids do not fully recapitulate the complexity of the human brain [26] [27]. Addressing these limitations through improved standardization, vascularization strategies, and enhanced maturation protocols represents an active area of research with significant implications for drug discovery and personalized medicine.
Protocol: Generating Cerebral Organoids for Disease Modeling and Drug Screening
Stem Cell Preparation and Neural Induction
- Objective: Generate homogeneous populations of neural progenitor cells from pluripotent stem cells.
- Materials: Human iPSCs or ESCs, mTeSR or equivalent stem cell media, neural induction media, Matrigel or synthetic extracellular matrix, low-adhesion plates.
- Procedure:
- Stem Cell Quality Control: Verify pluripotency marker expression (OCT4, NANOG, SOX2) and karyotype stability before initiation [27].
- Embryoid Body Formation: Dissociate stem cells to single cells and plate in low-adhesion plates to promote aggregate formation (3,000-5,000 cells/aggregate) [27].
- Neural Induction: Transfer aggregates to neural induction media containing SMAD pathway inhibitors (dorsomorphin, SB431542) to promote neural specification [27].
- Matrix Embedding: At day 5-7, embed neural aggregates in Matrigel droplets to support 3D architecture and polarized growth [27].
Organoid Maturation and Regional Patterning
- Objective: Guide self-organization and regional specification of brain organoids.
- Materials: Differentiation media, patterning factors (FGF, WNT, SHH, BMP inhibitors), spinning bioreactors or orbital shakers.
- Procedure:
- Maintenance Culture: Transfer embedded organoids to spinning bioreactors or orbital shakers to improve nutrient exchange and oxygen availability [27].
- Regional Patterning: Add region-specific patterning factors during critical developmental windows (days 10-30) to specify cortical, hippocampal, or midbrain identities [27].
- Extended Maturation: Maintain organoids for 2-6 months with regular media changes to support neuronal maturation, synaptogenesis, and gliogenesis [27].
- Quality Assessment: Monitor structural organization through immunohistochemistry for region-specific markers (PAX6, FOXG1, OTX2) and neuronal markers (TUJ1, MAP2) [27].
Disease Modeling and Therapeutic Screening
- Objective: Utilize organoids for disease mechanism investigation and drug candidate evaluation.
- Materials: Disease-specific iPSCs, immunohistochemistry equipment, electrophysiology recording systems, high-content imaging equipment.
- Procedure:
- Disease Modeling: Generate organoids from patient-derived iPSCs carrying disease-relevant mutations or from isogenic CRISPR-edited lines [26] [27].
- Phenotypic Characterization: Assess disease-relevant phenotypes using immunohistochemistry (protein aggregation, neuroinflammation), electrophysiology (network dysfunction), and single-cell RNA sequencing (transcriptional alterations) [26] [27].
- Drug Screening: Treat organoids with candidate compounds and assess rescue of disease phenotypes using standardized outcome measures.
- Personalized Medicine Applications: Generate multiple organoid lines from individual patients to assess inter-individual variability in drug response [26] [27].
The Scientist's Toolkit: Essential Research Reagents and Materials
Table 3: Essential Research Reagents and Materials for Stereotaxic Electrophysiology and BCIs
| Category/Item | Specification/Purpose | Key Applications | Representative Examples |
|---|---|---|---|
| Stem Cells & Differentiation [26] [27] | iPSCs, ESCs, neural induction media | Brain organoid generation, disease modeling | Patient-derived iPSCs, commercial stem cell lines |
| Extracellular Matrices [26] [27] | Matrigel, synthetic hydrogels | 3D organoid support, biomimetic environments | Corning Matrigel, synthetic PEG hydrogels |
| Neural Interface Materials [20] [25] | Organic semiconductors, flexible polymers | SWED fabrication, biocompatible electrodes | P3HT, PCPDTBT organic polymers |
| Stereotaxic Equipment | Precision frames, microdrives, injectors | Targeted electrode implantation, viral vector delivery | Kopf Stereotaxic, NeuroStar Robotic System |
| Electrophysiology Systems | Multi-electrode arrays, amplifiers | Neural signal acquisition, stimulation | Blackrock Neurotech, Intan RHD, Axon MultiClamp |
| Imaging & Visualization [21] | Micro-CT, high-resolution microscopy | Surgical planning, structural validation | Bruker Skyscan, two-photon microscopy |
| Vascular Access [22] | Ultrasound systems, closure devices | Minimally invasive delivery, surgical access | Terason ultrasound, Abbott vascular closure |
| Computational Tools [20] [28] | AI/ML platforms, signal processing | Neural decoding, data analysis | BoltzGen, custom MATLAB/Python pipelines |
The integration of advanced electrophysiological techniques, innovative brain-computer interfaces, and physiologically relevant disease models represents the forefront of neuroscience research. These complementary approaches, unified through the precision of stereotaxic surgical methods, provide an unprecedented capability to investigate neural function and dysfunction across multiple scales—from molecular and cellular processes to circuit-level dynamics and system-wide outcomes. The protocols and applications detailed in this document provide a roadmap for researchers seeking to leverage these technologies in both basic and translational contexts.
Looking forward, several emerging trends promise to further accelerate progress in this field. The continued development of non-surgical implantation techniques like Circulatronics may eventually reduce barriers to clinical translation while enabling novel research applications. Advances in AI-driven protein design, exemplified by platforms like BoltzGen, could yield new molecular tools for targeted neuromodulation and selective neural circuit manipulation [28]. Similarly, improvements in organoid vascularization and standardization will enhance their utility for disease modeling and therapeutic screening [26] [27]. Together, these innovations point toward a future where stereotaxic electrode array research is seamlessly integrated with personalized in vitro models and minimally invasive interfaces, creating new possibilities for understanding and treating neurological disorders.
Implantable electrode arrays represent a cornerstone of modern neuroscience, serving as critical interfaces for deciphering neural circuit function, treating neurological disorders, and developing brain-machine interfaces (BMIs). Within stereotaxic surgery research, selecting the appropriate electrode technology is paramount to experimental success and translational application. This application note provides a detailed technical comparison of four predominant electrode array technologies—Utah, Michigan, Stereo-electroencephalography (SEEG), and emerging 3D microfabricated arrays—to guide researchers and drug development professionals in their experimental design and implementation. We frame this comparison within the practical context of stereotaxic implantation methodologies, highlighting procedure-specific protocols, technical specifications, and application-specific considerations to optimize neural recording and stimulation outcomes across diverse research and preclinical contexts.
Electrode arrays facilitate extracellular recording and stimulation of neural populations with high spatiotemporal resolution. Their fundamental design principles involve a conductive element insulated by a biocompatible material with an exposed tip for electrical interfacing with neural tissue. The evolution from hand-made single-wire electrodes to sophisticated multielectrode arrays has been driven by advancements in microfabrication and materials science [29].
Table 1: Fundamental Characteristics of Major Electrode Array Types
| Array Type | Primary Architecture | Typical Electrode Count | Tissue Interface | Dominant Fabrication Method |
|---|---|---|---|---|
| Utah Array | 3D grid of rigid silicon needles | ~100 (96 standard) | Penetrating cortical columns | Silicon micromachining [30] |
| Michigan Probe | 2D planar shank with multiple sites | 4-128+ per shank | Laminar recording along shank | Thin-film lithography [31] |
| SEEG Electrode | Linear depth electrode with circumferential contacts | 5-18 contacts per lead | Deep brain sampling along trajectory | Medical-grade wire construction [17] |
| 3D Microfabricated | High-density 3D configurations | 1000+ (e.g., Neuropixels) | Large-scale population recording | CMOS/MEMS integration [31] |
Table 2: Quantitative Performance Specifications
| Parameter | Utah Array | Michigan Probe | SEEG Electrode | Neuropixels |
|---|---|---|---|---|
| Spatial Resolution | ~400 μm inter-electrode spacing [30] | ~20-100 μm along shank [31] | 3.5-10 mm along lead [17] | ~20 μm site spacing [31] |
| Typical Impedance | 50-500 kΩ at 1 kHz [29] | 0.5-2 MΩ at 1 kHz [29] | 10-100 kΩ (clinical range) | < 50 kΩ at 1 kHz [31] |
| Chronic Stability | Months to years (varies by model) [30] | Weeks to months (flexible designs) [31] | Acute to weeks (clinical monitoring) [17] | Hours to days (acute experiments) [31] |
| Simultaneous Recording Capability | ~10s of neurons [30] | 10s-100s of neurons [31] | Local field potentials & multi-unit | 100s-1000s of neurons [31] |
The historical progression of these technologies reveals their complementary strengths. Microwire technology, originating in the 1950s, established the foundation for extracellular recording [32]. The 1980s witnessed a transformation with silicon microfabrication techniques enabling the development of Michigan probes (2D planar arrays) and Utah arrays (3D needle arrays) [31] [30]. Recent innovations include high-density CMOS-based arrays like Neuropixels, which represent the cutting edge in 3D microfabricated technology with thousands of recording sites [31]. SEEG electrodes, while based on older stereotactic principles, have seen renewed technological advancement with improved materials and implantation techniques, particularly for deep brain structures [17].
Implantation Protocols for Stereotaxic Surgery
Preoperative Planning and Imaging
Successful implantation begins with precise targeting using multimodal imaging. For human applications and large animal models, structural magnetic resonance imaging (MRI) provides essential neuroanatomical landmarks, while functional MRI (fMRI) can identify target brain regions through movement execution or imagery, or tactile stimulation in sensory areas [30]. In rodent models, standard stereotaxic coordinates referenced to a brain atlas are typically employed. Critical planning steps include:
- Target Identification: For motor cortex applications, identify the hand knob region in humans or corresponding limb areas in animal models. For sensory applications, target the post-central gyrus or thalamic relay nuclei [33] [30].
- Trajectory Planning: Avoid vasculature and critical structures. For SEEG, plan oblique trajectories to sample multiple regions along a single lead [17].
- Frame Registration: For frameless stereotaxy, establish coordinate transformation between image space and physical space using fiducial markers.
Surgical Implantation Techniques
Table 3: Implantation Method Comparison for Different Array Types
| Array Type | Surgical Approach | Stereo-taxic Guidance | Insertion Method | Complication Mitigation |
|---|---|---|---|---|
| Utah Array | Craniotomy (~4×4 mm) | Frameless or frame-based | Pneumatic inserter | Dural sealing, antibiotic irrigation |
| Michigan Probe | Mini-craniotomy (~1-2 mm) | Frame-based preferred | Microdrive mechanical insertion | Dura puncture, surface anchoring |
| SEEG Electrode | Burr hole (2-3 mm) | Frame-based or robotic [17] | Manual or robot-guided to target [17] | Vascular imaging (DSA superior to MRA) [17] |
| 3D Microfabricated | Craniotomy (size varies) | Frame-based essential | Microdrive with precise descent | Brain stabilization, minimal vibration |
Vascular Avoidance Protocol: For penetrating electrodes, particularly SEEG with multiple trajectories, high-quality vascular imaging is critical. Digital Subtraction Angiography (DSA) provides superior vessel visualization compared to MR angiography, with identified electrode-vessel conflicts increasing hemorrhage risk from 0.37% to 7.2% per electrode [17]. Implementation steps:
- Pre-op DSA Acquisition: Perform with stereotactic frame in place for coordinate correlation.
- Trajectory Optimization: Adjust planned trajectories to maintain >1.5 mm clearance from identified vessels.
- Intra-op Verification: Utilize Cone Beam CT Angiography when available for real-time confirmation [17].
Robotic Assistance Protocol: Robotic-guided implantation significantly improves precision for SEEG electrodes, reducing entry point error by a mean difference of -0.57 mm compared to manual implantation [17]. Workflow:
- System Registration: Co-register robot to patient anatomy via fiducials or bone-mounted markers.
- Trajectory Planning: Upload preplanned trajectories to robotic system.
- Guided Insertion: Robot positions guide tube for drill and electrode insertion.
- Quality Control: Confirm placement with postoperative CT coregistered to preoperative plan.
Experimental Applications and Protocols
Acute Neural Recording Setup
For acute recording experiments typically employing Michigan probes or high-density arrays:
Materials Preparation:
- Prepare artificial cerebrospinal fluid (aCSF: 126 mM NaCl, 2.5 mM KCl, 1.25 mM NaH₂PO₄, 2 mM MgSO₄, 2 mM CaCl₂, 10 mM glucose, 26 mM NaHCO₃), continuously oxygenated with 95% O₂/5% CO₂.
- Maintain bath temperature at 32-34°C using feedback-controlled heater.
- Secure headplate to stereotaxic frame for stability.
Signal Acquisition Protocol:
- System Calibration: Verify electrode impedance between 0.5-2 MΩ at 1 kHz.
- Grounding: Ensure proper animal ground through scalp screw or reference wire.
- Amplification: Set gain to 1000x with bandpass filter 0.1-9000 Hz.
- Sampling: Acquire data at ≥30 kHz sampling rate to resolve action potential waveforms.
- Data Quality Assessment: Monitor for 60 Hz noise indicating poor grounding, or high-frequency noise suggesting amplifier saturation.
Chronic Implantation for Longitudinal Studies
For chronic Utah array or Michigan probe implants:
Sealing and Protection Protocol:
- Dural Closure: Place surgicel or gelfoam over exposed dura before array placement.
- Array Fixation: Secure array base to skull with medical-grade acrylic cemented around skull screws.
- Connector Mounting: Affix connector pedestal to skull posterior to array implantation site.
- Wound Closure: Close fascia and skin in separate layers around implant body, ensuring no tension on skin edges.
Post-operative Care and Recording:
- Administer analgesics (buprenorphine, 0.05 mg/kg) and antibiotics (cefazolin, 25 mg/kg) for 5-7 days post-surgery.
- Allow 1-2 weeks recovery before beginning recording sessions.
- For daily recordings, use lightweight cabling and commutator to minimize implant strain.
- Monitor signal quality and impedance weekly to detect encapsulation effects.
The Scientist's Toolkit: Research Reagent Solutions
Table 4: Essential Materials for Electrode Array Research
| Reagent/Material | Function | Application Notes |
|---|---|---|
| Medical-grade Silicone Elastomer | Insulation and encapsulation | Protects connections from tissue fluid; ensures long-term stability [29] |
| Parylene-C | Conformal insulation coating | Thin, pinhole-free insulation with excellent biocompatibility [32] [31] |
| Polyethylene Glycol (PEG) | Dissolvable adhesive for array insertion | Temporary bonding during implantation; dissolves upon contact with tissue [34] |
| Geltrex/Matrigel | Bioactive coating for improved integration | Enhances neuronal attachment; reduces glial scarring [35] |
| Iridium Oxide | High-charge-capacity coating for stimulation | Enables safe stimulation at lower impedance; critical for bidirectional interfaces [29] |
Performance Optimization and Troubleshooting
Signal Quality Optimization
Long-term recording stability remains challenging due to foreign body response. Key strategies include:
Material Selection: Flexible substrates such as polyimide reduce mechanical mismatch with brain tissue (Young's modulus ~1-2 kPa), diminishing chronic inflammation and glial scarring [31]. Ultra-small carbon fiber electrodes (6.8-8.4 μm diameter) demonstrate reduced foreign body response and can penetrate to 1 mm depths without insertion aids [34].
Surface Modification: Coat electrodes with biologically active molecules (laminin, polyethylene glycol) to improve neuronal integration. Conductive polymer coatings (PEDOT:PSS) can significantly reduce electrode impedance, enhancing signal-to-noise ratio for both recording and stimulation applications [29].
Safety and Efficacy Validation
Histological Assessment Protocol:
- Perfusion fixation with 4% paraformaldehyde at study endpoint.
- Section brain tissue at 40 μm thickness through implant site.
- Immunostaining for neurons (NeuN), astrocytes (GFAP), and microglia (Iba1).
- Quantify neuronal density within 100 μm of electrode track and glial scarring thickness.
Functional Validation:
- For stimulation arrays, determine charge density thresholds for behavioral effects and safety limits.
- For recording arrays, verify single-unit isolation quality and stability over time.
- Employ spike sorting algorithms (Kilosort, MountainSort) to track individual neurons across days.
Electrode array technologies continue to evolve, offering increasingly sophisticated tools for interfacing with the nervous system. Utah arrays provide robust cortical surface recording, Michigan probes enable precise laminar analysis, SEEG electrodes access deep brain structures with minimal invasiveness, and 3D microfabricated arrays offer unprecedented channel counts for large-scale neuronal population recording. Selection criteria must consider research questions, model system, and required spatial-temporal resolution. As stereotaxic techniques advance with improved robotic guidance and precision, integration of these technologies will further expand our capability to interrogate neural circuits in health and disease, ultimately accelerating drug development and therapeutic innovation for neurological disorders.
From Atlas to Implant: A Step-by-Step Surgical Protocol for Rodent and Primate Models
Stereotaxic neurosurgery for electrode array implantation is a discipline fundamentally dependent on precision, relying on coordinate systems to navigate the complex three-dimensional space of the human brain. The efficacy of these procedures is critically dependent on the accuracy of device placement [36]. The core principle involves using a standardized, or "stereotaxic," 3D coordinate frame for surgical planning and execution, allowing surgeons to translate locations from pre-operative images to the patient's physical anatomy in the operating room [37] [38]. This process begins with the definition of a coordinate space, typically anchored by internal brain landmarks such as the anterior commissure (AC) and posterior commissure (PC), which define the AC-PC line—a foundational axis for stereotaxic targeting [36] [39]. The mid-commissural point (the midpoint between AC and PC) is often assigned the coordinates (0, 0, 0), establishing the origin for the anatomical coordinate system [39].
Multiple Cartesian coordinate systems in Euclidean space are utilized during a procedure. These include the anatomical space (defined by patient-specific imaging and landmarks), the frame-based space (defined by the physical stereotactic apparatus attached to the patient's head), and the head-stage space (the coordinate system of the surgical arc used to guide the trajectory) [39]. The transformation between these spaces is a critical step, achieved through affine conversions that account for rotation, scaling, and translation using matrix mathematics [39]. The successful integration of these coordinate systems enables a surgeon to plan a trajectory on neuroimaging software and then use the frame's settings to precisely reach the intended target while avoiding critical structures.
Table 1: Key Coordinate Systems in Stereotactic Neurosurgery
| Coordinate Space | Definition | Primary Use |
|---|---|---|
| Anatomical Space | Defined by brain landmarks (AC, PC, midline) on patient MRI/CT | Pre-operative planning and target identification |
| Frame-Based Space | Defined by the N-localizer and physical stereotactic frame | Linking the plan to the physical apparatus on the patient |
| Head-Stage Space | Defined by the surgical arc's angles and depth settings | Intraoperative guidance and trajectory execution |
The Role of Brain Atlases in Target Selection
Brain atlases serve as essential reference tools, providing a detailed map of anatomical boundaries and functional territories that are not always visible on standard clinical MRI. A brain atlas is a digital database that captures the spatio-temporal distribution of a multitude of physiological and anatomical metrics, allowing for a quantitative characterization of normal variability across a population [37]. Atlases can be derived from a single representative brain specimen or can represent population averages, and they incorporate various modalities such as cytoarchitecture, chemoarchitecture, and gene expression patterns to define brain regions [40] [37].
The utility of an atlas depends on the clinical target. For some DBS implantation targets that are clearly visible on structural MRI and demonstrate little anatomical variability, it may be effective to choose targets directly from the patient's images or use a standard brain atlas with simple linear adjustments [36]. However, existing methods are less suited for targets that cannot be clearly identified on MRI and exhibit significant intersubject anatomical variability, such as the amygdala complex or specific somatosensory cortical areas [36] [33]. The amygdala, for instance, consists of multiple histologically defined subnuclei with different functional characteristics, which are indiscernible on standard MRI [36]. In such cases, more advanced nonlinear elastic morphing techniques are required to project subnuclear anatomical information from a histologically defined atlas onto the MRI volumes of individual subjects, accounting for the unique shape and size of each patient's brain [36].
The choice of atlas and the method of its application are therefore critical. Traditional 2D printed atlases have limitations due to the fixed distance between sections and plane of orientation [40]. Modern digital volumetric (3D) atlases, such as the Allen Mouse Brain Common Coordinate Framework for rodent studies or the MNI (Montreal Neurological Institute) template for human studies, allow for data analysis independent of the plane of sectioning and are better suited for automated workflows [40] [37]. Furthermore, the creation of disease-specific atlases (e.g., for Alzheimer's disease or multiple sclerosis) and age-specific atlases (e.g., for pediatric populations) is crucial, as the topological arrangement and anatomical features of the brain can differ substantially from the standard adult template [1] [37].
Structural MRI and Target Selection Protocols
Structural Magnetic Resonance Imaging (MRI) forms the anatomical backbone of pre-operative planning. High-resolution T1-weighted sequences, such as 3D magnetization-prepared rapid-acquisition gradient-echo (MP-RAGE), are typically acquired to provide detailed visualization of brain anatomy [36]. The protocol for target selection involves a multi-stage process of image registration, normalization, and targeting.
A detailed protocol for deep brain targets, such as in anterior capsulotomy, involves selecting a target point relative to visible landmarks on CT or MRI. For example, one reported approach suggests a target 5 mm posterior to the anterior border of the frontal horn at the level of the foramen of Monro [41]. However, the precise angulation of the trajectory is crucial to remain within the desired white matter tract (the internal capsule) and avoid adjacent gray matter structures like the caudate nucleus or putamen [41]. The trajectory must also be planned in the sagittal plane to ensure the entry point through the cortex is in a non-eloquent prefrontal area [41].
The following workflow outlines a generalized protocol for structural MRI-based planning:
- Image Acquisition: Obtain a high-resolution, volumetric T1-weighted MRI (e.g., MP-RAGE) with cubic voxel dimensions (e.g., 1.0 mm isotropic) to minimize interpolation errors in subsequent analyses [36].
- Spatial Normalization to Stereotaxic Space: Align the patient's native MRI to a standard stereotaxic space (e.g., Talairach or MNI space). This involves:
- Coregistration: Using a rigid mutual information maximization algorithm to align pre- and post-implantation images [36].
- AC-PC Alignment: Identifying the midpoints of the anterior and posterior commissures and rotating the brain volume so the AC-PC line is horizontal [36].
- Spatial Transformation: Applying a piecewise linear scaling transformation (Talairach transformation) based on a bounding box defined by the AC, PC, and the anterior, posterior, right, left, superior, and inferior borders of the cerebrum to correct for overall brain size differences [36].
- Atlas Co-registration and Morphing: Transfer cytoarchitectural boundary information from a histological atlas to the patient's normalized MRI. For targets with high intersubject variability, employ an elastic brain-morphing method rather than a simple linear Affine transformation. This nonlinear warping provides superior performance in fitting atlas templates to an individual's brain anatomy [36].
- Trajectory Planning: Using the normalized and atlas-informed images, plan the entry point and trajectory to the target. The trajectory should avoid blood vessels (as seen on susceptibility-weighted imaging or MR angiography), sulci, and eloquent cortical and subcortical areas to minimize the risk of hemorrhage or neurological deficit [41].
Table 2: Quantitative Brain Measurements for Spatial Normalization (from a sample of 5 subjects) [36]
| Measurement | Mean ± Standard Deviation (mm) |
|---|---|
| AC-PC Distance | 26.6 ± 0.94 |
| Brain Width | 130.6 ± 5.85 |
| Brain Length | 170.3 ± 13.09 |
| Brain Height | 111.4 ± 2.31 |
Functional MRI Guidance for Somatosensory Targets
For electrode array implantation in sensory areas, such as the hand region of the somatosensory cortex for bidirectional brain-computer interfaces (BCIs), functional MRI (fMRI) provides critical guidance that pure anatomical imaging cannot. The somatosensory cortex is organized somatotopically, meaning discrete regions receive sensory inputs from specific parts of the body [33]. The intuitive nature of sensory feedback in a BCI is essential for embodiment and functionality, making accurate targeting paramount [33].
The roadmap for successful implantation involves using fMRI to generate a functional map of the hand area, which is then used to guide the placement of intracortical microelectrode arrays [33]. This approach was successfully used to evoke tactile sensations localized to the digits in participants with spinal cord injury [33]. The specific protocol involves:
- Presurgical Functional Localization: Perform fMRI while delivering tactile stimulation to the individual digits of the hand. In cases of spinal cord injury where peripheral sensation is absent, attempted passive movement or motor imagery of the hand can be used to activate the sensorimotor cortex [33].
- Image Pre-processing and Quality Control (QC): Implement a rigorous QC protocol for the fMRI data to ensure valid results. This includes:
- Initial Check: Assessing imaging parameters (TR, voxel size, volumes) across participants and checking for artifacts and brain coverage [42].
- Segmentation: Using tools like Statistical Parametric Mapping (SPM) to segment the anatomical image into gray matter, white matter, and CSF [42].
- Realignment: Correcting for head motion during the fMRI scan and calculating framewise displacement (FD) to exclude participants with excessive motion [42].
- Coregistration and Normalization: Aligning the functional images to the high-resolution anatomical scan and then normalizing both to a standard stereotaxic space [42].
- Multi-Disciplinary Planning: The presurgical fMRI data analysis and planning of array locations should be performed by a broad team with expertise in neurosurgery, neuroscience, engineering, and the relevant patient population (e.g., spinal cord injury medicine) [33]. This collaborative approach ensures that the functional maps are accurately interpreted and translated into a viable surgical plan.
Integrated Application Notes and Protocols
Protocol 1: Atlas-Based Amygdala Electrode Localization
This protocol details a method for localizing electrodes within the amygdala complex, where subnuclei are not visible on standard MRI [36].
- Application: For research protocols involving deep brain stimulation or recording within the amygdala for epilepsy or mood disorders.
- Materials: Pre- and post-implantation T1-weighted MP-RAGE MRI volumes; histological atlas of amygdala subnuclei (e.g., Mai et al.); custom or commercial software with nonlinear registration capabilities (e.g., implemented in MATLAB).
- Procedure:
- Spatial Normalization: Coregister pre- and post-implantation MRI volumes and align them to the AC-PC coordinate system as described in Section 3.
- Electrode Contact Identification: Manually select the center of each electrode artifact on the post-implantation MRI volume and assign it a coordinate in the atlas space.
- Atlas Mapping: For a given electrode contact's y-coordinate (anteroposterior), select the corresponding coronal plate from the histological atlas.
- Elastic Morphing: Apply a nonlinear elastic morphing algorithm to warp the selected 2D atlas plate to precisely match the patient's brain anatomy on the corresponding pre-implantation MRI coronal slice. This step accounts for individual variability in medial temporal lobe anatomy.
- Subnuclear Assignment: Transfer the subnuclear boundary information from the morphed atlas onto the patient's MRI to identify the specific amygdala subnucleus in which the electrode contact is located.
Protocol 2: Somatosensory Cortex Array Implantation for BCI
This protocol outlines the pre-operative planning for implanting microelectrode arrays in the hand area of the somatosensory cortex to provide intuitive sensory feedback [33].
- Application: For clinical trials of bidirectional BCIs that restore sensation to individuals with paralysis or amputation.
- Materials: High-resolution T1-weighted anatomical MRI; task-based fMRI data (tactile stimulation or motor imagery); magnetoencephalography (MEG) data (optional); stereotactic planning software with fMRI integration.
- Procedure:
- fMRI Acquisition: Acquire fMRI data during tactile stimulation of individual digits (if sensation is present) or during attempted movement/motor imagery (if sensation is absent).
- Data Pre-processing: Conduct the full fMRI QC and pre-processing pipeline, including realignment, coregistration, normalization, and statistical analysis to generate activation maps for each digit.
- Somatotopic Mapping: Create a composite map of the hand somatotopy on the normalized brain, identifying the regions corresponding to digits D1 (thumb) through D5 (little finger). The organization typically runs from lateral (thumb) to medial (little finger) along the post-central gyrus.
- Target Finalization: The multi-disciplinary team reviews the functional activation maps overlaid on the normalized 3D anatomical scan. The final target for the microelectrode array is selected to cover the desired digit representations, typically within Brodmann's area 1 on the crown of the post-central gyrus.
- Surgical Workflow: In the operating room, the normalized plan with the functional targets is mapped back into the patient's native anatomical space and then to the frame-based coordinate system for surgical navigation.
Diagram Title: fMRI-Guided Somatosensory Targeting Workflow
The Scientist's Toolkit: Research Reagent Solutions
Table 3: Essential Materials for Stereotaxic Electrode Implantation Research
| Research Reagent / Tool | Function / Explanation |
|---|---|
| High-Resolution Histological Atlas (e.g., Mai et al.) | Provides cytoarchitectonic boundaries of subcortical nuclei (e.g., amygdala subnuclei) not visible on MRI for precise atlas-based targeting [36]. |
| Digital Volumetric Brain Atlas (e.g., MNI/ICBM152, Allen Mouse Brain CCF) | Serves as a standardized, population-based 3D reference template for spatial normalization and data integration across subjects and studies [40] [37]. |
| Nonlinear Registration Software (e.g., SPM, FSL, Elastix, Custom MATLAB) | Performs elastic morphing and diffeomorphic registration to warp atlas data to individual patient anatomy, accounting for nonlinear brain shape variations [36] [40]. |
| Stereotactic Planning Software (e.g., Analyze, SurgiPlan) | Enables visualization of MRI/fMRI data, trajectory planning, and calculation of frame-based coordinates and angles, integrating all pre-operative data [36] [39]. |
| Functional MRI (fMRI) & MEG Protocols | Used to map eloquent cortical areas (e.g., somatosensory hand area) non-invasively, guiding implantation to maximize functional outcomes in BCIs [33]. |
| Quality Control (QC) Pipelines (e.g., SPM-based QC) | Ensures the fidelity of pre-processing steps for structural and functional MRI, identifying artifacts and ensuring proper coregistration and normalization [42]. |
Within the context of stereotaxic surgery for electrode array implantation research, the dual principles of effective anesthesia and rigorous asepsis form the cornerstone of both scientific rigor and animal welfare. These procedures are intrinsically linked to the success of chronic electrophysiological studies, where the goal is to achieve high-quality neural recordings over extended periods with minimal impact on animal behavior or well-being. Poor anesthetic management can lead to physiological stress, hypothermia, and increased mortality, confounding experimental results and reducing the number of viable subjects [15]. Similarly, breaches in aseptic technique can introduce infection, provoking a tissue immune response that compromises neuronal health and recording stability around the implant [43]. This protocol details integrated methods for anesthesia and asepsis, framed within the broader thesis that refinements in these areas are essential for reducing experimental error, animal morbidity, and the final number of animals required, thereby upholding the 3R principles (Replacement, Reduction, and Refinement) as mandated by modern ethical frameworks [44].
Comprehensive Anesthesia Protocol for Rodent Survival Surgery
Anesthetic Agent Selection and Administration
The choice of anesthetic regimen is critical for maintaining physiological stability and ensuring survival during prolonged stereotaxic procedures. The following table summarizes the commonly used options, with isoflurane inhalation being the preferred method for its controllability.
Table 1: Comparison of Anesthetic Regimens for Rodent Stereotaxic Surgery
| Anesthetic Agent | Route | Induction Dose | Maintenance Dose | Advantages | Disadvantages & Risks |
|---|---|---|---|---|---|
| Isoflurane (Inhalation) | Inhalation | 2.5% - 3.5% in O₂ | 1.5% - 3% in O₂ [45] | Rapid induction & recovery [45]; Precise control over depth; Low mortality rates [45]. | Requires specialized equipment (vaporizer, scavenging) [45]. |
| Ketamine/Xylazine (Injectable) | Intraperitoneal (IP) | Ketamine (50-80 mg/kg) + Xylazine (10 mg/kg) [45] | Supplemental doses as needed | No specialized equipment needed [45]. | Long recovery times (~142 min) [45]; Higher mortality risk from respiratory depression [45]. |
| Pentobarbital (Injectable) | Intraperitoneal (IP) | 50 mg/kg [44] | Supplemental doses as needed | -- | Narrow safety margin; Less control during maintenance. |
Pre-surgical Analgesia: Administer a pre-emptive analgesic such as Buprenorphine (0.05-0.1 mg/kg, SC) at least 30 minutes prior to the initial incision to manage peri-operative and post-operative pain [46] [44].
Intraoperative Monitoring and Supportive Care
Maintaining physiological homeostasis under anesthesia is non-negotiable for survival and data quality.
- Depth of Anesthesia: Continuously monitor the suspension of pedal and corneal reflexes to ensure the animal remains at a surgical plane of anesthesia [45].
- Body Temperature Maintenance: Actively maintain body temperature at approximately 37-38°C using a thermostatically controlled heating pad with a rectal probe. Preventing hypothermia is critical; one study showed a 0% survival rate without warming versus 75% survival with an active warming system [15].
- Respiratory Rate: Monitor respiratory rate visually or with a monitoring system. Adjust isoflurane levels accordingly, as high concentrations can suppress respiration.
- Ophthalmic Care: Apply a lubricating ophthalmic ointment to both eyes to prevent corneal desiccation during anesthesia [46] [44].
Aseptic Technique for Chronic Implant Surgery
Pre-surgical Preparation
Asepsis begins with the preparation of the surgical environment, the surgeon, and the animal.
- Surgical Environment: Designate separate "dirty" (animal preparation) and "clean" (sterile surgery) zones. All surgical instruments must be sterilized, preferably via autoclaving (e.g., 30 minutes at 170°C) [44]. The stereotaxic frame and drill handpiece should be thoroughly disinfected before the procedure.
- Surgeon Preparation: The surgeon should perform a surgical hand scrub and don a sterile gown, mask, and sterile gloves [44].
- Animal Preparation: After inducing anesthesia and shaving the scalp, the surgical site must be rigorously disinfected. A sequence of iodine-based scrub (e.g., Betadine) followed by an iodine solution (or a chlorhexidine alternative) is effective. The solution should be applied in a circular motion from the center of the incision site outward and allowed to dry [46] [44].
Surgical Field and Implant Handling
Maintaining a sterile field throughout the procedure is paramount for preventing post-surgical infection, which can severely compromise the chronic stability of an electrode implant.
- Sterile Draping: After prepping the animal, place a sterile drape with a hole over the surgical site to isolate it.
- Implant and Instrument Handling: Sterilize all components that will contact the brain or cranial opening. For complex, modular implants, components can be sterilized using low-temperature methods (e.g., hydrogen peroxide plasma) if compatible with materials. Use sterile techniques when handling probes, skull screws, and dental cement [13] [44].
- Antibiotic Prophylaxis: The administration of a peri-operative broad-spectrum antibiotic (e.g., Ceftriaxone, 25-50 mg/kg, IM) is recommended to further reduce the risk of infection [45].
Integrated Workflow for Sterile Implantation
The following diagram illustrates the seamless integration of anesthesia and asepsis protocols into a complete surgical workflow for electrode array implantation.
Post-operative Care and Monitoring
The responsibility for animal welfare extends beyond the conclusion of the surgery.
- Analgesia: Provide sustained post-operative analgesia. A common regimen includes Buprenorphine (0.05-0.1 mg/kg, IP/SC) and/or an NSAID like Meloxicam (5 mg/kg, SC) administered for a minimum of 2-3 days post-surgery [46] [45].
- Monitoring: Monitor animals daily for signs of pain, distress, or infection (e.g., reduced activity, weight loss, porphyrin staining, wound dehiscence) until they have fully recovered, including the return to pre-surgical weight and normal behavior.
- Implant Protection: For chronic implants, ensure the "helmet" of dental cement is smooth and the scalp is sutured appropriately around it without being overly tight, to prevent skin irritation and implant failure [46].
The Scientist's Toolkit: Essential Reagents and Materials
Table 2: Key Research Reagent Solutions for Stereotaxic Surgery
| Item | Function/Application | Specific Examples & Notes |
|---|---|---|
| Inhalation Anesthetic System | Delivery and maintenance of general anesthesia. | Isoflurane vaporizer, induction chamber, nose cone, oxygen source, and scavenging system [15] [45]. |
| Pre-emptive Analgesic | Management of pre-, peri-, and post-operative pain. | Buprenorphine (0.1 mg/kg SC) [46]. |
| Skin Disinfectant | Aseptic preparation of the surgical site. | Povidone-Iodine scrub and solution (e.g., Betadine) or Chlorhexidine-based solutions (e.g., Hibitane) [44]. |
| Sterile Dental Cement | Securing the cranial implant and skull screws to the skull. | C&B Metabond or equivalent acrylic cement [46]. |
| Peri-operative Antibiotic | Prophylaxis against surgical site infection. | Ceftriaxone (25-50 mg/kg, IM) [45]. |
| Active Warming System | Maintenance of body temperature and prevention of hypothermia. | Thermostatically controlled heating pad with rectal probe [44] [15]. |
The protocols detailed herein for anesthesia and asepsis are not merely supportive tasks but are active and critical components of the experimental design in stereotaxic electrode implantation research. By ensuring animal welfare through meticulous attention to anesthetic depth, physiological support, pain management, and sterile technique, researchers directly enhance the quality and validity of their scientific data. This approach minimizes the confounding variables of pain, stress, infection, and inflammation, leading to more stable chronic recordings, a reduction in animal attrition, and full compliance with the ethical imperative of the 3Rs.
Stereotaxic surgery for electrode array implantation is a cornerstone technique in modern neuroscience research, enabling precise investigation of neural circuits and brain function in awake, behaving animals. This protocol details the critical initial stages of this procedure—skull exposure, Bregma-Lambda alignment, craniotomy, and dura resection—framed within the context of a broader thesis on chronic electrode implantation. The reliability of electrophysiological data and the success of long-term chronic recordings depend fundamentally on the accuracy and tissue preservation during these initial steps. This guide provides a standardized, detailed methodology to enhance surgical reproducibility, reduce animal mortality, and improve postoperative outcomes for researchers and scientists in preclinical drug development [15].
Surgical Workflow and Procedural Relationships
The diagram below outlines the key decision points and procedural flow for the initial stages of stereotaxic surgery.
Key Experimental Factors and Quantitative Outcomes
The following tables summarize critical factors that influence surgical success, based on empirical research.
Table 1: Risk Factors Affecting Stereotactic Implantation Accuracy
| Factor | Impact on Accuracy | Statistical Significance (P-value) |
|---|---|---|
| Skull Thickness | Correlated with entry point (EE) and target point (TE) error | EE: P = .003; TE: P = .012 [47] |
| Surgical Entry Angle | Significant predictor of EE, TE, and angular error | EE: P < .001; TE: P < .001; Angular: P = .030 [47] |
| Brain Region | Significant variation in accuracy across implantation sites | P ≤ .05 [47] |
| Lead Length | Correlated with target point (TE) error | TE: P = .020 [47] |
Table 2: Impact of Modified Surgical Techniques on Survival and Efficiency
| Modified Technique | Key Outcome | Quantitative Result |
|---|---|---|
| Active Warming Pad [15] | Improved intraoperative survival | 75% survival with warming vs. 0% without [15] |
| 3D-Printed Header [15] | Reduced total operation time | 21.7% decrease in surgery time [15] |
| 3D-Sharpened Silicon Shuttle [48] | Enabled dura penetration | Minimal tissue compression, chronic recordings ≥95 days [48] |
Detailed Experimental Protocols
Protocol: Animal Preparation and Skull Exposure
This initial phase ensures a stable, sterile surgical field.
- Anesthesia and Positioning: Induce and maintain anesthesia (e.g., isoflurane). Secure the animal in the stereotaxic frame using ear bars. Apply ophthalmic ointment to prevent corneal drying.
- Active Warming: Place the animal on a thermostatically controlled warming pad set to maintain body temperature at approximately 40°C to prevent anesthesia-induced hypothermia, a critical factor for survival [15].
- Aseptic Preparation: Shave the scalp and perform a sequential scrub with alternating povidone-iodine and alcohol swabs. Administer a local analgesic (e.g., lidocaine) subcutaneously at the incision site.
- Incision and Skull Exposure: Make a midline sagittal incision through the skin and underlying connective tissue to expose the skull. Gently retract the skin flaps and clear the skull surface of periosteum using a curette or blunt dissection. Ensure the surface is clean and dry for landmark identification.
Protocol: Bregma-Lambda Alignment and Coordinate Zeroing
This is the most critical step for accurate spatial targeting.
- Landmark Identification: Under a surgical microscope, identify the Bregma (the cranial suture junction between the coronal and sagittal sutures) and the Lambda (the junction of the sagittal and lambdoid sutures).
- Mount Measurement Tool: Attach a sterile needle (e.g., 24G) or a specialized 3D-printed measurement header to the stereotaxic micromanipulator [15].
- Align the Skull Plane: a. Lower the needle tip onto Bregma. Record the Dorsal-Ventral (DV) coordinate. b. Move the manipulator to position the needle tip precisely on Lambda. c. Adjust the animal's head position within the frame until the DV coordinate at Lambda matches the coordinate recorded at Bregma. This ensures the skull is leveled in the anteroposterior plane. d. Re-check Bregma to confirm consistency. Repeat adjustments until the DV readings are equal.
- Set Stereotaxic Zero: With the skull level, place the needle tip precisely on Bregma. Set this point as the zero coordinate (AP 0, ML 0, DV 0) for all subsequent calculations [6].
Protocol: Craniotomy and Dura Resection
This protocol provides two pathways: standard resection and an advanced transdural approach.
- Define Craniotomy Site: Calculate the Anterior-Posterior (AP) and Medial-Lateral (ML) coordinates for the target brain region. Use the zeroed Bregma coordinates as the reference. Define a craniotomy perimeter that is approximately 200 µm larger in both AP and ML dimensions than the target site for the electrode array [6].
- Perform Craniotomy: Using a high-speed surgical drill or a manual trephine, carefully thin the bone within the marked perimeter. Irrigate frequently with sterile saline to prevent thermal damage to the underlying cortex. Use fine forceps to lift away the bone flap, revealing the intact dura.
- Assess Dura and Choose Pathway:
- Standard Protocol (Dura Resection): Using a fine dura hook or a 25-30G needle, gently puncture the dura. Use micro-scissors to carefully resect a small portion of the dura, creating a clear opening for the electrode. Minimize contact with the underlying pia mater and vasculature [48].
- Advanced Protocol (Transdural Implantation): If using a 3D-sharpened silicon shuttle designed for dura penetration, the resection step can be omitted. The sharpened tip significantly reduces insertion force and allows for direct penetration of the intact dura, minimizing brain swelling and surgical time [48].
The Scientist's Toolkit: Essential Research Reagents and Materials
Table 3: Essential Materials for Stereotaxic Surgery and Implantation
| Item | Function/Benefit |
|---|---|
| Stereotaxic Frame with Micromanipulator | Provides rigid head fixation and precise 3D movement for coordinate targeting. |
| Active Warming Pad [15] | Prevents anesthesia-induced hypothermia, drastically improving intraoperative survival rates. |
| 3D-Printed Surgical Header [15] | Combines measurement and implantation functions, reducing surgery time by over 20%. |
| 3D-Sharpened Silicon Shuttle [48] | Enables implantation through intact dura, avoiding a durotomy and reducing tissue damage. |
| Modular & Adjustable Chronic Implant [13] | Allows vertical adjustment of probes with micron precision post-implantation for optimizing signal quality. |
| Fine Surgical Drills & Microscissors | Essential for performing a clean craniotomy and precise dura resection with minimal trauma. |
Stereotaxic surgery for electrode array implantation is a cornerstone technique in modern neuroscience research, enabling precise access to specific brain regions for neural recording, stimulation, and therapeutic delivery. However, the successful translation of findings across the phylogenetic scale requires a nuanced understanding of the profound anatomical, physiological, and technical differences between rodent and primate models. Failure to recognize these distinctions can compromise experimental outcomes, data validity, and animal welfare. This application note delineates the critical species-specific techniques required for successful stereotaxic surgery in rodents and non-human primates, providing a structured framework for researchers navigating the complexities of cross-species neuroscientific investigation. The content is framed within the context of electrode array implantation research, addressing the unique requirements of researchers, scientists, and drug development professionals working to advance neuromodulation therapies and our understanding of brain function.
Comparative Analysis: Fundamental Divergences in Surgical Approach
The selection of an appropriate animal model is dictated by the research question, but the surgical approach must be meticulously tailored to the specific species. Table 1 summarizes the core technical differences between rodent and primate stereotaxic surgery, highlighting how fundamental techniques must be adapted for each model.
Table 1: Core Technical Differences in Rodent vs. Primate Stereotaxic Surgery
| Parameter | Rodent (Mouse/Rat) Models | Non-Human Primate Models |
|---|---|---|
| Primary Anatomical Landmarks | Bregma and Lambda skull sutures [15] [49] | Pre-operative MRI with fiducial markers (e.g., tooth markings) [50] [51] [52] |
| Head Stabilization | Rigid fixation via ear bars and incisor bar [53] [49] | Complex head frame with ear bars, eye bars, and palate bar [52] |
| Coordinate Verification | Skull surface flattening (Bregma-Lambda alignment) [53] | Co-registration with pre-operative MRI; fiducial coordinate matching [50] [52] |
| Impact of Anesthesia | Pronounced hypothermia; requires active warming [15] | Prolonged suppression periods in burst-suppression EEG patterns [54] |
| Key Welfare Challenge | Hypothermia and prolonged recovery [15] [55] | Accurate targeting to minimize subject number and tissue damage; post-surgical infection [55] [52] |
| Typical Surgery Duration | Shorter (minutes to a few hours) [15] | Extended (several hours), often multi-stage [52] |
Anatomical and Physiological Underpinnings of Technical Divergence
The technical contrasts in Table 1 are not arbitrary but are rooted in deep-seated anatomical and physiological differences. Rodents have relatively small, lissencephalic (smooth) brains, which allow for the use of standardized atlases based on external skull landmarks like Bregma and Lambda. The primary challenge is often physiological maintenance, as their high surface-area-to-volume ratio makes them highly susceptible to anesthesia-induced hypothermia, a major factor in intraoperative mortality [15]. In contrast, non-human primates possess large, gyrencephalic (folded) brains with significant individual variability. This makes standardized atlases unreliable and necessitates patient-specific preoperative planning using MRI [50] [52]. Furthermore, neural responses to physiological states like locomotion differ significantly between species; for instance, running strongly modulates activity in the mouse primary visual cortex but has only a minimal, often suppressive, effect in the marmoset [56]. These fundamental differences dictate that techniques successful in one model cannot be directly transferred to another without careful consideration and adaptation.
Species-Specific Protocols and Experimental Methodologies
Refined Stereotaxic Protocol for Rodent Electrode Array Implantation
The following protocol refines standard procedures for rodent surgery, incorporating key modifications to enhance survival and precision for electrode implantation, based on established methods [53] and recent refinements [15] [55].
Preoperative Preparation:
- Anesthesia and Analgesia: Induce anesthesia using a ketamine/xylazine cocktail (e.g., 40/10 mg/kg IP) or 4-5% isoflurane. Maintain with 1-2% isoflurane. Administer preoperative analgesics (e.g., Buprenorphine, 0.05-0.1 mg/kg SC) [53].
- Active Warming: Place the animal on a stereotaxic frame equipped with a feedback-controlled heating pad. Maintain body temperature at 37-38°C throughout the procedure to prevent anesthesia-induced hypothermia, a critical factor for survival [15].
- Head Stabilization and Asepsis: Secure the head in the stereotaxic frame using ear bars and an incisor bar. Apply ophthalmic ointment. Shave the scalp and disinfect the surgical site with alternating betadine and 70% ethanol scrubs (3x each) [53].
Surgical Procedure and Electrode Implantation:
- Incision and Skull Exposure: Make a midline sagittal incision of the scalp (~1.5-2 cm). Retract the skin and soft tissue using surgical clips or a retractor. Gently scrape the skull surface clean of periosteum [53].
- Skull Leveling (Critical Step): Using a stereotaxic drill bit or probe, identify the coordinates of Bregma and Lambda. Adjust the animal's head position until the dorsal-ventral (DV) coordinate at Lambda is within ±0.05 mm of the DV coordinate at Bregma. Repeat this leveling process 2 mm lateral to Bregma on both sides to ensure the skull is flat in both the anteroposterior (AP) and mediolateral (ML) planes [53] [49].
- Coordinate Calculation and Craniotomy: Navigate the drill to the target coordinates relative to Bregma. For a standard electrode array, drill a single burr hole. For larger devices (e.g., DBS electrodes), create a "cloverleaf" craniotomy by drilling overlapping holes. Carefully puncture the dura mater with a bent 32G needle to expose the brain surface [53].
- Electrode Implantation and Fixation: Lower the electrode array slowly to the target DV coordinate.
- Adhesive and Cement: For secure long-term fixation, first apply a thin layer of cyanoacrylate tissue adhesive around the implant and exposed skull. Then, create a robust head-cap using a combination of dental cement (e.g., Metabond) and UV light-curing resin. This hybrid approach decreases surgery time, improves healing, and minimizes implant detachment compared to either material alone [55].
- Closure and Recovery: Suture the muscle and skin layers separately. Administer a postoperative analgesic (e.g., Meloxicam) and place the animal in a warm, clean cage for recovery, monitoring until fully ambulatory [53].
Advanced Stereotaxic Protocol for Non-Human Primate Electrode Implantation
This protocol for primates emphasizes accuracy for targeting deep brain structures like the caudate and putamen for preclinical research, leveraging MRI guidance [52] and fiducial marking [50] [51].
Preoperative Planning and Fiducial Creation:
- Pre-operative MRI: Sedate the primate and secure its head in an MRI-compatible stereotaxic frame. Administer a contrast agent if needed. Acquire high-resolution T1 and T2-weighted images. During the scan, a fiducial marker (e.g., a Vitamin E capsule) is placed at a known stereotaxic position [52].
- Non-Surgical Fiducial Marking: While the head is secured in the frame for the MRI, drill a small divot (1.0 mm diameter) into the enamel of the upper incisors. Mark this divot with a permanent marker. Use a stereotaxic localizer to record the precise 3D coordinates of these bilateral tooth markings. These serve as reproducible reference points for future surgeries [50] [51].
Surgical Procedure for Electrode Placement:
- Animal Repositioning and Verification: On the day of surgery, anesthetize the primate and position it in the stereotaxic frame. Identify the tooth divots and re-measure their coordinates. If the coordinates do not match those from the MRI session, reposition the animal in the frame until they align precisely. This ensures the brain is positioned exactly as it was during preoperative imaging [50].
- Surgical Exposure: After standard aseptic preparation, perform a midline or C-shaped skin incision to reflect a scalp flap. Perform a craniotomy over the target area based on the MRI-defined coordinates.
- Dural Incision and Electrode Trajectory: Carefully incise the dura to expose the cortical surface.
- Electrode Implantation: Using a sterile micromanipulator, slowly lower the electrode array along the planned trajectory to the target depth within the caudate or putamen. The infusion can be performed via a hydraulic system connected to a Hamilton syringe [52].
- Closure and Postoperative Care: After the electrode is secured and the implant is created, close the dura, replace the bone flap, and suture the tissues in layers. Provide aggressive postoperative analgesia and monitoring for infection.
The experimental workflow for both rodent and primate stereotaxic surgery is summarized in Figure 1 below.
Figure 1. Comparative Workflow for Rodent and Primate Stereotaxic Surgery. The diagram outlines the critical, species-specific pathways for successful electrode implantation. The rodent protocol (blue) relies on skull landmarks, while the primate protocol (red) is dependent on pre-operative MRI and fiducial verification.
Quantitative Data and Outcomes
Empirical data demonstrates the efficacy of refined techniques in improving surgical outcomes and data quality in both species. Table 2 quantifies the impact of specific refinements on survival and accuracy.
Table 2: Quantitative Impact of Technique Refinement in Stereotaxic Surgery
| Refinement Technique | Species | Key Performance Metric | Reported Outcome | Source |
|---|---|---|---|---|
| Active Warming Pad | Rodent | Intraoperative Survival Rate | Increased from 0% to 75% | [15] |
| 3D-Printed Header for CCI/Electrode | Rodent | Total Operation Time | Reduction of 21.7% | [15] |
| Hybrid Adhesive (Cyanoacrylate + UV Resin) | Rodent (Mouse) | Cannula Detachment / Adverse Effects | "Near 100% success rate" | [55] |
| Tooth-Marking Fiducial with MRI | Non-Human Primate | Stereotaxic Targeting Accuracy | 91% (50/55 cases) precise to target | [50] |
| Tooth-Marking Fiducial with MRI | Non-Human Primate | Subjects Requiring Repositioning | 31% (17/55 subjects) | [50] |
The Scientist's Toolkit: Essential Research Reagents and Materials
Successful execution of species-specific stereotaxic surgery requires a carefully curated set of tools and materials. Table 3 lists essential items and their functions for the core procedures described in this note.
Table 3: Essential Research Reagent Solutions for Stereotaxic Surgery
| Item Category | Specific Examples | Function / Application |
|---|---|---|
| Anesthetics & Analgesics | Ketamine/Xylazine, Isoflurane, Buprenorphine, Lidocaine | Induction and maintenance of anesthesia; pre-, intra-, and post-operative pain management. [53] [52] |
| Stereotaxic Frames & Navigation | Rodent frame with ear/incisor bars, Primate head frame (MRI-compatible), Micromanipulator | Precise head stabilization and targeted navigation to brain coordinates. [53] [52] |
| Implants & Delivery Systems | Electrode arrays, Hamilton syringes, Osmotic pumps, Neurostimulators | Direct delivery of therapeutic agents (viruses, drugs) or electrical stimulation/recording. [57] [53] [52] |
| Adhesives & Cements | Cyanoacrylate tissue adhesive, Dental acrylic (Metabond), UV light-curing resin | Secure and long-term fixation of implants (electrodes, cannulas) to the skull. [55] [53] |
| Pre-operative Imaging & Fiducials | MRI/CT scanner, Vitamin E capsules | Creation of patient-specific surgical plans and reliable reference points for primates. [50] [52] |
| Physiological Support | Active warming pad, Forced air warmer (Bair Hugger), Pulse oximeter | Maintenance of body temperature and vital signs during prolonged anesthesia. [15] [52] |
The path to successful and translatable neuromodulation research is paved with a rigorous, species-appropriate methodological approach. As detailed in this application note, stereotaxic techniques must be tailored to the unique anatomical, physiological, and practical realities of the chosen animal model. The reliance on skull landmarks and the critical need for thermoregulation define the rodent approach, whereas the imperative for individualized MRI-guided planning and fiducial-based verification is paramount in primates. By adopting these critical species-specific techniques—from active warming and hybrid adhesives in rodents to tooth-marking fiducials and MRI co-registration in primates—researchers can significantly enhance animal welfare, improve surgical precision, increase experimental reproducibility, and ultimately generate more reliable and meaningful data for the advancement of neuroscience and therapeutic drug development.
Within the broader context of stereotaxic surgery for electrode array implantation research, a central challenge lies in balancing the initial mechanical trauma of device insertion with the long-term biological response that determines chronic recording stability. The implantation of neural interfaces inevitably triggers both acute and chronic inflammatory responses; acute inflammatory reactions occur due to geometric and mechanical mismatches during implantation, while chronic inflammation is driven by persistent mechanical mismatch and micromotions between the implant and brain tissue, leading to glial scar formation and eventual electrode failure [58]. This application note details targeted strategies and precise protocols designed to minimize initial tissue trauma and promote chronic stability for long-term electrophysiological studies in animal models, particularly non-human primates.
The Stability Challenge: Acute and Chronic Inflammation
The long-term stability of implanted electrode arrays is fundamentally challenged by the body's immune response. The process can be broken down into two key phases:
- Acute Inflammatory Response: This initial response is triggered by the mechanical mismatch between the electrode and the soft brain tissue (Young's modulus approximately 1–10 kPa) during implantation [58]. This mismatch causes mechanical impact, tearing neuronal tissue, damaging neurons and nerve fibers, and leading to tissue displacement and deformation. The injured tissue releases inflammatory factors that attract immune cells to the site to phagocytose cell debris [58].
- Chronic Inflammatory Response: After the acute phase, a persistent mechanical mismatch remains. Macroscopic and microscopic movements of the implant cause ongoing friction with the brain tissue [58]. This leads to the activation of microglia and astrocytes, which proliferate and migrate to the injury site. The secretion of extracellular matrix (ECM) components ultimately results in the formation of a dense glial scar around the electrode [58]. This scar tissue acts as an insulating layer, increasing the distance between neurons and the electrode recording sites, causing rapid signal attenuation and a sharp rise in impedance, which can render the electrode non-functional [58].
Core Strategies for Minimizing Trauma and Ensuring Stability
Strategy 1: Coordinated Electrode Shape and Implantation Method
The shape of the neural interface determines the implantation method, which directly influences the extent of implantation-induced damage and the acute inflammatory response [58]. The core principle is to customize the implantation strategy to the electrode's geometry.
3.1.1 Unified Implantation This strategy uses a single guidance system, such as a rigid shuttle, to deploy multiple electrodes simultaneously or in a single step. It is particularly well-suited for deep brain detection and helps maintain a predefined spatial arrangement of electrodes [58].
- Example – Open-Sleeve Electrode: A polyimide-based 128-channel open-sleeve electrode, 15 µm thick and 1.2 mm wide, uses a U-shaped neck design. While this design increases thickness and width, it reduces the risk of rigid shuttle detachment. However, this comes at the cost of increased acute injury, with glial sheath formation observed two weeks post-implantation [58].
- Example – Folded Multi-shank Electrodes: Guiding multi-shank electrodes, such as folded electrodes, increases detection throughput with a single implantation but doubles the implantation thickness, potentially causing more tissue displacement [58].
3.1.2 Distributed Implantation This approach involves using multiple independent guidance systems to deploy electrodes sequentially. It allows for greater flexibility in placement and adaptation to tissue morphology [58].
- Example – NeuroRoots Electrode: This innovative design separates all detection channels into individual filaments that are 7 µm wide and 1.5 µm thick. These filaments are transferred via capillary action to a single-shank guiding microwire (35 µm diameter). After implantation, the microwire is retracted, aiming to avoid additional injury. This design has enabled signal recording for up to 7 weeks [58].
- Example – Nanowire Electrodes: The cross-sectional area of distributed electrodes has been progressively reduced, with some nanowire designs reaching 10 µm², aiming to match the subcellular level and minimize acute injury during implantation [58].
Table 1: Comparison of Unified and Distributed Implantation Strategies
| Feature | Unified Implantation | Distributed Implantation |
|---|---|---|
| Core Principle | Single guidance system for multiple electrodes | Multiple independent guidance systems |
| Best Suited For | Deep brain detection; high-throughput recording in a single area | Expanding detection range; minimizing single implantation cross-section |
| Throughput | High within a localized region | High over a broader region |
| Acute Tissue Injury | Generally higher due to larger cross-sectional area | Lower, as cross-section is minimized to subcellular levels |
| Tissue Compatibility | Balanced stiffness for implantation vs. long-term compatibility | Excellent due to minimal mechanical mismatch |
| Example Technologies | Single-shank and folded multi-shank electrodes | NeuroRoots, Nanowires, Robotic-assisted systems |
Strategy 2: Passive and Active Biocompatibility Enhancement
Beyond physical design, the material surface properties of the electrode can be engineered to modulate the biological response.
- Passive Enhancement of Biocompatibility: This involves modifying the electrode surface through functionalization to make it "invisible" to the immune system, thereby passively "escaping" immune recognition. The goal is to align the electrode's surface properties with the surrounding neural tissue [58].
- Active Inhibition of Inflammation: This innovative strategy involves designing the electrode to actively release anti-inflammatory substances from a drug-controlled release system. This modulates the local microenvironment around the implantation site, promoting tissue repair and mitigating the chronic inflammatory response [58].
The most effective stability strategies often involve the compatibility between these passive invisibility and active modulation approaches [58].
Detailed Experimental Protocol for Stereotaxic Array Implantation
The following protocol provides a detailed methodology for the stereotactic implantation of microelectrode arrays in non-human primates, such as the common marmoset (Callithrix jacchus), incorporating steps aimed at minimizing trauma [6].
Protocol: Stereotaxic Implantation of Microelectrode Arrays
Preoperative Preparation:
- Array and Equipment Setup: Secure the microelectrode array to a stereotaxic electrode holder. Connect the holder to the stereotaxic micromanipulator and set one microelectrode to the interaural coordinates. This coordinate serves as a reference for calculating the implantation coordinates for the entire array [6].
- Sterilization: Sterilize the complete assemblies (electrode array attached to the holder) in an ultraviolet (UV) light chamber for at least 2 hours [6].
- Craniotomy Planning: Attach a 24 G needle to a stereotaxic probe holder and set its tip to the interaural coordinates. Use this assembly to define the location of the craniotomy on the skull. The craniotomy should be an outline approximately 200 µm larger in the anteroposterior (AP) and mediolateral (ML) dimensions than the target implantation site [6].
- Sterilization of Surgical Tools: Sterilize the probe holder assembly in the UV chamber for at least 2 hours [6].
- Animal Anesthesia and Preparation: Induce anesthesia in the animal and secure its head in the stereotaxic frame. Administer preoperative care as required by the approved animal use protocol [6].
Surgical Procedure:
- Incision and Exposure: Make a midline scalp incision and carefully retract the skin and underlying tissues to fully expose the skull surface.
- Craniotomy: Perform a craniotomy at the predefined location using a surgical drill, taking care not to damage the underlying dura mater.
- Durotomy: Carefully incise the dura to expose the brain surface.
- Array Implantation (Using Guided Implantation):
- For flexible electrodes, mount the array onto a rigid guidance shuttle (e.g., tungsten wire, SU8) coated with a soluble material like polyethylene glycol (PEG) to temporarily secure it [58].
- Using the stereotaxic manipulator, slowly lower the guided array along the planned trajectory into the target brain region at a controlled speed to minimize tissue displacement.
- If using a soluble coating, allow it to dissolve (e.g., PEG melting) upon reaching the target depth [58].
- Retract the rigid shuttle, leaving the flexible electrode in place [58].
- Securing the Array: Apply surgical-grade adhesive (e.g., dental acrylic) around the base of the array where it exits the craniotomy to secure it to the skull. Ensure the array's connector is positioned appropriately for future recordings.
- Wound Closure: Suture the surgical wound in layers around the implant, ensuring aseptic technique.
Postoperative Care:
- Animal Recovery: Monitor the animal closely until it fully recovers from anesthesia. Provide postoperative analgesics and antibiotics as directed by the approved animal use protocol [6].
- Chronic Recording: The protocol allows for the examination of brain function, such as local field potential and spike activity recordings, in awake, freely behaving animals as early as one week after surgery [6].
The Scientist's Toolkit: Essential Research Reagents and Materials
Table 2: Key Research Reagents and Materials for Array Implantation
| Item | Function / Application |
|---|---|
| Microelectrode Arrays (e.g., single-shank, multi-shank, filamentary) | Chronic recording of electrophysiological signals (e.g., local field potentials, spike activity) from specific brain regions in awake, behaving animals [6]. |
| Stereotaxic Frame with Micromanipulator | Provides precise three-dimensional positioning and stabilization of the animal's head and the electrode for accurate targeting of brain structures [6]. |
| Rigid Guidance Shuttles (e.g., Tungsten Wire, SU8) | Temporary stiffening agents essential for the implantation of flexible electrodes, preventing buckling and enabling penetration of the pia and brain tissue [58]. |
| Soluble Coatings (e.g., Polyethylene Glycol - PEG) | Used to temporarily secure a flexible electrode to a rigid shuttle. It dissolves upon reaching the target brain region, allowing shuttle retraction and minimizing tissue damage [58]. |
| Surgical Adhesive (e.g., Dental Acrylic) | Used to chronically secure the implanted array to the skull, providing mechanical stability and sealing the craniotomy [6]. |
| Anti-inflammatory Drug Delivery Systems | Controlled-release coatings or integrated systems on the electrode designed to actively release anti-inflammatory compounds to modulate the local tissue response and suppress chronic inflammation [58]. |
Workflow and Signaling Pathways
Electrode Implantation Stability Optimization Workflow
Diagram 1: Inflammation leading to electrode failure.
Stability Strategy Implementation Workflow
Diagram 2: Strategies for stability and minimized trauma.
Within the context of a broader thesis on stereotaxic surgery for electrode array implantation research, effective post-operative care is a critical determinant of scientific validity. Survival studies, particularly those involving chronic neural implants in animal models, require meticulous monitoring and analgesia protocols to ensure animal well-being, minimize confounding variables, and guarantee the collection of high-quality, reproducible electrophysiological data. Post-operative recovery is not merely an ethical imperative but a methodological cornerstone; uncontrolled pain and surgical complications can induce significant physiological stress, alter neural activity, and compromise the integrity of long-term recordings [13]. This document provides detailed application notes and protocols for monitoring and analgesia, framed within the specific demands of stereotaxic surgery and chronic implantation research.
Quantitative Assessment Strategies in Post-Operative Care
The transition from subjective assessment to a structured, quantitative evaluation of animal recovery is a key advancement in refining survival studies. Implementing a data-driven approach allows for the early detection of complications, objective evaluation of analgesic efficacy, and dynamic adjustment of care plans.
Core Principle: A quantitative assessment strategy (QAS) involves the regular, scheduled measurement of defined physiological and behavioral parameters. This strategy has been shown in clinical settings to significantly improve pain management, enhance psychological status, and reduce postoperative complications [59]. The same principles of structured evaluation can be adapted and applied to preclinical survival studies.
Structured Assessment Schedule and Parameters
The following table outlines a proposed schedule and the core parameters for post-operative monitoring, synthesizing best practices from the literature [59] [15] [60].
Table 1: Post-Operative Monitoring Schedule and Quantitative Assessment Parameters
| Post-Op Time Point | Physiological Monitoring | Pain & Distress Assessment | Functional Recovery | Incision & Complication Check |
|---|---|---|---|---|
| Immediately Post-Op | Heart rate, SpO₂, body temperature [60] | Anesthesia recovery score, presence of vocalization | Righting reflex, ambulation | Check for hemorrhage, ensure anesthetic recovery |
| Day 1-3 (BID) | Body weight, temperature, hydration status | Mouse Grimace Scale (MGS), posture, spontaneous behavior | Nesting score, locomotor activity in home cage | Suture integrity, signs of infection (redness, swelling, discharge) |
| Day 4-7 (SID) | Body weight, food/water intake | MGS, response to gentle palpation near incision site | Grooming behavior, social interaction (if grouped) | Wound closure, dehiscence |
| Week 2+ (Every 2-3 days) | Body weight until return to pre-op baseline | Behavioral markers normalized to pre-op baseline | Normalization of species-specific behaviors | Full healing of surgical site, implant stability [13] |
Complication Management and Analgesic Regimen
A proactive plan for managing common post-operative complications is essential. The adequacy of analgesia should be continually assessed, and interventions should be pre-emptively defined.
Table 2: Common Post-Operative Complications and Management Protocols
| Complication | Signs & Symptoms | Preventive Measures | Intervention & Management |
|---|---|---|---|
| Pain | Reduced mobility, abnormal posture (hunching), piloerection, vocalization, reduced food/water intake, high MGS score | Pre-emptive analgesia (e.g., sustained-release buprenorphine), multimodal analgesia [60] | Administer rescue analgesia as per approved protocol. Re-evaluate analgesic regimen if pain signs persist. |
| Hypothermia | Body temperature below 36°C (mouse) / 37.5°C (rat), lethargy | Use of active warming pads during and after surgery [15] | Gradual re-warming using controlled heating pad or incubator until normothermic. Provide supplemental fluids. |
| Dehydration/Weight Loss | >20% body weight loss, skin tenting, sunken eyes | Subcutaneous fluids (e.g., Normosol) during surgery and post-op [60] | Subcutaneous or intraperitoneal fluid administration. Offer hydrated diet (gel packs, soft food). |
| Incision Infection | Erythema, edema, purulent discharge, dehiscence | Aseptic surgical technique, peri-operative antibiotics | Topical/systemic antibiotics as directed by veterinarian. May require wound cleaning and potential implant removal in severe cases. |
| Implant Failure | Loose headcap, broken connectors, poor signal quality [13] | Robust implant design (e.g., modular, 3D-printed components), secure anchoring with dental cement [13] | Re-secure with dental acrylic if possible. If chronic recording is compromised, may require ethical endpoint. |
Detailed Experimental Protocols
Protocol 1: Multimodal Analgesia Administration for Rodents
This protocol outlines the administration of a multimodal analgesic regimen to manage post-operative pain effectively in rodents following stereotaxic surgery.
1. Reagents and Materials:
- Buprenorphine SR (sustained-release, 1.0 mg/kg) or Meloxicam (1-2 mg/kg for rats; 1-5 mg/kg for mice)
- Sterile saline (0.9%)
- Insulin syringes (29-30 G)
- Heated pad or cage
- Animal health monitoring sheets
2. Procedure:
- Pre-emptive Analgesia: Administer a long-acting analgesic such as Meloxicam (subcutaneously, SC) approximately 30 minutes prior to skin incision. This pre-empts the establishment of central sensitization [60].
- Intra-operative Support: Maintain body temperature using a feedback-controlled heating pad set to 37°C throughout the procedure to prevent hypothermia, a known complicating factor [15].
- Post-operative Analgesia (Immediate): Immediately following surgery, administer a sustained-release formulation of a potent opioid such as Buprenorphine SR (SC). This provides continuous analgesia for up to 72 hours, minimizing handling stress associated with repeated injections [60].
- Post-operative Analgesia (Extended): For 2-3 days following surgery, continue administering a non-steroidal anti-inflammatory drug (NSAID) like Meloxicam (SC or orally in soft food) to control inflammation and provide complementary analgesia.
- Monitoring and Re-assessment: Monitor the animal at least twice daily for the first 72 hours using the parameters in Table 1. If signs of pain are observed, consult with the veterinary team for a potential rescue analgesic dose.
3. Quality Control:
- Record all drug administrations, including batch numbers, dosages, routes, and times.
- Document the animal's weight and pain score before and after analgesic administration to track efficacy.
Protocol 2: Aseptic Recovery and Intensive Care Monitoring
This protocol ensures a sterile and supportive recovery environment immediately following surgery.
1. Reagents and Materials:
- Clean, pre-warmed cage with fresh bedding
- Recirculating water warming pad or incubator
- Sterile lubricant eye ointment
- Hydrated diet gel packs and soft food
- Disinfectants (e.g., chlorine dioxide, vaporized hydrogen peroxide)
2. Procedure:
- Preparation: Set up a recovery cage on a heating pad set to 37°C. Place soft, paper-based bedding without enrichment that could hinder mobility.
- Immediate Post-Op Transfer: Once spontaneous breathing is stable, transfer the animal from the stereotaxic frame to the pre-warmed recovery cage.
- Positioning: Place the animal in a sternal recumbency position to facilitate breathing. Ensure the head and implant are not in contact with bedding or cage walls.
- Continuous Monitoring: Remain with the animal until it is fully ambulatory. Check the following every 15 minutes:
- Respiration rate and pattern.
- Mucous membrane color.
- Response to gentle stimuli.
- Supportive Care: Re-apply lubricant to the eyes if needed. Ensure access to hydrated food and water sources placed easily within reach.
- Post-Recovery Housing: Once the animal is fully awake and mobile, return it to its home cage. For the first 72 hours, house the animal singly or with a familiar cage mate to prevent interference with the implant by other animals [13].
3. Quality Control:
- The recovery area should be quiet, dimly lit, and separated from procedural rooms.
- All equipment (forceps, heating pads) should be cleaned and disinfected between animals.
Visualization of Workflows and Logical Relationships
Post-Operative Care Decision-Making Pathway
This diagram visualizes the logical workflow for monitoring an animal and making critical decisions regarding its post-operative care, from initial assessment to intervention.
Analgesic Dosing and Efficacy Logic
This diagram outlines the decision-making process for selecting and evaluating the efficacy of an analgesic regimen in a survival study.
The Scientist's Toolkit: Research Reagent Solutions
This section details key materials and reagents essential for implementing the post-operative care and monitoring protocols described above.
Table 3: Essential Reagents and Materials for Post-Operative Care
| Item | Function/Application | Example & Notes |
|---|---|---|
| Sustained-Release Buprenorphine | Long-acting (up to 72h) opioid analgesic for potent pain relief. | Buprenorphine SR (1.0 mg/kg). Reduces handling stress compared to BID-TID injections [60]. |
| NSAIDs (e.g., Meloxicam, Carprofen) | Reduces inflammation and provides analgesia; part of a multimodal approach. | Meloxicam (1-5 mg/kg). Often administered pre-emptively and continued for 2-3 days post-op [60]. |
| Local Anesthetic (e.g., Bupivacaine) | Provides localized, long-lasting nerve block at the incision site. | 0.25% Bupivacaine, infiltrated subcutaneously prior to incision [60]. |
| Active Warming System | Prevents hypothermia induced by anesthesia and surgery, improving survival and recovery [15]. | Feedback-controlled heating pad or custom PCB heat bed maintaining temperature at ~37°C [15]. |
| Hydration & Nutritional Support | Prevents dehydration and supports recovery, especially if animal is hypophagic. | Normosol or Lactated Ringer's Solution (SC); DietGel Recovery or similar softened diet [60]. |
| Dental Acrylic Cement | Secures the chronic implant (e.g., electrode array) to the skull. | Mix of powder and liquid polymer (e.g., Metabond, Palacos). Creates a durable, stable headcap [13] [60]. |
| Modular Implant System | Chronic electrode assembly allowing for precise targeting and stable long-term recordings. | Custom, 3D-printed implant with adjustable shuttles for probes (e.g., Neuropixels), weighing ~8.4g for rats [13]. |
Enhancing Precision and Survival: Strategies for Troubleshooting and Surgical Optimization
Stereotaxic surgery for the implantation of electrode arrays is a cornerstone technique in modern neuroscience research, enabling precise investigation of neural circuits and brain function. However, the viability of chronic neural recordings and the validity of experimental data are consistently threatened by three major perioperative challenges: brain swelling (edema), bleeding (hemorrhage), and infection. These complications can lead to significant tissue damage, altered neural signals, implant rejection, and ultimately, experimental failure. This Application Note details the underlying causes of these challenges and provides evidence-based protocols to mitigate them, ensuring the reliability and reproducibility of stereotaxic surgery outcomes in research settings. The strategies outlined herein are framed within the context of a broader thesis on improving the safety and efficacy of chronic electrode array implantation.
Pathophysiology and Quantitative Assessment of Key Challenges
Understanding the mechanisms and quantifying the impact of these surgical challenges is the first step toward developing effective countermeasures. The table below summarizes the primary causes and consequences of each major complication.
Table 1: Major Challenges in Stereotaxic Electrode Array Implantation
| Challenge | Primary Causes | Impact on Research | Quantifiable Measures |
|---|---|---|---|
| Brain Swelling (Edema) | Disruption of the blood-brain barrier, mechanical trauma from impactor or electrode insertion, inflammatory response [61]. | Altered neural signals, increased intracranial pressure, neuronal death, inaccurate electrode placement. | Tissue water percentage (e.g., 3-5% increase post-TBI [61]); decreased electrical impedance (R²=0.69 with tissue water [61]). |
| Bleeding | Damage to pial or cortical blood vessels during craniotomy, durotomy, or electrode insertion [62]. | Hematoma formation, secondary edema, inflammation, neural cell death, signal contamination. | Survival rate (e.g., 0% without warming vs. 75% with warming in severe models [15]); volume of hemorrhage on histology. |
| Infection | Breach of aseptic technique, contamination of implants, inadequate postoperative care [63]. | Meningitis, abscess formation, chronic inflammation, glial scarring, implant failure. | Presence of clinical signs (lethargy, wound dehiscence); histopathological signs of inflammation (e.g., immune cell infiltration). |
A key method for quantifying cerebral edema, a hallmark of brain swelling, involves measuring tissue impedance. Research has demonstrated that electrical impedance is inversely proportional to tissue water percentage. In a controlled cortical impact (CCI) model, voltage measurements at the injury site showed a significant correlation with tissue water content (R² = 0.69, p<0.0001), providing a reliable, real-time method to quantify edema severity [61]. The following diagram illustrates the cascade of events following surgical trauma and the methods for its detection.
Diagram 1: Pathophysiology and Quantification of Cerebral Edema. Surgical trauma triggers a cascade leading to cerebral edema, which can be quantified through impedance measurements or tissue water analysis.
Experimental Protocols for Challenge Mitigation
Protocol: Minimally Invasive Implantation of Shape-Changing Electrode Arrays (SCEAs) to Reduce Bleeding and Swelling
This protocol utilizes a novel SCEA designed to be implanted through a small cranial opening, minimizing damage to the skull, dura, and underlying vasculature, thereby reducing the risk of bleeding and subsequent edema [62].
I. Materials
- SCEA: Ultrathin, flexible electrode array with carbon nanotube/gold conductive layers and a Parylene-C substrate.
- Nitinol Shape Actuator: A biocompatible shape-memory alloy wire programmed for deployment at body temperature.
- Polyethylene Oxide (PEO): Water-soluble adhesive to temporarily secure the SCEA to the actuator.
- Sterile Saline
- Standard Stereotaxic Setup: Including drill and microsurgical instruments.
II. Procedure
- Pre-implantation Preparation: Compress the SCEA and bond it to the nitinol actuator using PEO, forming a narrow strip a few millimeters wide.
- Cranial Access: Perform a small craniotomy (e.g., 0.8 mm x 2 mm for rat epidural implantation) or a short dural slit (e.g., 6 mm for canine subdural implantation) instead of a large craniectomy [62].
- Array Insertion: Gently insert the compressed SCEA strip through the small cranial or dural opening onto the cortical surface.
- Array Deployment: Irrigate with warm sterile saline to dissolve the PEO and activate the nitinol actuator. The SCEA will spontaneously deploy and expand to its full sheet-like form (e.g., ~20 mm x 15 mm) within minutes.
- Actuator Removal: Once the SCEA is fully deployed and in contact with the cortical surface, carefully withdraw the nitinol actuator through the small opening.
- Closure and Fixation: Secure the electrode leads and close the surgical site following standard aseptic procedures.
III. Validation
- MRI and Histology: Post-operative MRI and immunohistochemical analysis should show minimal inflammatory response, no significant damage to brain structure, and intact pial blood vessels, confirming minimal invasiveness and high biocompatibility [62].
- Signal Quality: Verify the functionality of the SCEA by recording high-quality micro-ECoG signals, including high-frequency oscillations, from the large cortical area.
Protocol: Active Warming to Prevent Hypothermia and Improve Survival
Preventing intraoperative hypothermia is critical for reducing mortality, especially in prolonged surgeries involving severe models like CCI with electrode implantation [15].
I. Materials
- Custom Active Warming Bed: Consisting of a thermistor, microcontroller unit (MCU), PID controller, driver circuit, and a custom PCB heat pad.
- LCD Monitor: For real-time temperature monitoring.
- Stereotaxic Frame with Bed
II. Procedure
- System Setup: Position the custom PCB heat pad underneath the middle area of the stereotaxic bed. Place the thermal sensor in contact with the animal's body beneath it.
- Parameter Setting: Set the PID controller on the active warming system to maintain the rodent's body temperature at 40°C throughout the surgical procedure [15].
- Monitoring: Continuously monitor the real-time temperature reading on the LCD display and ensure the system is maintaining normothermia.
- Post-operative Care: Transfer the animal to a separate heating pad in a clean recovery cage until it is fully ambulatory.
III. Validation
- Survival Rate: The implementation of an active warming system has been shown to increase survival rates from 0% to 75% in severe CCI models with electrode implantation [15].
- Physiological Stability: Maintained normothermia prevents complications like cardiac arrhythmias and prolonged recovery, leading to more stable physiological parameters post-surgery.
Protocol: Aseptic Surgical Technique for Chronic Implantation
Meticulous aseptic technique is non-negotiable for preventing infection in chronic implants. This protocol is adapted from established methods for rodent and primate surgery [63] [53].
I. Pre-operative Preparation
- Sterilization: Sterilize all surgical instruments (e.g., forceps, drills, electrode holders) via autoclaving or UV radiation for at least 2 hours [12] [53].
- Surgeon Attire: Wear a clean lab coat, sterile gloves, mask, and head cover.
- Animal Preparation: After inducing anesthesia, shave the surgical site and disinfect the scalp with alternating scrubs of betadine and 70% ethanol, repeated three times [53].
II. Intra-operative Asepsis
- Draping: Use sterile drapes to isolate the surgical field.
- Gentle Tissue Handling: Minimize tissue dissection and damage to reduce the nidus for infection.
- Antibiotic Use: Consider the use of perioperative antibiotics (e.g., included in the sterile saline irrigation) as approved by the institutional animal care committee.
III. Post-operative Care
- Analgesia: Administer pre- and post-operative analgesics (e.g., Buprenorphine, Ketoprofen) to manage pain and reduce stress, which can impair immune function [53].
- Monitoring: Monitor the animal daily for signs of infection (lethargy, wound redness, discharge) for at least one week post-surgery.
- Wound Care: Keep the surgical site clean until fully healed.
The Scientist's Toolkit: Essential Reagents and Materials
The following table lists key materials and reagents essential for implementing the protocols described and for ensuring the success of stereotaxic implantation surgeries.
Table 2: Key Research Reagent Solutions for Stereotaxic Surgery Challenges
| Reagent/Material | Function/Application | Protocol/Challenge Addressed |
|---|---|---|
| Shape-Changing Electrode Array (SCEA) | Enables large-scale cortical mapping via minimally invasive implantation, reducing bleeding and tissue damage. | Minimally Invasive Implantation [62] |
| Carbon Nanotube (CNT)/Gold Conductor | Maintains electrical conductivity under extreme mechanical strain during SCEA deployment. | SCEA Functionality [62] |
| Nitinol Shape Actuator | Provides temperature-dependent deployment mechanism for the SCEA within the body. | SCEA Deployment [62] |
| Active Warming System | Prevents anesthesia-induced hypothermia, significantly improving survival rates. | Hypothermia Prevention [15] |
| Bipolar Electrode Unit (BEU) | Used for real-time, site-specific measurement of cerebral edema via tissue impedance analysis. | Edema Quantification [61] |
| Metabond / Dental Acrylic | Provides secure and stable attachment of the implant assembly to the skull for chronic recordings. | Implant Fixation [53] |
| Buprenorphine | Potent analgesic administered pre- and post-operatively to manage pain and reduce stress. | Post-operative Care / Infection Control [53] |
| Betadine & 70% Ethanol | Skin preparation disinfectants used in alternating scrubs to achieve asepsis before incision. | Aseptic Technique [53] |
The challenges of brain swelling, bleeding, and infection are interconnected and can critically compromise stereotaxic surgery for electrode array implantation. Addressing them requires a multi-faceted approach that combines novel engineering solutions, such as minimally invasive shape-changing arrays, with refined surgical protocols, including strict asepsis and active temperature management. The quantitative methods and detailed protocols provided here offer researchers a concrete framework to enhance animal welfare, improve the quality and reliability of neural data, and increase the overall success and reproducibility of their experiments. By systematically implementing these strategies, the field can advance toward more robust and chronic neural interface studies.
In the precise field of stereotaxic surgery for electrode array implantation, the maintenance of rodent normothermia is not merely a procedural detail but a critical determinant of experimental success. Isoflurane anesthesia, a cornerstone of rodent surgical protocols, induces peripheral vasodilation, which promotes rapid heat loss and leads to hypothermia. This state disrupts thermoregulation and can trigger a cascade of negative side effects, including cardiac arrhythmias, increased vulnerability to infection, impaired cognitive function, heightened pain perception, and prolonged recovery time [15]. These physiological disturbances not only compromise animal welfare but also introduce significant variability, potentially jeopardizing the validity and reproducibility of neuroscientific data. Within the specific context of complex procedures like controlled cortical impact (CCI) models and chronic electrode implantation, hypothermia can be a primary factor in intraoperative mortality [15]. This application note details the vital role of active warming pad systems in preventing hypothermia, thereby enhancing survival rates and ensuring the integrity of data in stereotaxic neurosurgery research.
Quantitative Evidence: Survival and Efficacy Data
The following table summarizes key quantitative findings from recent studies on the impact of active warming systems in rodent stereotaxic surgery.
Table 1: Quantitative Data on Active Warming System Efficacy in Rodent Stereotaxic Surgery
| Metric | Finding without Active Warming | Finding with Active Warming | Source/Context |
|---|---|---|---|
| Survival Rate | 0% survival in initial experiments | 75% survival achieved | Severe TBI model with CCI and electrode implantation [15] |
| Target Body Temperature | Not applicable (passive cooling) | Maintained at 37.5 °C or 40 °C | Protocol for epiretinal stimulation & CCI surgery protocol [64] [15] |
| Surgery Time Efficiency | Baseline (conventional system) | 21.7% decrease in total operation time | Using a modified CCI device with integrated 3D-printed header [15] |
| Primary Complication Addressed | Hypothermia induced by isoflurane anesthesia | Prevention of hypothermia and its negative side effects | Rodent model under isoflurane anesthesia [15] |
Detailed Experimental Protocol: Implementation of an Active Warming System
This section provides a step-by-step methodology for integrating an active warming system into a stereotaxic surgery procedure for electrode array implantation, based on refined experimental protocols [15] [64] [65].
Materials and Equipment
- Active Warming System: A custom-built or commercial system (e.g., Model # TP702 from Gamry Industries) is required [64].
- Heating Element: A custom-made Printed Circuit Board (PCB) heat pad is recommended for even heat distribution [15].
- Temperature Controller: A microcontroller unit (MCU) with a Proportional-Integral-Derivative (PID) controller algorithm for reliable and precise temperature regulation [15].
- Thermal Sensor: A thermistor or similar thermal probe for real-time temperature monitoring [15].
- Stereotaxic Surgery Setup: Including a stereotaxic frame, anesthesia induction chamber, isoflurane anesthesia machine with a nose cone, and surgical instruments [15] [65].
Pre-operative Procedures
- Animal Preparation: Anesthetize the rodent in an induction chamber using 5% isoflurane until fully sedated [65].
- Positioning: Secure the animal in the stereotaxic frame, maintaining anesthesia with 1-2% isoflurane delivered via a nose cone. Regularly adjust the isoflurane level based on the monitored respiratory rate [65].
- System Setup:
- Place the PCB heat pad beneath the dorsal torso of the rodent on the stereotaxic bed, ensuring contact is optimized for heat transfer.
- Position the thermal sensor underneath the animal's body, in close proximity to the skin, to accurately monitor core body temperature [15].
- Set the target temperature on the MCU controller. Studies have successfully used target temperatures of 40 °C [15] and 37.5 °C [64] for surgical maintenance.
- Activate the system and allow the rodent's temperature to stabilize at the target value for at least 5-10 minutes before initiating the surgical procedure.
Intra-operative Monitoring
- Continuous Monitoring: Continuously monitor and display the rodent's body temperature throughout the entire surgical procedure via the LCD monitor connected to the system [15].
- Controller Operation: Rely on the PID controller to automatically adjust the power to the heat pad, maintaining a stable temperature and preventing both hypothermia and the risk of localized overheating [15].
- Procedure Integration: The stability provided by the warming system allows the surgeon to focus on complex steps such as Bregma-Lambda measurement, craniotomy, controlled cortical impact, and precise electrode array implantation [15] [65].
Post-operative Care
- Recovery: Upon completion of surgery, turn off the active warming system.
- Transition: Immediately transfer the animal to a clean, warm recovery cage. The cage should be placed on a circulating warm water blanket or in a thermostatically controlled incubator set to approximately 30 °C.
- Monitoring: Continuously monitor the animal until it fully regains consciousness and maintains sternal recumbency, ensuring a stable thermoregulatory capacity has been restored.
The workflow below summarizes the critical role of active warming within the entire surgical protocol.
The Scientist's Toolkit: Essential Research Reagent Solutions
The successful implementation of a hypothermia prevention strategy relies on specific materials and equipment. The table below lists key solutions for researchers.
Table 2: Essential Materials for Active Warming in Rodent Stereotaxic Surgery
| Item | Function/Application | Specific Examples / Notes |
|---|---|---|
| Active Warming System | Maintains rodent core body temperature during anesthesia. | Can be commercial (e.g., Gamry TP702) or custom-built with a PCB heat pad [64] [15]. |
| PID Temperature Controller | Provides precise and stable thermal regulation, preventing temperature fluctuations. | Microcontroller Unit (MCU) with a PID algorithm is superior to simple on/off thermostats [15]. |
| Thermal Sensor (Thermistor) | Monitors real-time body temperature for feedback control. | Should be placed under the animal's body for accurate measurement [15]. |
| Isoflurane Anesthesia System | Standard for rodent survival surgery; induces vasodilation and hypothermia. | Comprises an vaporizer, induction chamber, and nose cone for maintenance [15] [65]. |
| Post-op Warm Recovery Cage | Prevents secondary hypothermia during anesthetic recovery. | Use a thermostatically controlled incubator or a cage on a warm water blanket [65]. |
| Refined Surgical Devices | Reduces overall operative time, limiting exposure to anesthetics. | 3D-printed headers integrated with impactors or electrodes improve efficiency [15]. |
Integrating an active warming system is a critical refinement in stereotaxic surgery protocols for electrode array implantation. Robust evidence demonstrates that preventing isoflurane-induced hypothermia directly translates to dramatically improved animal survival rates—from 0% to 75% in severe models [15]. Furthermore, the stability afforded by maintained normothermia enhances the quality and reliability of electrophysiological data collected from implanted electrodes. By adhering to the detailed protocol and utilizing the essential tools outlined in this application note, researchers can uphold the highest standards of animal welfare while simultaneously ensuring the scientific rigor and reproducibility of their neurosurgical research.
Stereotaxic surgery is a cornerstone technique in neuroscience research and clinical practice, enabling precise access to specific brain structures for procedures such as electrode array implantation, site-targeted lesions, and viral vector injections [66] [67]. The success of these procedures fundamentally depends on accurate targeting, which remains challenging when targeting small or deep brain nuclei due to limitations in traditional manually-driven stereotaxic systems [66]. These conventional systems rely heavily on operator skill and experience, with success rates potentially dropping to as low as 30% for small, deep brain targets, significantly hindering research reproducibility and clinical outcomes [66] [67].
The integration of three-dimensional (3D) skull reconstruction with robotic positioning platforms represents a transformative advancement in stereotaxic technology. This combination directly addresses key sources of inaccuracy: the manual alignment of the animal's skull to a standardized coordinate system (achieving "skull-flat" position) and the precision of moving surgical tools to calculated coordinates [67]. By automating these processes with high-resolution 3D vision and robotic precision, these next-generation systems significantly improve targeting accuracy, reduce surgical time, and minimize operator-dependent variability, thereby accelerating the pace of discovery in basic neuroscience and improving the safety and efficacy of clinical neuromodulation therapies [66].
The following tables summarize key quantitative findings from evaluations of robotic stereotaxic systems utilizing 3D reconstruction technologies, demonstrating their performance in both research and clinical settings.
Table 1: Accuracy Metrics of Robotic Stereotaxic Systems
| System / Study | Application Context | Targeting Accuracy (Mean ± SD or Mean) | Key Accuracy Findings |
|---|---|---|---|
| 3D Skull Reconstruction & 6DOF Robotic Platform [66] [67] | Small Rodent Surgery | Not explicitly quantified (Sub-millimeter precision demonstrated) | • Achieves rapid, precise "skull-flat" positioning.• Successfully targets small, deep brain nuclei (e.g., medial nucleus of the trapezoid body). |
| Medtronic Stealth Autoguide [68] | Human SEEG Electrode Placement | Euclidean Tip Error: ( 4.67 \pm 0.27 ) mm (n=77 electrodes) | • Accuracy deemed acceptable for safe and effective SEEG studies. |
| Neuromate Robotic System [69] | Paediatric & Adult SEEG Electrode Placement | Entry Point Error: ( 1.82 \pm 1.15 ) mmTarget Point Error: ( 1.98 \pm 1.05 ) mm (n=464 electrodes) | • Significantly higher target/entry errors in paediatric patients.• Higher errors for electrodes targeting the temporo-mesial region. |
Table 2: Efficiency and Safety Outcomes of Robotic Stereotactic Procedures
| System / Study | Procedure Time | Complication Rate / Key Safety Findings |
|---|---|---|
| Medtronic Stealth Autoguide [68] | 15-20 minutes per electrode | • 1 hemorrhage in 102 electrodes (first patient).• No deaths or infections. |
| Neuromate Robotic System [69] | 37 ± 14 minutes per electrode (decreased with number placed) | • No clinically relevant hemorrhages.• No infectious complications.• 70.1% of patients became seizure-free (ILAE I) after subsequent surgery. |
| Shape-Changing Electrode Array (SCEA) [70] | N/A | • Minimal inflammatory response or damage post-implantation in rats.• High chronic biocompatibility confirmed by MRI and histology. |
Experimental Protocols
Protocol for Automated Stereotaxic Surgery in Rodents Using 3D Skull Reconstruction
This protocol details the procedure for using a integrated 3D skull profiler and a 6-degree-of-freedom (6DOF) robotic platform for precise targeting in small rodents [66] [67].
I. System Setup and Calibration
- Equipment: Ensure the robotic system is assembled, comprising the 3D profiler (video projector and two 2D CCD cameras) and the 6DOF Stewart platform. Confirm all hardware and control software are connected and operational.
- Calibration: Perform a system calibration using a reference object with known dimensions to align the 3D vision system with the coordinate system of the robotic platform. Verify the calibration by targeting a known point on a test skull or phantom.
II. Animal Preparation and Positioning
- Anesthetize the rodent according to approved institutional animal care protocols.
- Secure the animal's body in a holder. Fix the skull securely to the top plate of the robotic platform using a non-invasive head-holder, ensuring the skull surface is exposed and unobstructed for the 3D scan.
III. 3D Skull Surface Reconstruction
- Initiate the 3D skull profiler. The system will project a series of horizontal and vertical line patterns (structured illumination) onto the exposed skull.
- The two CCD cameras capture the deformation of these line patterns from different angles.
- Using principles of geometrical triangulation, the control software reconstructs a high-resolution 3D surface profile of the entire skull from the captured images. This process typically involves analyzing 42 or more images per camera [66].
- The software automatically identifies key cranial landmarks (e.g., Bregma, Lambda) on the reconstructed 3D skull model.
IV. Automated Skull Alignment ("Skull-Flat")
- The software calculates the necessary translations and rotations (roll, pitch, yaw) required to align the skull into the standard "skull-flat" position based on the 3D model.
- These coordinates are sent to the 6DOF robotic platform (Stewart platform), which automatically adjusts the length of its six motorized axes to re-position the skull with high precision.
V. Surgical Tool Guidance and Targeting
- Using a stereotaxic atlas integrated with the software, select the target brain nucleus. The system provides the 3D coordinates relative to the aligned skull.
- The robotic platform then moves to align the desired trajectory, guiding a surgical tool (e.g., injection pipette, electrode) to the target coordinates for insertion.
- Perform the intended procedure (e.g., injection, electrode implantation).
VI. Post-Procedural Validation
- After the intervention, validate targeting accuracy using appropriate histological methods or post-operative imaging in the case of electrode implantation.
Protocol for Robotic SEEG Electrode Implantation with Stealth Autoguide
This protocol outlines the key steps for implanting stereotactic electroencephalography (SEEG) electrodes in human patients using the Medtronic Stealth Autoguide system, a clinical application of robotic stereotaxy [68] [71].
I. Preoperative Planning
- Acquire high-resolution preoperative MRI and CT angiography (CTA) scans.
- Transfer image sets to the StealthStation S8 planning station and coregister them.
- For each electrode, plan both the entry point on the skull and the deep-brain target. Visually inspect the entire trajectory on "probe's eye view" to avoid blood vessels and minimize sulcal crossings.
II. Patient Positioning and Registration
- Position the patient supine under general anesthesia. Fix the head in a CRW stereotactic base frame attached to the operating table.
- Attach the StealthStation's digital reference frame (DRF) to the frame.
- Register the preoperative images to the patient's physical space using a laser-based facial recognition system or fiducial markers. Ensure registration accuracy is ideally below 2.0 mm.
III. Robotic System Docking
- Drape the patient and the Autoguide robotic arm sterily.
- Manually position the Autoguide arm in proximity to the planned entry point and lock it.
- On the navigation system, select the first planned trajectory. The robot will perform a fine-tuned movement to the exact entry point and lock into position.
IV. Drilling and Bolt Implantation
- Attach a sterile drilling platform to the robotic arm.
- Advance a drill through the guide to create a burr hole through the full thickness of the skull.
- Open the dura mater using a dural perforator with monopolar cautery.
- Screw a guide bolt firmly into the burr hole.
V. Electrode Implantation and Confirmation
- Measure the distance from the drilling platform to the guide bolt and subtract this from the planned "platform-to-target" distance to determine the final electrode length.
- Insert a stylet to the calculated depth through the guide bolt, then replace it with the corresponding SEEG electrode.
- Secure the electrode by screwing it into the guide bolt.
- Use intraoperative fluoroscopy (e.g., O-arm) to confirm correct electrode placement.
- Repeat steps III-V for all planned electrodes.
- After all electrodes are placed, perform a final postoperative MRI or CT scan to assess accuracy and check for complications.
System Workflow and Logical Diagrams
The following diagram illustrates the integrated workflow of a robotic stereotaxic system, from skull scanning to precise tool positioning.
The diagram below details the surgical workflow for implanting depth electrodes, highlighting the synergy between preoperative planning and robotic execution.
The Scientist's Toolkit: Research Reagent Solutions
Table 3: Essential Materials and Reagents for Advanced Stereotaxic Research
| Item Name | Function / Application | Key Characteristics |
|---|---|---|
| 6DOF Robotic Platform (Stewart Platform) [66] [67] | Precise skull and tool positioning. | Provides translational (X, Y, Z) and rotational (roll, pitch, yaw) control for accurate alignment. |
| Structured Illumination 3D Profiler [66] [67] | Non-contact 3D skull surface mapping. | Uses a projector and two CCD cameras for high-resolution reconstruction via geometrical triangulation. |
| Shape-Changing Electrode Array (SCEA) [70] | Large-scale, minimally invasive ECoG mapping. | Ultrathin, flexible array compressed for insertion; deploys on cortex via shape-memory actuator. |
| Carbon Nanotube (CNT)/Gold Conductor [70] | Conductive layer in SCEAs. | Maintains conductivity under extreme mechanical deformation during array deployment. |
| Nitinol Shape Actuator [70] | In vivo deployment of compressed SCEAs. | Biocompatible shape-memory alloy; transforms from martensite (strip) to austenite (sheet) at body temperature. |
| Ad-Tech SEEG Electrodes [68] | Intracerebral recording in clinical SEEG. | Depth electrodes (e.g., 1.2mm Behnke-Fried hybrid) for chronic intracranial monitoring. |
| Water-Soluble PEO Adhesive [70] | Temporal control of SCEA deployment. | Delays and slows array deployment by requiring time for dissolution in physiological fluid. |
Operating Room (OR) efficiency is a critical determinant of surgical success, particularly in complex stereotaxic procedures for electrode array implantation where prolonged anesthesia time increases patient risk and confounds experimental outcomes. Inefficient workflows, including poorly defined staff roles, inaccurate scheduling, and cumbersome traditional equipment, contribute significantly to extended anesthesia duration. This application note details modified devices and workflows that directly address these inefficiencies. We present quantitative data on time savings and provide structured protocols for implementing a pit-stop turnover model, computational scheduling algorithms, and a compact stereotactic system. By integrating these evidence-based strategies, research institutions can achieve substantial reductions in non-surgical time, thereby minimizing anesthesia exposure, improving data quality in neurophysiological studies, and enhancing overall laboratory productivity.
Stereotaxic surgery for electrode array implantation is a cornerstone of neuroscience research, enabling precise investigation of neural circuits in animal models. The physiological stability of the animal model under anesthesia is paramount to the success of these procedures and the validity of the resultant data. Prolonged anesthesia time is associated with increased risks of hypothermia, cardiovascular instability, and compromised recovery, which can directly impact the quality of chronic neural recordings and animal welfare. Streamlining OR efficiency is therefore not merely an operational goal but a scientific necessity. This document frames the challenge of OR efficiency within the specific context of stereotaxic research, outlining modified devices and workflows proven to reduce non-operative time. The strategies presented are derived from clinical studies and adapted for the research environment, with a focus on practical implementation for scientists and drug development professionals.
Quantitative Data on OR Inefficiencies and Interventions
The financial and temporal costs of OR inefficiency are well-documented. Understanding these metrics is the first step in targeting improvements. The tables below summarize key baseline data and the quantitative impact of specific interventions.
Table 1: Baseline Operating Room Inefficiency Metrics
| Metric | Baseline Value | Significance & Impact |
|---|---|---|
| OR Cost per Minute | $36 - $113 USD [72] | Highlights the significant financial waste associated with delays and inefficiencies. |
| Robotic OR Turnover Time | 99.2 minutes (average) [73] | Demonstrates the substantial time lost between procedures in complex surgeries. |
| Surgical Duration Estimation Error | Surgeons accurately estimate time ~26% of the time [72] | Inaccurate scheduling leads to overbooking (42% of time) or under-utilization (32% of time) [72]. |
| Elective Surgery Cancellation Rate | 10% to 40% [72] | Often caused by poor OR organization and scheduling overruns. |
Table 2: Impact of Efficiency Interventions on OR Timelines
| Intervention | Outcome Metric | Result |
|---|---|---|
| Pit-Stop Model Turnover [73] | Total OR Turnover Time | Reduced from 99.2 minutes to 53.2 minutes (3 months post-intervention). |
| Pit-Stop Model Turnover [73] | Room Ready Time (RRT) | Reduced from 42.2 minutes to 27.2 minutes (p<0.0001). |
| Computational Scheduling [74] | On-Time Starts (8-10 a.m.) | Increased from 28.65% to 32.13% of surgeries. |
| Computational Scheduling [74] | OR Occupancy (9-11 a.m.) | Increased from 87.53% to 98.07%. |
| Machine Learning Scheduling [72] | Surgical Time Prediction | Outperformed traditional estimation by up to 50%, saving thousands of OR minutes. |
Workflow Modification: The Pit-Stop Model for OR Turnover
A primary source of anesthesia delay is the prolonged turnover time between surgical cases. Applying a structured, pit-stop model—inspired by motor racing—can dramatically improve this process.
Experimental Protocol: Implementing the Pit-Stop Model
Objective: To standardize OR turnover tasks, eliminate duplication of effort, and reduce the time from one patient leaving the OR to the next patient being ready for anesthesia induction.
Materials:
- Laminated, color-coded task cards for each role [73].
- Designated team members: Circulator, Robotic Support (or Equipment Specialist), Scrub Technician, and Environmental Services [73].
Methodology:
- Pre-Intervention Observation: Directly observe 5-10 OR turnovers to map existing workflows, identify bottlenecks, and task duplication [73].
- Task Card Development: Create a comprehensive list of all tasks required for turnover. Allocate these tasks unambiguously to specific roles on color-coded cards [73]. Example tasks include:
- Circulator: Coordinate with support team, transport patient to recovery, check in next patient [73].
- Equipment Specialist: Undrape and check specialized equipment (e.g., stereotactic frame), obtain sterile supply trays, open sterile supplies [73].
- Scrub Technician: Coordinate with surgeon for special equipment, clean back tables and stands, set up for the next case [73].
- Environmental Services: Sanitize all surfaces, manage waste, mopping, and final room inspection [73].
- Team Briefing and Training: Conduct meetings with all surgical staff (surgeons, anesthesiologists, nursing, technicians) to review the new process, assign leadership, and distribute task cards [73].
- Implementation: During turnover, each staff member retrieves their assigned task card and executes the listed duties in the prescribed sequence. Leadership ensures the process remains calm and organized [73].
- Evaluation and Sustainability: Measure Room Ready Time (RRT) and Total Turnover Time (TTT) pre- and post-intervention. Conduct regular briefings to reinforce the process and address challenges [73].
Workflow Modification: Computational Scheduling for Predictable Start Times
Inaccurate surgical scheduling is a root cause of delayed anesthesia starts and prolonged fasting times for animals. Computational and machine learning algorithms can significantly improve timing predictions.
Experimental Protocol: Implementing a Scheduling Algorithm
Objective: To improve the accuracy of surgical duration predictions, thereby optimizing OR utilization and ensuring on-time anesthesia starts.
Materials:
- Historical surgical data (e.g., procedure type, surgeon, actual procedure duration, patient characteristics).
- Scheduling software with algorithm integration capabilities [74] [72].
Methodology:
- Data Collection: Extract at least one year of historical data on stereotaxic procedures. Essential variables include: planned vs. actual start and end times, surgeon, specific procedure type (e.g., cortical array vs. deep brain implant), and animal identifier [72].
- Algorithm Selection/Training:
- Traditional Algorithm: Implement an algorithm that incorporates mean surgical duration, pooled standard deviation, and acceptable over/under-utilization limits. This can appropriately book ~76% of OR schedules [72].
- Machine Learning Model: For superior accuracy, train a model (e.g., regression tree, neural network) using the collected historical data. These models can use pre-operative variables to predict surgical time within 10 minutes for 50% of cases [72].
- Integration and Workflow Change: Integrate the chosen algorithm into the lab's scheduling system. Replace the practice of relying on surgeon estimates alone with the algorithm's output.
- Staff Reinforcement: Hold monthly meetings with all surgeons and staff to present performance indicators (on-time starts, utilization rates) and reinforce the importance of adhering to the optimized schedule using positive reinforcement [74].
- Continuous Monitoring: Track key performance indicators, including the percentage of surgeries starting within a 15-minute window of the scheduled time and OR occupancy rates during key morning hours [74].
Device Modification: Compact Stereotactic Systems for Streamlined Workflow
Traditional stereotactic base-frames are heavy, cumbersome, and can interfere with other equipment, potentially increasing setup and adjustment time. A compact, low-profile system can address these issues.
Experimental Protocol: Utilizing a Compact Stereotactic Platform
Objective: To reduce OR time and improve patient comfort through the use of a low-profile, skull-mounted stereotactic device platform.
Materials:
- Compact stereotactic device platform (e.g., 7.7 × 5.4 cm²) [75].
- Compatible surgical instruments and imaging localizer [75].
- 3D printing or conventional machining for fabrication [75].
Methodology:
- Pre-Surgical Planning: Pre-operatively, attach the device platform to the target skull location. This can be done as a separate, short procedure prior to the main surgical day [75].
- Imaging and Registration: Attach the MRI or CT localizer to the implanted platform and perform imaging. Use the acquired images for surgical trajectory planning [75].
- Surgical Intervention: On the day of electrode implantation, attach the compact targeting device to the pre-placed platform. This eliminates the need for placing a large, cumbersome frame on the day of surgery [75].
- Validation: The system has demonstrated a surgical targeting accuracy of 1.83 ± 0.15 mm and a total surgical time of 78.3 ± 5.4 min for bilateral electrode implantation, which is on par with conventional clinical systems [75].
Workflow Visualization
The following diagrams illustrate the logical relationships and workflows of the key efficiency strategies discussed.
Diagram 1: Pit-Stop Model Implementation Workflow
Diagram 2: Computational Scheduling Optimization
The Scientist's Toolkit: Research Reagent Solutions
Table 3: Essential Materials for Efficient Stereotaxic Surgery
| Item | Function in Protocol | Application Note |
|---|---|---|
| Compact Stereotactic System [75] | Low-profile, skull-mounted platform for accurate instrument guidance. | Reduces patient discomfort and OR clutter; enables pre-operative mounting for faster day-of-surgery setup. |
| High-Density Thin-Film Microelectrode Array [76] | Scalable, conformable array for neural recording/stimulation. | Designed for minimally invasive implantation (e.g., via cranial micro-slit), reducing surgical and anesthesia time. |
| 3D-Printed MRI-Compatible Head-Holder [77] | Non-metallic stereotactic frame for safe pre-operative MRI. | Allows for precise, individual-specific coordinate planning, increasing surgical accuracy and reducing target exploration time. |
| OR Black Box Platform [78] | System of sensors and AI to capture and analyze OR data. | Provides objective, data-driven insights into workflow inefficiencies, distractions, and error rates to guide targeted improvements. |
| Laminated Task Cards [73] | Visual cue for role definition and task allocation during turnover. | A low-resource, high-impact tool to ensure task completion without duplication or omission. |
Chronic neural interfaces are indispensable tools for fundamental neuroscience research and the development of therapeutic brain-computer interfaces (BCIs). A paramount challenge in this field is the maintenance of high-fidelity, single-neuron recordings over extended periods (months to years). A primary obstacle to this goal is the foreign body response (FBR) triggered by electrode implantation, which leads to glial scarring, neuronal death, and a progressive degradation of signal-to-noise ratio (SNR) [31]. This application note, framed within the context of stereotaxic surgery for electrode array implantation, details electrode-specific strategies and protocols designed to minimize insertion trauma and ensure chronic recording stability. By integrating advancements in materials science, electrode design, and surgical technique, researchers can significantly enhance the longevity and quality of neural recordings.
Electrode Design and Material Strategies
The physical and chemical properties of the electrode itself are critical determinants of the chronic FBR. The overarching design principle is to minimize the mechanical mismatch between the implant and the native brain tissue.
Material Flexibility and Biocompatibility
Traditional rigid probes (e.g., silicon, tungsten) exacerbate chronic inflammation through persistent micromotion at the tissue-device interface [31]. Emerging solutions focus on flexible substrates.
- Ultrathin, Flexible Arrays: Probes fabricated from polyimide or parylene-C are highly flexible, reducing mechanical strain on surrounding tissue. One study demonstrated a cortical 1,024-channel thin-film microelectrode array that is conformable and designed for minimally invasive deployment [76].
- Anti-Fouling Coatings: Applying ultrathin (<100 nm) polymer coatings via methods like photoinitiated Chemical Vapor Deposition (piCVD) can dramatically improve biocompatibility. A piCVD-applied poly(2-hydroxyethyl methacrylate-co-ethylene glycol dimethacrylate) coating provided superior protein resistance, maintained low electrical impedance, and in vivo resulted in a 66.6% reduction in gliosis and an 84.6% increase in neuronal preservation compared to uncoated probes. This coating also maintained stable signal quality for 3 months, with SNR improving from 18.0 to 20.7 [79].
Geometric and Structural Considerations
The size and shape of the electrode shank directly influence tissue displacement during insertion and the degree of chronic inflammation.
- Reduced Footprint: The development of "slim" or "ultra-slim" electrode arrays minimizes tissue displacement. Evidence from cochlear implants shows that slimmer, straighter electrode arrays are associated with superior preservation of residual hearing, a proxy for reduced trauma [80].
- Scalable, High-Density Designs: High-density microelectrode arrays (HD-MEAs) allow for a high number of recording sites on a single, minimally sized shank, reducing the number of insertions required for large-scale recording. CMOS-based technologies like Neuropixels exemplify this approach [31] [81].
Table 1: Quantitative Comparison of Electrode Designs and Their Impact on Chronic Stability
| Electrode Design Feature | Example/Description | Quantified Benefit/Performance | Source |
|---|---|---|---|
| piCVD Anti-fouling Coating | Poly(2-hydroxyethyl methacrylate-co-ethylene glycol dimethacrylate) | 66.6% reduced gliosis; 84.6% increased neuronal density; Stable SNR (18.0-20.7) over 3 months | [79] |
| Slim Straight Array (Cochlear Implant) | Cochlear Slim Straight Array (SSA) | Superior long-term preservation of residual hearing (PTA4, PTAlow) compared to perimodiolar arrays | [80] |
| Minimally Invasive µECoG Array | 1024-channel thin-film surface array | Implantable via 500-900 µm cranial "micro-slit" without craniotomy; >91% electrode yield; Reversible implantation | [76] |
| Modular & Adjustable Chronic Implant | 3D-printed implant for Neuropixels | Probe vertical adjustment with micron precision (0.3 mm pitch screw); Stable recording for 112 days in rats | [13] |
Experimental Protocols for Implantation and Validation
The following protocols provide a framework for surgically implanting neural electrodes while minimizing acute trauma and setting the stage for chronic stability.
Protocol: Stereotaxic Implantation of Flexible Probes
Objective: To safely implant a flexible electrode array into a targeted brain region, minimizing acute tissue damage and inflammation. Materials: Stereotaxic frame, flexible electrode array (e.g., Neuropixels), modular implant kit [13], precision screwdriver, bone drill, dura mater hook, artificial cerebrospinal fluid (aCSF), biocompatible adhesive (e.g., Kwik-Sil), and standard surgical tools.
Preoperative Planning:
- Use MRI/CT data to determine target coordinates.
- Sterilize all components of the modular implant kit and the electrode array.
- Assemble the implant system and pre-test the electrode functionality in vitro [13].
Surgical Preparation:
- Anesthetize the animal (rat/mouse) and secure its head in the stereotaxic frame.
- Perform a midline scalp incision, expose the skull, and level the skull surface.
- Mark the target craniotomy site based on stereotaxic coordinates.
Minimally Invasive Craniotomy:
- For surface arrays (µECoG), consider the "cranial micro-slit" technique: create a 500-900 µm wide incision in the skull using a precision sagittal saw, allowing subdural insertion without a full craniotomy [76].
- For penetrating arrays, perform a small-diameter (~1-2 mm) craniotomy using a drill. Keep the bone flap intact if possible.
- Carefully incise and reflect the dura mater to expose the brain surface. Continuously irrigate with aCSF to prevent drying.
Probe Insertion:
- For rigid probes: Lower the probe to the brain surface and advance it to the target depth at a slow, controlled speed (e.g., ~1-2 µm/s for Michigan-style probes) [31] [13].
- For flexible probes: Use a biodegradable shuttle (e.g., PEG) or a stiffening agent to temporarily rigidize the probe for insertion. Slowly advance the probe-shuttle assembly to the target depth. Retract or dissolve the shuttle, leaving the flexible probe in place [31].
Securing the Implant:
- Secure the probe's connector or the modular implant body to the skull using dental acrylic.
- Seal the craniotomy with silicone elastomer (e.g., Kwik-Sil) to prevent infection and stabilize the brain.
- Suture the skin incision around the implant base.
Protocol: Post-Implantation Adjustment and Chronic Monitoring
Objective: To optimize recording quality post-surgery and monitor long-term signal stability and tissue health. Materials: Neural data acquisition system (e.g., Open Ephys), precision microdrive [13] [82], histological tissue processing equipment.
Post-Operative Recovery: Monitor animals closely until fully recovered from anesthesia. Provide analgesia as per approved animal protocol.
Chronic Probe Adjustment:
- After initial implantation, allow the tissue to stabilize for 24-48 hours.
- Use a precision microdrive system (e.g., the Kepler screwdriver with a 0.3 mm pitch drive screw, enabling 0.012 mm vertical movement per full turn) to make fine adjustments to the probe depth [13]. This allows researchers to "search" for optimal neuronal signals while minimizing tissue irritation from large, rapid movements.
- Systems like the OptoDrive enable chronic adjustments in freely moving mice with 15 µm resolution, facilitating long-term single-unit tracking [82].
Functional Validation:
- Signal Quality Metrics: Regularly record neural activity. Calculate and track SNR and the number of isolatable single units over time. A stable or improving SNR is a key indicator of a healthy interface [79].
- Optogenetic Validation: In animals expressing opsins, use integrated optical fibers to stimulate neurons and confirm that recorded signals are driven by local circuit activity [82].
Histological End-Point Analysis:
- At the experiment's conclusion, perfuse the animal and extract the brain.
- Section the brain and perform immunohistochemical staining for:
- Compare these histological markers between implanted and contralateral control regions to quantify the FBR.
The following diagram illustrates the critical relationship between electrode properties, the biological response, and the ultimate functional outcome of recording stability.
Chronic Recording Stability Pathway
The Scientist's Toolkit: Essential Research Reagents and Materials
Table 2: Key Reagents and Materials for Chronic Neural Interface Research
| Item Name | Function/Application | Specific Example |
|---|---|---|
| piCVD Coating System | Applies ultrathin, conformal, and durable anti-fouling polymer coatings to electrode surfaces. | Poly(2-hydroxyethyl methacrylate-co-ethylene glycol dimethacrylate) for protein resistance and stable impedance [79]. |
| Modular 3D-Printed Implant | Holds and allows fine adjustment of high-density probes; customizable for different probes and recording systems. | Open-source implant kit compatible with Neuropixels, featuring a shuttle system and precision drive screw [13]. |
| Precision Microdrive | Enables fine vertical adjustment of electrodes post-implantation with micron-level resolution. | Kepler screwdriver (25:1 gear ratio) for 0.012 mm/step movement [13]; OptoDrive for mice (15 µm resolution) [82]. |
| Anti-GFAP Antibody | Immunohistochemical marker for reactive astrocytes; used to quantify glial scarring. | Standard primary antibody for visualizing and quantifying the glial scar around the implant track [31]. |
| Anti-Iba1 Antibody | Immunohistochemical marker for microglia; used to assess neuroinflammatory response. | Standard primary antibody for identifying and quantifying activated microglia near the implant site [76]. |
| Anti-NeuN Antibody | Immunohistochemical marker for neuronal nuclei; used to quantify neuronal survival. | Standard primary antibody for counting viable neurons in the vicinity of the implanted electrode [31]. |
| Biodegradable Shuttle | Temporarily rigidizes flexible probes for reliable insertion into brain tissue. | Polyethylene glycol (PEG) or other sucrose-based materials that dissolve upon contact with tissue [31]. |
Achieving stable chronic neural recordings requires a holistic approach that integrates electrode design, material science, and refined surgical practices. The strategies outlined herein—employing flexible, slim electrodes with biocompatible coatings, utilizing minimally invasive insertion techniques, and implementing chronic adjustment protocols—collectively address the challenge of the foreign body response. By systematically applying these electrode-specific considerations, researchers can significantly blur the distinction between man-made devices and natural tissue, paving the way for robust and transformative advances in basic neuroscience and clinical neurotechnology.
Confirming Success: Techniques for Validating Implantation and Comparing Technological Solutions
This application note provides a detailed protocol for the functional validation of implanted electrode arrays in the context of stereotaxic surgery research. It focuses specifically on the recording and analysis of auditory-driven and sensory-evoked neural activity, a critical step for confirming targeting accuracy and circuit functionality in studies involving the auditory cortex and associated sensory pathways. The ability to record precise, stimulus-locked neural responses is fundamental for research in systems neuroscience, neuromodulation, and the development of novel neurotherapeutics. The methodologies outlined herein are designed to provide researchers with a robust framework for acquiring high-quality, interpretable data on neural network dynamics in response to controlled sensory stimuli [83] [84].
Key Experimental Workflows
The following diagrams outline the core experimental and data analysis workflows for validating sensory-evoked neural activity.
Diagram 1: Stereotaxic Surgery & Sensory Validation Workflow
Diagram 2: Neural Data Processing Pipeline
Research Reagent Solutions & Essential Materials
Table 1: Key Research Reagents and Materials for Sensory-Evoked Neural Recording
| Item | Function / Explanation |
|---|---|
| Multi-electrode Arrays | High-density electrodes for simultaneous recording from populations of neurons in targeted brain regions such as the auditory cortex [85]. |
| Stereotaxic Frame | Provides precise, stable positioning for accurate implantation of electrode arrays into deep brain structures based on coordinate atlases. |
| Izhikevich Neuron Model | A computationally efficient spiking neuron model used to simulate and interpret the spiking and bursting behavior of cortical neurons in response to stimuli [86]. |
| DataHigh GUI | A MATLAB graphical user interface for visualizing high-dimensional neural population activity, including single-trial neural trajectories [85]. |
| Multifractal Analysis (MFDFA) | A mathematical tool for characterizing the higher-order statistics and long-range memory of neuronal interspike intervals, revealing network structure [86]. |
| Intravascular Electrodes | A less invasive recording technique using catheters to place microelectrodes in cortical and deep veins for high-fidelity brainwave recording [87]. |
| Somatosensory & Auditory Stimuli | Controlled sensory inputs (e.g., auditory tones, whisker deflections) used to evoke reproducible, time-locked neural activity for functional validation [83] [86]. |
Quantitative Parameters for Sensory Evoked Activity
Table 2: Key Quantitative Metrics for Analyzing Sensory-Evoked Network Activity
| Parameter | Description | Typical Measurement / Notes |
|---|---|---|
| Spindle Bursts | Synchronized, spindle-shaped oscillations in the neonatal barrel cortex in vivo [83]. | Local field potential (LFP) recordings; dominant pattern in neonatal rodents. |
| Gamma Oscillations | Faster rhythmic activity in a specific frequency range [83]. | Local field potential (LFP) recordings; represents a distinct pattern of early network activity. |
| Fano Factor | A measure of spike count variability relative to a Poisson process [86]. | Decreases sharply following stimulus onset, indicating a transition to more deterministic, stimulus-driven spiking. |
| q-order Hurst Exponent (H(q)) | A multifractal metric derived from interspike intervals (ISIs) that characterizes long-range memory and higher-order statistical behavior in spiking dynamics [86]. | Sensitive to underlying network connectivity and topology; robust to changes in stimulus strength. |
| Multifractal Spectrum | A plot of the singularity dimension (f(α)) against the singularity exponent (α), describing the heterogeneity of local scaling properties in a time series [86]. | Used to characterize the complexity of neuronal spiking dynamics and infer functional network architecture. |
| Somatosensory Evoked Potentials (SEPs) | Electrical potentials recorded in response to stimulation of peripheral sensory nerves [87]. | Can be recorded via intravascular electrodes; larger responses are evoked by stimulating the contralateral side. |
Detailed Experimental Protocols
Protocol: Stereotaxic Implantation for Auditory Cortex Recording
Objective: To precisely implant a multi-electrode array into the auditory cortex for recording stimulus-evoked activity.
Materials:
- Stereotaxic apparatus
- Anesthesia system (e.g., isoflurane)
- Drill for craniotomy
- Target electrode array
- Sterile surgical tools
- Bone wax and tissue adhesive
Procedure:
- Anesthesia and Fixation: Induce and maintain surgical-level anesthesia in the rodent model. Secure the animal's head in the stereotaxic frame using ear bars and a nose clamp, ensuring stability and alignment.
- Stereotaxic Targeting: After a midline incision and cranial exposure, identify Bregma. Calculate the precise anteroposterior (AP) and mediolateral (ML) coordinates for the primary auditory cortex based on a brain atlas. The dorsoventral (DV) coordinate targets the cortical layers of interest.
- Craniotomy and Implantation: Perform a small craniotomy at the calculated coordinates. Lower the electrode array slowly to the target DV depth using a microdrive.
- Fixation: Secure the electrode array and its connector to the skull using tissue adhesive and dental acrylic.
- Post-operative Care: Monitor the animal until full recovery from anesthesia, providing post-operative analgesics as required. Allow a minimum recovery period of 5-7 days before commencing neural recording sessions.
Protocol: Recording Auditory-Evoked Network Activity
Objective: To record and characterize neural population activity in the auditory cortex in response to controlled auditory stimuli.
Materials:
- Implanted electrode array and recording system
- Data acquisition software
- Calibrated speaker system
- Sound-attenuating chamber
Stimulus and Recording Procedure:
- Stimulus Design: Generate a transient auditory stimulus, such as a pure tone (e.g., 10 kHz, 70 dB SPL, 100 ms duration) or a brief white noise burst. A log-normal function over time can mimic thalamic inputs to the sensory cortex [86].
- Experimental Setup: Place the awake, head-fixed animal in a sound-attenuating chamber. Connect the implanted electrode array to the pre-amplifier and data acquisition system.
- Trial Structure: Present the auditory stimulus repeatedly (e.g., 50-100 trials) with a random inter-trial interval (e.g., 2-4 seconds) to prevent habituation. Synchronize stimulus onset with neural data acquisition via a trigger signal.
- Data Acquisition: Record wideband neural signals (e.g., 0.1 Hz to 7.5 kHz sampled at 30 kHz) from all channels of the electrode array throughout each trial, capturing both the spontaneous baseline and the stimulus-evoked response period.
Protocol: Analysis of Single-Trial Population Dynamics
Objective: To extract latent variables from population activity and visualize the neural trajectories across different conditions.
Materials:
- Raw or preprocessed spike train data
- Computational software (e.g., MATLAB with DataHigh tool or Python)
- Dimensionality reduction algorithms (e.g., Gaussian-process factor analysis - GPFA)
Analysis Procedure:
- Preprocessing:
- Spike Sorting: Apply spike sorting algorithms to the raw wideband data to assign action potentials to individual neurons.
- Binning: For single-trial neural trajectory analysis, bin the spike trains into small, non-overlapping time bins (e.g., 1-20 ms) to create a population vector for each bin [85].
- Dimensionality Reduction:
- Use a method like GPFA to reduce the n-dimensional population activity (where n is the number of neurons) to a smaller number of latent variables (k < n) that capture the prominent co-fluctuation patterns across the neural population [85].
- Visualization with DataHigh:
- Input the single-trial neural trajectories into the DataHigh GUI.
- Use the interface to navigate through a continuum of 2-d projections of the k-dimensional latent space, observing how the neural population's state evolves over time on single trials in response to auditory stimuli [85].
- Validation: Confirm successful functional validation by identifying distinct, stimulus-locked neural trajectories that are reproducible across trials and differ significantly from spontaneous activity patterns.
Application Notes
Within a research program focused on stereotaxic surgery for electrode array implantation, functional maps of the cerebral cortex serve as critical benchmarks for validating surgical targeting and ensuring the functional relevance of recorded neural data. Tonotopic (frequency) and somatotopic (bodily) organization are two of the most robust and quantifiable functional architectures in the brain. This document provides detailed application notes and protocols for using these maps to physiologically validate electrode placements in the auditory and somatosensory cortices.
The Role of Functional Maps in Stereotaxic Research
Stereotaxic implantation of microelectrode arrays, for instance in the common marmoset, provides a powerful platform for studying brain function in awake, behaving primates [2]. However, the anatomical coordinates derived from atlases are subject to individual variability. Functional mapping before, during, or after implantation provides an essential validation step.
- Physiological Validation: Confirming that an electrode is located in a target structure, such as the primary auditory cortex (A1), requires more than anatomical placement; it requires demonstrating that the recorded neurons exhibit the known functional properties of A1, such as a systematic progression of characteristic frequency [88] [89].
- Electrode Localization: Post-implantation, tonotopic and somatotopic mapping paradigms can be used to assign each recording channel to a specific functional region (e.g., A1 versus rostral field) or a specific body part representation (e.g., digit D2 versus D3) [90].
- Quality Control: The presence of a well-ordered functional map is a strong indicator of healthy, undamaged neural tissue surrounding the electrode array. A disrupted map may suggest tissue damage or imprecise targeting.
Tonotopic Maps in Auditory Cortex
Tonotopy is the spatial arrangement of where sounds of different frequency are processed, a principle that begins in the cochlea and is maintained throughout the central auditory pathway [88]. In the cortex, multiple tonotopically organized fields are often arranged with mirror-symmetric gradients [89].
Key Features for Validation:
- Gradient Direction: In humans and non-human primates, the primary auditory cortex (A1 or hA1) and the rostral field (R or hR) often exhibit mirror-symmetric tonotopic gradients. For example, A1 may show a posterior-to-anterior low-to-high frequency gradient, while R shows the reverse [88] [89].
- Anatomical Landmark: In humans, the primary tonotopic map is located along Heschl's gyrus (HG), with gradients typically running perpendicular to the gyrus rather than parallel to it [89].
- Plasticity: Tonotopic maps are not entirely static. Exposure to specific frequencies during critical periods can shift neuronal "best frequencies" in animals like mice, demonstrating experience-dependent plasticity [88]. This must be considered when interpreting map stability.
Somatotopic Maps in Somatosensory Cortex
Somatotopy is the point-for-point correspondence of an area of the body to a specific point on the central nervous system, most famously represented in the primary somatosensory cortex (S1) as a sensory "homunculus" [91] [92].
Key Features for Validation:
- Spatial Magnification: The cortical territory dedicated to a body part is proportional to its sensory receptor density and functional importance (e.g., large areas for hands and lips) [92] [93].
- Map Discontinuities: The classic homunculus contains somatotopic discontinuities (e.g., the hand is located next to the face), which can serve as key landmarks for verifying map integrity [92].
- High-Resolution Mapping: Modern ultra-high field (7T) functional MRI (fMRI) allows for the differentiation of individual digit representations within the hand area of S1, enabling highly precise localization [90].
Table 1: Comparative Overview of Tonotopic and Somatotopic Maps
| Feature | Tonotopic Map (Auditory) | Somatotopic Map (Somatosensory) |
|---|---|---|
| Mapped Stimulus Dimension | Sound Frequency (Pitch) | Body Location (Touch) |
| Peripheral Origin | Basilar membrane of the cochlea [88] | Skin/body surface receptors [92] |
| Primary Cortical Location | Heschl's gyrus (Humans) [89] | Postcentral gyrus (S1) [92] |
| Key Organizational Principle | Gradient reversals indicate separate fields (e.g., A1 and R) [88] [89] | Body part adjacency with discontinuities (e.g., hand/face) [92] |
| Validation Role in Electrophysiology | Confirm placement in core auditory fields by identifying characteristic frequency gradients. | Confirm placement in S1 and identify the specific body part representation being recorded from. |
Experimental Protocols
The following protocols are designed for use in a research setting, typically in conjunction with fMRI in human subjects or electrophysiological recording in animal models. They can be adapted for use during stereotaxic procedures to provide real-time functional feedback.
Protocol 1: fMRI Tonotopic Mapping in Human Auditory Cortex
This protocol is adapted from non-invasive human studies and exemplifies the principles that can be translated into invasive validation methods in animal models [94] [89].
1. Stimulus Design:
- Stimulus Type: Use narrowband stimuli (e.g., tone pips or amplitude-modulated noises) centered on specific frequency bands. Narrowband stimuli offer superior sensitivity to frequency-dependent responses compared to broadband sounds [94].
- Center Frequencies: Employ at least 4-6 logarithmically spaced center frequencies (e.g., 200, 400, 800, 1600, 3200, 6400 Hz) to adequately sample the frequency gradient [89].
- Presentation Paradigm: Use a block design or a slow, continuous "sweep" of frequencies. Stochastically alternating tone sequences can be effective for provoking robust cortical responses [89].
2. Data Acquisition and Analysis:
- fMRI Parameters: Acquire data on a high-field scanner (3T or higher). Use sparse imaging sequences to avoid interference of scanner noise with the auditory stimuli [89].
- Analysis: For each voxel, fit a tuning function to determine its "best frequency" (BF). Project these BF values onto a reconstructed model of the cortical surface.
- Map Interpretation: Identify regions of Heschl's gyrus showing a systematic progression of BFs. Look for adjacent regions with mirror-reversed gradients (e.g., low-high-low) to demarcate core auditory fields like hA1 and hR [89].
Table 2: Example Stimulus Parameters for Tonotopic Mapping
| Parameter | Specification | Rationale |
|---|---|---|
| Stimulus Type | Narrowband tones or amplitude-modulated noise | Optimizes sensitivity to frequency tuning [94] |
| Frequency Bands | 6 bands, center frequencies from 200 Hz to 6400 Hz (log scale) | Adequately samples the human hearing range [89] |
| Stimulus Duration | 80 ms tone bursts, 20 ms inter-stimulus interval | Mimics stimuli used in established protocols [89] |
| Presentation | Blocks of 8-10 sec per frequency, randomly interleaved | Allows for robust hemodynamic response modeling |
Protocol 2: High-Resolution Somatotopic Mapping of the Hand
This protocol, based on ultra-high field fMRI work, details how to map the individual digit representations in S1, providing a high-precision benchmark [90].
1. Stimulus Design:
- Stimulus Type: Use a vibrotactile stimulator to deliver precise tactile stimuli to the fingertips.
- Paradigm: Employ a "travelling wave" paradigm. Stimulate each digit (D1-D5) in a repeating sequence (e.g., D1->D2->D3->D4->D5->D1...). The slow periodic stimulation creates a phase-locked hemodynamic response [90].
- Control: Ensure stimulation is isolated to the digit and does not cause movement of adjacent digits or the hand.
2. Data Acquisition and Analysis:
- fMRI Parameters: Acquire data using a 7T MRI scanner with a high-resolution acquisition protocol to resolve small cortical columns.
- Analysis: Perform a phase analysis of the BOLD signal relative to the stimulus sequence. The phase at which a voxel responds most strongly indicates its preferred digit location in the sequence. This allows for the creation of a continuous map of digit representation across the postcentral gyrus.
- Atlas Creation: Data from multiple subjects can be combined to create a probabilistic atlas of digit representation, quantifying the typical layout and its variability [90].
The Scientist's Toolkit: Research Reagent Solutions
Table 3: Essential Materials for Functional Mapping and Validation
| Item | Function/Application |
|---|---|
| Multi-frequency Audio Generator & Calibrated Earphones | Precisely presents auditory stimuli at controlled frequencies and intensities for tonotopic mapping [89]. |
| Vibrotactile Stimulators (e.g., piezoelectric) | Delivers controlled, localized tactile stimulation to specific body parts (e.g., digits) for somatotopic mapping [90]. |
| Stereotaxic Surgical System | Provides precise, atlas-guided targeting for implantation of microelectrode arrays in animal models [2]. |
| Microelectrode Arrays | Records neural activity (spikes and local field potentials) from multiple cortical sites simultaneously in awake, behaving animals [2]. |
| Ultra-High Field (7T) MRI Scanner | Enables high-resolution functional imaging necessary for differentiating fine-scale maps like individual digits in S1 [90]. |
Workflow and Logical Diagrams
Functional Validation Workflow for Stereotaxic Implantation
The following diagram outlines the logical workflow for using functional maps to validate electrode array placements.
Logic of Tonotopic Map Interpretation
This diagram illustrates the logical process of interpreting recorded neural data to identify distinct auditory fields based on tonotopic gradient reversals.
Accurately correlating electrophysiological data with anatomical structures is a fundamental requirement in neuroscience research. Post-mortem histological verification provides the definitive link between the physiological responses recorded during experiments and their precise origins within the brain. For researchers utilizing stereotaxic surgery for electrode array implantation, this process enables the confirmation of targeting accuracy, particularly for deep brain structures or small nuclei where slight deviations can compromise experimental outcomes. This protocol details established and emerging methodologies for locating electrode tracks and lesion sites, emphasizing techniques that balance spatial resolution with tissue preservation.
Key Verification Methods and Their Characteristics
The choice of verification method depends on the experimental requirements, including the desired spatial resolution, the chronicity of the implant, and the need to minimize tissue damage. The following table summarizes the core quantitative parameters of contemporary verification techniques.
Table 1: Comparison of Post-mortem Histological Verification Methods
| Method | Typical Mark Size | Key Agent/Technique | Detection Method | Tissue Damage | Longevity In Vivo | Key Advantages |
|---|---|---|---|---|---|---|
| Tungsten Deposition [95] | 10-100 µm | Tungsten oxide from biphasic current | Dark-field microscopy after Nissl staining | Low | At least 2 years | Fine-scale, minimal damage, long-lasting |
| Electrolytic Microlesion [95] | ~100 µm | DC current-induced tissue damage | Tissue gliosis and damage in stained sections | High | N/A | Long-established, widely used |
| Fluorescent Diye Coating [95] | Track of electrode path | Fluorescent dye coated on electrode | Fluorescence microscopy | Low | Short (e.g., ≤ 48 hours) | Easy implementation, no tissue damage |
| Iron Deposition (e.g., from Steel Electrodes) [95] | ~100 µm | Iron ions from anodic current | Prussian Blue or other histochemical staining | Moderate (can be reduced with biphasic current) | Varies | Compatible with common steel electrodes |
| CT-Based Localization [96] [97] | N/A (Relies on electrode visualization) | Pre- and post-operative micro-CT scanning | Co-registration with MRI and atlas | N/A (Imaging technique) | N/A | Enables in vivo verification, good for deep structures |
Detailed Experimental Protocols
Tungsten Oxide Deposition Marking
This protocol describes a fine-scale marking technique for tungsten microelectrodes, generating durable marks with minimal tissue damage, ideal for chronic experiments [95].
Materials Required:
- Conventional tungsten microelectrodes
- Constant-current stimulator capable of delivering biphasic pulses
- Standard histological equipment for perfusion, sectioning, and Nissl staining (e.g., Cresyl Violet)
- Dark-field microscope
Procedure:
- Electrode Placement: Upon completion of the final recording session from the target site, leave the tungsten electrode in place.
- Current Application: Connect the electrode to the constant-current stimulator. Apply biphasic current pulses through the electrode. The typical parameter is 40–50 μA for a duration of several minutes [95].
- Mechanism: The anodic phase of the current pulse generates an insoluble tungsten oxide film at the electrode tip. The subsequent cathodic phase detaches this oxide via bubble formation, depositing it in the surrounding tissue [95].
- Perfusion and Histology: Following a survival period appropriate for the experiment (this method has been validated for periods up to two years [95]), transcardially perfuse the animal with fixative. Extract the brain, process for cryo- or paraffin-sectioning, and stain the sections with a Nissl stain such as Cresyl Violet.
- Visualization: Observe the sections under a dark-field microscope. The deposited tungsten oxide appears as a bright red marking against the background, with a size corresponding to the electrode tip (10–100 µm) [95].
CT-MRI Fusion for In Vivo Localization
This protocol allows for the non-invasive verification of implant location in vivo, which can be correlated with post-mortem histology. It is particularly valuable for complex implants targeting multiple structures [96].
Materials Required:
- Micro-CT scanner (capable of ~35 µm resolution for pre-op and ~19 µm for post-op)
- MRI scanner
- Surgical and stereotaxic equipment
- Software for 3D image co-registration (e.g., 3D Slicer, FSL)
Procedure:
- Pre-operative Scanning: Anesthetize the animal and secure it in a specialized isoflurane mask within the micro-CT scanner. Acquire a pre-operative CT scan at a lower resolution (e.g., 35 µm) to visualize skull sutures and bone landmarks at a low radiation dose [96].
- Image Leveling: Align the pre-operative CT image with the standard stereotaxic coordinate system (e.g., Paxinos atlas). Level the sagittal plane using Bregma and Lambda, and use symmetrical cranial structures to level the horizontal and coronal planes [96].
- Surgery and Implantation: Perform the stereotaxic surgery to implant the chronic electrode array or optic fiber as planned.
- Post-operative Scanning: After a recovery period (e.g., 4-12 days), acquire a high-resolution post-operative CT scan (e.g., 19 µm). Position the animal to minimize metal shadow artifacts from the implant [96].
- Image Co-registration:
- Co-register the post-operative CT scan with the pre-operative scan by matching bone structures.
- Segment the implant from the post-operative CT data using an intensity threshold.
- Co-register a pre- or post-operative MRI scan with the CT data to provide soft-tissue contrast.
- Map the segmented implant trajectory and tip onto the MRI and the standard brain atlas to determine its stereotaxic coordinates [96].
Diagram 1: CT-MRI fusion workflow for in vivo verification.
Optimized Histological Analysis and Color Detection
The accurate interpretation of stained histological sections is paramount. The following workflow and considerations enhance the detection and analysis of marks and tracks.
Diagram 2: Standard post-mortem histology workflow.
For immunohistochemically stained images, particularly common Hematoxylin and DAB (H-DAB) stains, digital color optimization can significantly improve the perceptual contrast for a human observer. The native blue-brown color map of H-DAB is suboptimal for human visual perception [98].
Color Optimization Protocol [98]:
- Image Acquisition: Capture the histological image as a standard RGB file.
- Stain Separation: Use an optimized color deconvolution algorithm to separate the image into its two distinct stain channels (e.g., Hematoxylin and DAB).
- Color Map Extraction: Extract the original bivariate color map inherent in the image from the intensity information of both channels.
- Color Map Replacement: Create a new, perceptually linear color map designed for optimal distinguishability. Replace the original color of each pixel with the corresponding value from the new, optimized color map. This digital re-staining can improve perceptual contrast by a factor of more than 2 [98].
The Scientist's Toolkit
Table 2: Essential Reagents and Materials for Histological Verification
| Item | Function/Application | Example/Specification |
|---|---|---|
| Tungsten Microelectrodes | The substrate for creating tungsten oxide marks via biphasic current [95]. | Conventional sharpened tungsten wire. |
| Biphasic Current Stimulator | Generates the specific current waveform required for tungsten oxide deposition without excessive tissue damage [95]. | Constant-current isolator capable of delivering 40-50 μA pulses. |
| Cresyl Violet (Nissl Stain) | Standard histological stain used to counterstain tissue and visualize the bright red tungsten oxide mark under dark-field [95]. | 0.1-1.0% solution in acetate buffer. |
| Micro-CT Scanner | High-resolution X-ray imaging for visualizing bone landmarks and radiopaque implants in vivo [96] [97]. | Resolution of 19-35 µm for mouse/rat brains. |
| Prussian Blue Stain Kit | Histochemical stain used to detect ferric (Fe³⁺) ions deposited by steel or elgiloy electrodes [95]. | Commercial kit containing potassium ferrocyanide and acid. |
| Image Co-registration Software | Aligns pre- and post-op CT scans, MRI data, and atlas coordinates to determine implant location in 3D space [96]. | 3D Slicer, FSL, or custom tools (e.g., ct-tools [97]). |
| Flexible Depth Electrodes | Modern high-channel-count electrodes that cause less chronic tissue damage, improving signal quality and histological outcome [99]. | µSEEG arrays based on polyimide or parylene-C [99]. |
Stereotaxic surgery is a cornerstone technique in neuroscience research, enabling precise access to specific brain regions for interventions such as electrode array implantation. The evolution from traditional manual systems to digital and fully robotic platforms represents a significant advancement, aiming to enhance accuracy, reproducibility, and experimental throughput. This comparative analysis provides a structured evaluation of manual, digital, and fully robotic stereotaxic systems, with a specific focus on their application in chronic electrode implantation research. The content is framed within a broader thesis investigating the optimization of stereotaxic techniques for neural recording and stimulation studies, providing researchers and drug development professionals with clear performance data and standardized protocols to inform their experimental design.
Quantitative Comparative Analysis of Stereotaxic Platforms
The selection of a stereotaxic system is often guided by quantitative metrics of performance. The table below summarizes key performance characteristics based on empirical data from the literature.
Table 1: Performance Comparison of Stereotaxic System Types
| System Type | Targeting Accuracy (mm) | Procedure Time | Key Advantages | Primary Limitations |
|---|---|---|---|---|
| Manual Systems | 1.00 - 2.00 [100] [101] | Baseline (Longest) | Low cost, high customizability, simple operation [102] | Susceptible to human error, steep learning curve, user-dependent reproducibility [66] |
| Digital & Patient-Specific | 0.51 - 0.69 [100] | Significant reduction (e.g., ~2 hours) [100] | High customizability, excellent accuracy, no intraoperative adjustments needed [100] | Requires pre-operative imaging and design, lead time for fabrication [100] |
| Fully Robotic Platforms | 0.20 - 1.38 [103] [66] | ~21.7% reduction vs. manual [15] | Superior ergonomics, eliminates hand tremor, integrated planning software, high throughput [103] [101] [104] | High initial cost, complex setup, requires technical training [103] |
Experimental Protocols for Electrode Array Implantation
The following protocols detail standardized methodologies for electrode implantation using each system type, which can be cited as reference procedures in a thesis.
Protocol for Manual Stereotaxic Implantation
This protocol is adapted from conventional techniques used in chronic implant studies [13] [102].
- Animal Preparation and Skull Exposure: Anesthetize the rodent (e.g., using isoflurane) and secure it in the stereotaxic frame using ear and bite bars. Maintain body temperature at ~37°C using a heating pad throughout the procedure to ensure survival and stable physiology [15]. Apply ophthalmic ointment, shave the scalp, and disinfect the surgical site. Make a midline incision to expose the skull and clean the surface.
- Skull Leveling and Coordinate Identification: Using the manual micromanipulator, position a needle tip over the Bregma landmark. Record the coordinates. Repeat for the Lambda landmark. Adjust the animal's head position until the dorsal-ventral (DV) coordinates at Bregma and Lambda differ by less than 0.05 mm, ensuring a "skull-flat" position [66].
- Target Calculation and Drill Guide Placement: Using the stereotaxic atlas, calculate the Anterior-Posterior (AP) and Medial-Lateral (ML) offsets from Bregma to the target. Move the drill guide to the calculated (AP, ML) coordinate.
- Craniotomy and Electrode Implantation: Perform a small craniotomy at the target site. Calculate the final DV coordinate from the brain surface. Slowly lower the electrode array to the target depth using the micromanipulator. Avoid lateral movements and control the insertion speed to minimize tissue damage [13].
- Fixation and Closure: Secure the electrode array to the skull using dental acrylic. Suture the surgical incision and administer post-operative care.
Protocol for Robotic Stereotaxic Implantation
This protocol leverages an automated system for enhanced precision and workflow efficiency [103] [66] [104].
- Pre-operative Planning and System Setup: Acquire a pre-operative MRI/CT scan and import the data into the robotic system's software. Register the image data to the stereotaxic atlas within the software. Define the target coordinates for electrode implantation and any obstacle zones (e.g., blood vessels) virtually.
- Automatic Skull Registration and Alignment: Secure the anesthetized animal in a specialized holder on the robotic platform. The system's 3D profiler (e.g., using structured illumination) will automatically scan the skull surface and reconstruct a 3D model [66]. The software identifies Bregma and Lambda, and the robotic platform autonomously adjusts the animal's position to achieve the "skull-flat" orientation.
- Robotic-Guided Craniotomy and Implantation: The system's robotic arm automatically moves the surgical drill to the planned (AP, ML) coordinate and performs a craniotomy. The arm then exchanges the drill for the electrode holder and advances the electrode to the target DV depth at a controlled, pre-defined speed.
- Real-time Verification and Fixation: Optionally, use intraoperative imaging (e.g., MRI) for real-time confirmation of electrode placement [103]. Secure the electrode with dental acrylic and proceed with wound closure.
System Selection Workflow
The following diagram illustrates the decision-making logic for selecting an appropriate stereotaxic system based on research requirements.
The Scientist's Toolkit: Essential Research Reagents and Materials
Successful chronic electrode implantation relies on a suite of specialized materials and reagents. The following table details key components for a typical experiment.
Table 2: Essential Research Reagents and Materials for Chronic Electrode Implantation
| Item | Function/Application | Specific Examples / Notes |
|---|---|---|
| Stereotaxic Frame | Provides a stable platform for precise head fixation and instrument guidance. | Manual frames (e.g., Kopf), motorized robotic systems (e.g., Neurostar StereoDrive) [104]. |
| Electrode Array | Records neural activity or delivers electrical stimulation. | Chronic implants like Neuropixels probes; designs may include modular shuttles for vertical adjustment [13]. |
| Surgical Consumables | Support the aseptic surgical procedure and implant fixation. | Dental acrylic cement, bone screws, sterilants (e.g., ethanol, betadine) [13] [100]. |
| 3D-Printed Implant Components | Customizable interfaces for securing electrodes to the skull. | Modular headstage interfaces, implant bodies, and protective caps printed from materials like PA12 or PLA [13] [100]. |
| Precision Tools | Enable fine adjustment and manipulation during surgery. | Custom screwdrivers with planetary gears (e.g., Kepler screwdriver) for micron-level electrode adjustment post-implantation [13]. |
| Anesthesia & Analgesia | Ensure animal welfare and compliance with ethical guidelines. | Isoflurane for inhalation anesthesia, injectable analgesics (e.g., buprenorphine) for post-operative pain management [15]. |
The efficacy of neuroscientific research and the reliability of clinical brain-computer interfaces (BCIs) fundamentally depend on the consistent performance of implanted microelectrode arrays. These arrays serve as the critical bridge for recording neural activity and delivering therapeutic stimulation. Evaluating their performance through quantitative metrics—signal-to-noise ratio (SNR), electrode yield, and long-term longevity—is therefore paramount for experimental planning, device selection, and data validation. This document provides detailed application notes and protocols for the systematic evaluation of these key performance metrics, framed within the context of stereotaxic implantation surgery for both basic and translational research.
Performance Metrics and Quantitative Benchmarks
A comprehensive evaluation of electrode arrays requires a multi-faceted approach, analyzing performance across different temporal, species, and material contexts. The data below, synthesized from recent clinical and pre-clinical studies, provides critical benchmarks for researchers.
Table 1: Long-term Performance of Utah Arrays in Clinical and Pre-clinical Studies
| Study / Model | Average Lifespan | Key Yield Metrics | Longevity Highlights |
|---|---|---|---|
| BrainGate Clinical Trial (n=14 participants) [105] | Mean enrollment: 2.8 years (up to 7.6 years) | • 35.6% of electrodes recorded neural spiking.• Only 7% decline in yield over study enrollment. | 11 of 14 arrays provided meaningful movement decoding throughout the study. |
| Non-Human Primate & Human Subjects (n=55 arrays) [106] | 622 days average recording availability. | N/A | Arrays could last over 1000 days; one array functioned for ~9 years. Human implants lasted longer than NHP implants. |
| LCP-based Electrode Arrays (Accelerated Aging) [107] | Projected 14 years in body. | Stable impedance and low leakage current after accelerated testing in 87°C saline for 158 days. | Demonstrates the exceptional potential of Liquid Crystal Polymer (LCP) encapsulation for chronic stability. |
Table 2: Material and Design Impact on Array Performance
| Performance Factor | Impact on Metrics | Evidence from Literature |
|---|---|---|
| Electrode Metallization | Significantly affects recording quality and yield. | Iridium oxide (IrOx) metallization demonstrated superior yield compared to platinum [106]. |
| Substrate Material | Determines long-term reliability against moisture. | Liquid Crystal Polymer (LCP) shows exceptionally low moisture absorption (<0.04%), leading to projected lifespans of over a decade [107]. |
| Array Density & Interconnects | Increases risk of crosstalk, corrupting SNR and signal integrity. | High-density, closely-routed interconnects can lead to signal coherence that reflects routing layout rather than neural activity, especially in high-frequency bands (>300 Hz) [108]. |
Experimental Protocols for Performance Evaluation
Protocol: Chronic In-Vivo Assessment of SNR, Yield, and Longevity
This protocol is designed for the longitudinal tracking of electrode array performance following stereotaxic implantation in animal models or human clinical trials.
I. Objective To quantitatively monitor the signal-to-noise ratio, functional electrode yield, and longevity of an intracortical microelectrode array over a period of months to years.
II. Materials and Reagents
- Surgical Setup: Stereotaxic frame, isoflurane anesthesia system, active warming pad (e.g., PID-controlled heat bed to maintain 40°C and reduce mortality [15]), surgical tools, and drill.
- Implant: Utah Intracortical Multi-Electrode Array (UEA) or other microelectrode array.
- Neural Signal Acquisition System: Amplifier and data acquisition system capable of recording full-band neural data (e.g., 0.1 Hz to 7.5 kHz sampling rate).
- Software: For spike sorting and signal analysis (e.g., custom MATLAB or Python scripts).
III. Procedure
- Stereo-tactic Implantation: Perform the implantation surgery under aseptic conditions. The use of a modified stereotaxic header that integrates the impactor and electrode insertion tool can reduce operation time by 21.7%, minimizing anesthesia exposure [15].
- Data Acquisition: At regular intervals (e.g., weekly), record neural data from all electrodes on the array. For each session, acquire at least 30 minutes of spontaneous neural activity. The recording parameters should include:
- Sampling Rate: ≥ 30 kHz per channel for action potential resolution.
- Filtering: Broadband recording (e.g., 0.1 Hz - 7.5 kHz) or simultaneous recording of both Local Field Potential (LFP: 0.1-300 Hz) and spiking activity (300-5000 Hz).
- Signal Processing:
- Spike Detection: Apply a standard threshold (e.g., -4.5 times the root-mean-square of the bandpass-filtered signal) to detect putative spike waveforms on each channel.
- Spike Sorting: Use a semi-automated or automated algorithm (e.g., Kilosort, MountainSort) to cluster the detected waveforms into single units (SUA) and multi-units (MUA).
- Metric Calculation:
- Signal-to-Noise Ratio (SNR): For each sorted unit, calculate SNR as the ratio of the peak-to-peak amplitude of the average spike waveform to twice the standard deviation of the background noise.
- Functional Electrode Yield: Calculate the percentage of electrodes on the array that record at least one well-isolated single unit or multi-unit activity.
- Longevity Tracking: Plot the SNR and yield metrics for each electrode and the entire array as a function of time post-implantation.
IV. Data Analysis and Interpretation
- Track the decay of average SNR and yield over time to estimate the functional lifespan of the array.
- Correlate performance decay with histological analysis of the tissue response post-mortem.
Protocol: Identification and Correction of Signal Crosstalk
As electrode density increases, crosstalk becomes a critical confounder for signal fidelity. This protocol outlines steps to identify and correct for crosstalk contamination.
I. Objective To detect the presence of crosstalk between closely-routed electrode channels and apply a back-correction algorithm to recover the ground-truth signals.
II. Materials and Reagents
- Implant: High-density microelectrode array with known routing layout.
- Acquisition System: Standard neural signal acquisition system.
- Software: Computational environment (e.g., MATLAB, Python) for signal coherence analysis and crosstalk modeling.
III. Procedure
- Data Acquisition: Record evoked neural activity (e.g., Somatosensory Evoked Potentials (SEPs)) while knowing the precise location of the stimulus.
- Signal Coherence Analysis:
- Compute the signal coherence between all pairs of channels in the high-frequency multi-unit activity (MUA) band (e.g., >300 Hz).
- Generate a coherence map relative to a reference electrode placed at the stimulation site.
- Crosstalk Identification:
- Compare the coherence map with the physical routing layout of the electrode array.
- A positive finding for crosstalk is indicated if channels with high coherence are physically adjacent in the routing layout, even if their recording sites on the cortex are far apart [108].
- Crosstalk Correction:
- Develop an electrical model of the recording chain, from the electrode-tissue interface to the amplifier, based on impedance spectroscopy measurements.
- Use this model to simulate the expected crosstalk levels between channels.
- Apply a crosstalk back-correction algorithm to subtract the estimated coupled signal from each channel, effectively reducing the coherence between closely-routed lines [108].
IV. Data Analysis and Interpretation
- A drop in coherence between closely-routed channels after correction corroborates crosstalk contamination.
- This protocol should be a standard part of data quality control for high-density arrays.
The Scientist's Toolkit: Essential Research Reagents and Materials
Table 3: Key Materials for Stereotaxic Surgery and Electrode Array Evaluation
| Item | Function/Application | Specific Example / Benefit |
|---|---|---|
| Utah Array (UEA) | Standard for chronic single-neuron recording in motor cortex for BCI. | FDA-cleared for investigational use; extensive longevity data available [106] [105]. |
| High-Density CMOS MEA | In-vitro and ex-vivo recording at subcellular to network levels. | Allows recording from >200,000 electrodes; high spatial resolution for mapping neural pathways [81]. |
| Liquid Crystal Polymer (LCP) | Substrate/encapsulation for long-term implants. | Low moisture absorption ensures device longevity (>10 years projected) [107]. |
| Iridium Oxide (IrOx) | Electrode tip metallization. | Superior recording yield and charge injection capacity compared to platinum [106]. |
| Active Warming Pad | Maintains normothermia during rodent surgery. | PID-controlled heat bed significantly improves post-surgical survival rates [15]. |
| Modified Stereotaxic Header | Integrated tool for TBI and electrode implantation. | 3D-printed header reduces surgery time, minimizing anesthesia complications [15]. |
| Crosstalk Back-Correction Algorithm | Software for signal integrity validation. | Corrects for signal contamination in high-density arrays, crucial for data fidelity [108]. |
Workflow and Signaling Diagrams
Electrode Array Evaluation Workflow
The following diagram outlines the logical workflow for the comprehensive evaluation of an implanted electrode array, from surgical preparation to final data interpretation.
Signal Contamination and Correction Pathway
This diagram illustrates the pathway of signal contamination through crosstalk and the subsequent correction process to recover the true neural signal.
The field of stereotaxic surgery for electrode array implantation is undergoing a rapid transformation, driven by technological convergence and escalating market demand. The global intracranial electrode market, valued at USD 538.20 million in 2024, is projected to reach USD 964.77 million by 2032, growing at a Compound Annual Growth Rate (CAGR) of 6.70% [109]. Similarly, the broader implantable neural probes market anticipates a rise from USD 1.5 billion in 2024 to USD 4.2 billion by 2033, at a formidable CAGR of 15.5% [110]. This growth is strategically fueled by an increasing prevalence of neurological disorders, advances in brain mapping technologies, and the rising adoption of precision neurosurgical techniques [109] [111]. For researchers and drug development professionals, this landscape presents both unprecedented opportunities and a complex vendor ecosystem to navigate. This application note provides a detailed 2025 outlook on key providers and strategic technologies, framed within the context of stereotaxic surgery for electrode array implantation research, to inform strategic experimental planning and procurement decisions.
The neurotechnology market is characterized by robust growth and distinct regional dynamics. North America currently dominates, generating 41.34% of the neurotechnology brain-computer interface market revenue in 2024, anchored by robust regulatory pathways and significant venture funding [111]. However, the Asia-Pacific region is the growth frontrunner, expected to expand at a CAGR of 17.32%, driven by state funding, rapid industrial growth, and a rising burden of neurological conditions [111] [112].
Table 1: Global Market Outlook for Key Neurotechnology Segments (2024-2033)
| Market Segment | Market Size (2024) | Projected Market Size (2033) | CAGR | Primary Growth Drivers |
|---|---|---|---|---|
| Intracranial Electrodes | USD 538.20 Million [109] | USD 964.77 Million [109] | 6.70% [109] | Rising neurological disorders, precision neurosurgery adoption [109] |
| Implantable Neural Probes | USD 1.5 Billion [110] | USD 4.2 Billion [110] | 15.5% [110] | AI/ML integration, expanding neuroprosthetic applications [110] |
| Micro Electrode Arrays (Overall Market) | USD 1.5 Billion [113] | USD 3.2 Billion [113] | 9.2% [113] | Drug discovery focus, rise of neurological disorders [113] |
| Neurosurgery Market | USD 3.45 Billion [112] | USD 5.33 Billion [112] | 4.45% [112] | Aging population, minimally invasive procedure demand [112] |
Several macro-trends are shaping the strategic direction of the market. There is a pronounced shift towards higher-density electrode arrays (exceeding 1000 contacts) to achieve finer neural resolution [109]. The integration of Artificial Intelligence (AI) and Machine Learning (ML) is revolutionizing data analysis, enabling real-time neural decoding and adaptive neurostimulation [111] [110]. Furthermore, the industry is moving towards hybrid diagnostic and therapeutic systems that combine recording and stimulation capabilities in a single platform, facilitating closed-loop therapies for conditions like epilepsy [109]. Finally, a strong emphasis on minimally invasive implantation techniques, including robotic surgery, aims to reduce procedure times and improve patient outcomes [109] [112].
Key Provider and Technology Landscape
The vendor ecosystem for electrode arrays can be segmented into established medical technology leaders, specialized monitoring companies, and innovative BCI pioneers. The following table details key providers and their strategic technological focus.
Table 2: Key Providers and Strategic Technologies for Electrode Arrays (2025 Outlook)
| Company | Core Specialization | Key Product / Technology | Strategic Technological Advantage |
|---|---|---|---|
| AD-TECH Medical | Intracranial Monitoring | Depth electrodes, cortical grid electrodes [109] | High-density cortical grids (up to 256 contacts), MRI-compatible designs [109] |
| PMT Corporation | Epilepsy Monitoring | SEEG depth electrodes, subdural strips [109] | Helix depth electrode design, superior signal clarity for long-term EEG [109] |
| NeuroPace | Responsive Neurostimulation | RNS System with implantable electrodes [109] | Closed-loop system with real-time seizure detection and automated stimulation [109] |
| Medtronic | Neuromodulation | Deep Brain Stimulation (DBS) electrodes [109] | Directional lead technology, MRI conditional systems [109] |
| Blackrock Neurotech | Brain-Computer Interfaces | Utah Array, implantable neural probes [113] [111] | High-channel-count arrays for clinical and research BCI applications [113] |
| NeuroScan | EEG Hardware | Research and clinical EEG systems [114] | One of the oldest and most published providers of EEG products [114] |
| Brain Products | EEG Hardware | High-density EEG headsets (up to 160 channels) [114] | Dense headset arrays, tools compatible with fMRI and NIRS [114] |
| DIXI Medical | Stereoelectroencephalography | MicroDeep SEEG electrodes [109] | Precision contact spacing (5-10mm intervals) for detailed mapping [109] |
Vendor selection is increasingly influenced by technological differentiation. For foundational academic research, companies like NeuroScan and Brain Products provide established, publication-rich EEG platforms [114]. For advanced in vivo implantation studies, especially in epilepsy, specialists like AD-TECH Medical, PMT Corporation, and DIXI Medical offer clinically validated, high-fidelity electrodes [109]. For pioneering therapeutic and BCI research, companies like NeuroPace (closed-loop stimulation) and Blackrock Neurotech (high-density arrays) represent the cutting edge [109] [111]. The strategic vendor landscape is expected to see further consolidation, with larger players acquiring innovative startups to expand their technological portfolios [115].
Application Note: Protocol for In Vitro Neuropharmacology Screening Using Microelectrode Arrays (MEAs)
Background and Principle
The Microelectrode Array (MEA) technique is a non-invasive platform for recording extracellular field potentials from excitable tissues, predominantly used for in vitro neuropharmacology and neurotoxicity screening [116]. It allows long-term recording of network-level activity in cultured neuronal networks (NNs), providing a sensitive functional endpoint that detects effects of chemical perturbations before structural changes occur [117]. This protocol outlines a standardized method for assessing compound effects on neuronal electrophysiology, based on established, reproducible multi-laboratory practices [117].
Experimental Workflow
The following diagram illustrates the end-to-end workflow for a typical MEA-based screening experiment.
Detailed Methodology
Materials and Equipment
Table 3: Research Reagent Solutions for MEA-Based Screening
| Item | Function / Description | Example / Note |
|---|---|---|
| MEA Chips | Planar substrate with embedded microelectrodes for extracellular recording. | Commercially available from various suppliers; ensure compatibility with recording system. |
| Primary Neuronal Cells | Source of electrically active neuronal networks. | Commonly from rodent cortices or hippocampi; human iPSC-derived neurons are increasingly used [116]. |
| Culture Media | Supports growth, viability, and functional maturation of neuronal networks. | Serum-free medium supplemented with growth factors, as defined by standardized protocols [117]. |
| Reference Compounds | Pharmacological agents for assay validation and system calibration. | Fluoxetine (serotonin reuptake inhibitor), Muscimol (GABAA receptor agonist), Verapamil (calcium channel blocker) [117]. |
| Data Acquisition System | Amplifies, filters, and digitizes raw electrical signals from the MEA. | Integrated commercial systems (e.g., from Multi Channel Systems) or custom setups [116]. |
| Analysis Software | Extracts quantitative parameters from raw electrophysiological data. | Custom scripts or commercial software for spike detection, burst analysis, and network metrics [117]. |
Step-by-Step Procedure
- Cell Culture on MEA: Plate dissociated primary neuronal cells (e.g., from rat cortex) onto MEA chips pre-coated with an adhesion-promoting substrate like poly-D-lysine. Maintain cultures in serum-free medium under standard conditions (37°C, 5% CO₂) [117] [116].
- Culture Maturation: Allow neuronal networks to develop and mature for 3-4 weeks in vitro. During this period, spontaneous, synchronized electrophysiological activity (spikes and bursts) will emerge. Monitor cultures regularly using predefined acceptance criteria for network morphology and spontaneous activity to ensure experimental validity [117].
- Baseline Recording: Before compound application, record the spontaneous electrical activity of the NN for at least 10-15 minutes to establish a stable baseline. The recording should be conducted in a maintained environment at 37°C [117].
- Compound Application: Apply the test compound directly to the culture medium. A vehicle control should be run in parallel. The three reference compounds listed in Table 3 provide a mechanistic validation set:
- Fluoxetine: Serotonin reuptake inhibitor; expected to modulate synaptic activity.
- Muscimol: GABAA receptor agonist; expected to suppress spontaneous activity via enhanced inhibition.
- Verapamil: L-type calcium channel blocker; expected to reduce neuronal excitability [117].
- Post-Treatment Recording: Record neuronal activity for a minimum of 30 minutes after compound application to capture both acute and adaptive network responses [117].
- Data Analysis: Analyze recorded data to extract key electrophysiological parameters. The most sensitive and reproducible parameter is often the Mean Firing Rate (MFR) or Mean Network Spike Rate [117]. Additional parameters include:
- Number of spikes and bursts
- Mean Burst Rate (MBR)
- Burst duration and structure
- Interburst interval
- Statistical Analysis and IC₅₀ Calculation: Normalize the MFR from the post-treatment period to the baseline period. Use dose-response data to calculate the half-maximal inhibitory concentration (IC₅₀) for the compound. The expected IC₅₀ ranges for reference compounds from multi-laboratory studies are:
- Fluoxetine: 1.53 ± 0.17 to 5.4 ± 0.7 μM
- Muscimol: 0.16 ± 0.03 to 0.38 ± 0.16 μM
- Verapamil: 2.68 ± 0.32 to 5.23 ± 1.7 μM [117].
Application Note: Protocol for Preclinical Seizure Liability Assessment Using MEAs
Background and Principle
Seizure liability is a critical safety endpoint in drug development. The MEA platform offers a medium-throughput, physiologically relevant in vitro model for detecting compound-induced hyperexcitability in mature neuronal networks. This protocol utilizes acute hippocampal or cortical tissue slices combined with MEA recording, bridging the gap between reduced cell cultures and in vivo models [116].
Experimental Workflow
The workflow for seizure liability assessment in acute brain slices is outlined below.
Detailed Methodology
Materials and Equipment
Table 4: Essential Materials for MEA-Based Seizure Liability Assessment
| Item | Function / Description | |
|---|---|---|
| Acute Brain Slices | Preserves native cytoarchitecture and synaptic connectivity. | Typically 300-400 μm thick, prepared from juvenile or adult rodents. |
| Artificial Cerebrospinal Fluid (aCSF) | Physiological solution for slice maintenance and perfusion. | Oxygenated (95% O₂/5% CO₂) and containing ions (Na⁺, K⁺, Ca²⁺, Mg²⁺, Cl⁻, HCO₃⁻) and glucose. |
| Perfusion Chamber for MEA | Maintains slice viability during recording. | Provides continuous, oxygenated aCSF flow at a controlled temperature (32-34°C). |
| Pro-Convulsant Control | Positive control to validate assay sensitivity. | Compounds like 4-Aminopyridine (4-AP) or Bicuculline which reliably induce epileptiform activity. |
Step-by-Step Procedure
- Slice Preparation: Prepare acute hippocampal or cortical slices from the chosen species (e.g., mouse, rat) using a vibratome in ice-cold, oxygenated sucrose-based aCSF or standard aCSF to minimize anoxic damage [116].
- Slice Stabilization: Incubate slices in oxygenated aCSF at room temperature for at least one hour for recovery. Subsequently, position a single slice on the MEA recording chamber, which is continuously perfused with warm (32-34°C), oxygenated aCSF.
- Baseline Recording: Record spontaneous and evoked (if applicable) field potentials and multi-unit activity for a minimum of 20 minutes to establish a stable, non-epileptiform baseline.
- Compound Application: Perfuse the slice with the test compound, typically starting at a low concentration and progressing to higher concentrations in a cumulative manner. Include a positive control (e.g., 100 μM 4-AP) and a vehicle control in separate experiments.
- Data Recording and Analysis: Record electrical activity for a sufficient duration at each concentration to capture developing epileptiform patterns. Key analysis parameters include:
- Latency to onset of epileptiform activity.
- Spike frequency within epileptiform bursts.
- Duration of epileptiform events.
- Synchronization of activity across different electrodes.
- Risk Classification: Classify the seizure liability of the test compound based on the profile and potency of the induced epileptiform activity compared to baseline and control recordings. This functional data provides a direct, quantitative measure of network hyperexcitability for preclinical risk assessment [116].
The vendor and technology landscape for electrode arrays in 2025 is dynamic and promising, characterized by strong growth, strategic technological convergence, and a diverse set of established and emerging providers. The integration of AI, the development of higher-density and minimally invasive arrays, and the refinement of standardized in vitro protocols like MEA-based screening are collectively enhancing the precision, efficiency, and predictive power of neuroscientific research and drug development. By leveraging the detailed market data, vendor analysis, and experimental protocols provided in this application note, researchers can make informed decisions to advance their work in stereotaxic surgery and neural interface technology.
Conclusion
Stereotaxic surgery for electrode array implantation is a cornerstone technique that bridges foundational neuroscience with transformative clinical applications like BCIs and Deep Brain Stimulation. Mastering this procedure requires a synthesis of meticulous pre-operative planning, species-specific surgical execution, and robust post-operative validation. The field is rapidly advancing, with clear trends toward full automation through robotic platforms, integration of AI for surgical planning and data analysis, and the development of sophisticated high-channel-count electrodes. For researchers, staying abreast of these innovations—from optimized surgical protocols that enhance survival to novel validation methods—is paramount. The future of neural interfacing hinges on continued refinement of these implantation techniques, promising not only more robust scientific data but also accelerated development of therapeutic interventions for a range of neurological disorders.
References
- 1. Stereotaxic Atlas - an overview [https://www.sciencedirect.com/topics/medicine-and-dentistry/stereotaxic-atlas]
- 2. for Implantation of Microelectrode Stereotaxic in the... Surgery Arrays [https://pubmed.ncbi.nlm.nih.gov/31609344/]
- 3. A study on remote-controlled microscopy for enhanced ... [https://www.sciencedirect.com/science/article/pii/S2214751925000568]
- 4. for Suprachiasmatic Nucleus Lesions in Mice Stereotaxic Surgery [https://bio-protocol.org/en/bpdetail?id=2346&type=0]
- 5. A mouse brain stereotaxic topographic atlas with isotropic ... [https://www.nature.com/articles/s41586-025-09211-8]
- 6. for Implantation of Microelectrode Stereotaxic in the... Surgery Arrays [https://www.jove.com/pl/t/60240/stereotaxic-surgery-for-implantation-microelectrode-arrays-common]
- 7. A mouse model of stereotactic radiosurgery-induced ... [https://pmc.ncbi.nlm.nih.gov/articles/PMC12461976/]
- 8. Historical perspectives, challenges, and future directions of ... [https://bioelecmed.biomedcentral.com/articles/10.1186/s42234-021-00076-6]
- 9. The Beginning of Modern Neuroscience - The Galvani/Volta [https://docs.backyardbrains.com/retired/experiments/Galvani_Volta/]
- 10. The Past, Present And Future Of Brain-Computer Interfaces [https://www.forbes.com/sites/robtoews/2025/10/05/these-are-the-startups-merging-your-brain-with-ai/]
- 11. Brain-computer interfaces are closer than you think [https://www.clinicaltrialsarena.com/analyst-comment/brain-computer-interfaces-closer/]
- 12. Stereotaxic Surgery for Implantation of Microelectrode ... [https://www.jove.com/t/60240/stereotaxic-surgery-for-implantation-microelectrode-arrays-common]
- 13. A modular, adaptable, and accessible implant kit for chronic ... [https://pmc.ncbi.nlm.nih.gov/articles/PMC12539253/]
- 14. How Stereotaxic Apparatus Works — In One Simple Flow ... [https://www.linkedin.com/pulse/how-stereotaxic-apparatus-works-one-simple-flow-2025-io66f/]
- 15. Modified stereotactic neurosurgery techniques for rodent ... [https://www.nature.com/articles/s41598-025-05328-y]
- 16. Cirq® for Functional Neurosurgery: Robotic Surgery [https://www.brainlab.com/surgery-products/fsn-hubpage/cirq-fsn/]
- 17. SEEG in 2025: progress and pending challenges in stereotaxy ... [https://pmc.ncbi.nlm.nih.gov/articles/PMC11888833/]
- 18. ROSA ONE® Brain: Robotic Neurosurgery [https://www.zimmerbiomet.com/en/products-and-solutions/zb-edge/robotics/rosa-brain.html]
- 19. Stereotaxic Instrument Market Report 2025 (Global Edition) [https://www.cognitivemarketresearch.com/stereotaxic-instrument-market-report]
- 20. Application and future directions of brain-computer ... [https://www.sciencedirect.com/science/article/pii/S2589238X2500083X]
- 21. Focus on EP | HRS 2025: 5 Takeaways Impacting Practice [https://www.acc.org/Latest-in-Cardiology/Articles/2025/07/01/01/Focus-on-EP-HRS-2025]
- 22. Vascular access and closure management for ... [https://pmc.ncbi.nlm.nih.gov/articles/PMC12560965/]
- 23. Top 10 Brain-Computer Interface Companies in 2025 [https://www.sphericalinsights.com/blogs/top-10-companies-leading-the-brain-computer-interface-market-in-2025-key-players-statistics-future-trends-2024-2035]
- 24. Brain Computer Interface Market Size, Growth Rate, ... [https://www.forinsightsconsultancy.com/reports/brain-computer-interface-market]
- 25. A nonsurgical brain implant enabled through a cell ... [https://www.nature.com/articles/s41587-025-02809-3]
- 26. Modeling neurodegenerative diseases with brain organoids [https://pubmed.ncbi.nlm.nih.gov/41278202/]
- 27. Modeling neurodegenerative diseases with brain organoids [https://www.frontiersin.org/journals/cell-and-developmental-biology/articles/10.3389/fcell.2025.1663286/full]
- 28. MIT scientists debut a generative AI model that could ... [https://news.mit.edu/2025/mit-scientists-debut-generative-ai-model-that-could-create-molecules-addressing-hard-to-treat-diseases-1125]
- 29. Trends and recent development of the microelectrode ... [https://www.sciencedirect.com/science/article/abs/pii/S095656632030840X]
- 30. Historical perspectives, challenges, and future directions of ... [https://pmc.ncbi.nlm.nih.gov/articles/PMC8456563/]
- 31. Material and design strategies for chronically-implantable ... [https://www.nature.com/articles/s41427-025-00613-8]
- 32. A brief history of electrode technology [https://www.neuronexus.com/a-brief-history-of-electrode-technology/]
- 33. A Roadmap for Implanting Electrode Arrays to Evoke ... [https://pmc.ncbi.nlm.nih.gov/articles/PMC11669040/]
- 34. A method for efficient, rapid, and minimally invasive ... [https://pmc.ncbi.nlm.nih.gov/articles/PMC11838573/]
- 35. Multi electrode array assays using iPSC-derived neurons [https://www.bit.bio/blog/top-tips-mea-ipsc-derived-neurons]
- 36. Stereotactic Atlas-Based Depth Electrode Localization in the ... [https://pmc.ncbi.nlm.nih.gov/articles/PMC2790801/]
- 37. Review Brain templates and atlases [https://www.sciencedirect.com/science/article/abs/pii/S1053811912000419]
- 38. Stereotaxic Space - an overview [https://www.sciencedirect.com/topics/engineering/stereotaxic-space]
- 39. Coordinate Systems for Navigating Stereotactic Space [https://pmc.ncbi.nlm.nih.gov/articles/PMC7358954/]
- 40. A neuroscientist's guide to using murine brain atlases for ... [https://pmc.ncbi.nlm.nih.gov/articles/PMC10033636/]
- 41. CT target selection in stereotactic anterior capsulotomy [https://pubmed.ncbi.nlm.nih.gov/7624628/]
- 42. A functional MRI pre-processing and quality control ... [https://www.frontiersin.org/journals/neuroimaging/articles/10.3389/fnimg.2022.1070151/full]
- 43. Implantable intracortical microelectrodes: reviewing the ... [https://www.nature.com/articles/s41378-022-00451-6]
- 44. Improving Stereotaxic Neurosurgery Techniques and ... [https://pmc.ncbi.nlm.nih.gov/articles/PMC8465152/]
- 45. Anesthesia protocol for ear surgery in Wistar rats (animal ... [https://pmc.ncbi.nlm.nih.gov/articles/PMC9043713/]
- 46. Mouse Stereotaxic Surgery [https://www.protocols.io/view/mouse-stereotaxic-surgery-d64k9guw.html]
- 47. A Multivariate Approach to Quantifying Risk Factors Impacting... [https://pubmed.ncbi.nlm.nih.gov/39329517/]
- 48. A microfabricated, 3D-sharpened silicon shuttle for insertion of ... [https://pmc.ncbi.nlm.nih.gov/articles/PMC7036288/]
- 49. Video: Rodent Stereotaxic Surgery [https://www.jove.com/v/5205/rodent-stereotaxic-surgery]
- 50. Technique for enhanced accuracy and reliability in non ... [https://pmc.ncbi.nlm.nih.gov/articles/PMC4294192/]
- 51. Technique for enhanced accuracy and reliability in non- ... [https://www.sciencedirect.com/science/article/abs/pii/S0165027006001063]
- 52. Stereotaxic surgical targeting of the non-human primate ... [https://pmc.ncbi.nlm.nih.gov/articles/PMC5962357/]
- 53. Mouse Stereotaxic Surgery [https://www.protocols.io/view/mouse-stereotaxic-surgery-d7t99nr6.html]
- 54. Spatial signatures of anesthesia-induced burst-suppression ... [https://pmc.ncbi.nlm.nih.gov/articles/PMC9129882/]
- 55. Refining Stereotaxic Neurosurgery Techniques and Welfare... [https://pmc.ncbi.nlm.nih.gov/articles/PMC10452028/]
- 56. Running modulates primate and rodent visual cortex ... [https://elifesciences.org/articles/87736]
- 57. Most Common Neurosurgery CPT Codes List 2025 [https://medibillmd.com/blog/neurosurgery-cpt-codes/]
- 58. Long-term stability strategies of deep brain flexible neural ... [https://www.nature.com/articles/s41528-025-00410-x]
- 59. Effects of postoperative quantitative assessment strategy ... [https://pmc.ncbi.nlm.nih.gov/articles/PMC11948103/]
- 60. Implantation of an Electrode Assembly in a Mouse Brain for ... [https://www.jove.com/v/31247/implantation-an-electrode-assembly-mouse-brain-for]
- 61. Regional Differences in Cerebral Edema after Traumatic Brain ... [https://pmc.ncbi.nlm.nih.gov/articles/PMC3774545/]
- 62. Shape-changing electrode array for minimally invasive ... [https://www.nature.com/articles/s41467-024-44805-2]
- 63. Surgical Techniques for Chronic Implantation of Microwire ... [https://www.ncbi.nlm.nih.gov/books/NBK3895/]
- 64. Optimizing electrical stimulation parameters to enhance ... [https://www.nature.com/articles/s41598-025-08657-0]
- 65. Impaired theta and low-gamma directed information flow in the ... [https://pmc.ncbi.nlm.nih.gov/articles/PMC12228199/]
- 66. Robotic stereotaxic system based on 3D skull ... [https://www.sciencedirect.com/science/article/abs/pii/S0165027020303782]
- 67. Robotic stereotaxic system based on 3D skull ... [https://pmc.ncbi.nlm.nih.gov/articles/PMC8764742/]
- 68. Placement of Stereotactic Electroencephalography Depth ... [https://pmc.ncbi.nlm.nih.gov/articles/PMC10602512/]
- 69. Stereotactic depth electrode placement surgery in ... [https://www.sciencedirect.com/science/article/pii/S1059131121000765]
- 70. Shape-changing electrode for... | Nature Communications array [https://www.nature.com/articles/s41467-024-44805-2?error=cookies_not_supported&code=c3fcb750-d62a-48df-a98a-4a81e8209ac6]
- 71. Video: Operative Technique and Nuances for the ... [https://www.jove.com/v/59456/operative-technique-nuances-for-stereoelectroencephalographic-seeg]
- 72. Data Driven Insights to Operating Room Inefficiencies [https://journaloei.scholasticahq.com/article/117196-data-driven-insights-to-operating-room-inefficiencies-what-s-next-part-1]
- 73. Reducing Operating Room Turnover Time for Robotic ... [https://pmc.ncbi.nlm.nih.gov/articles/PMC6010351/]
- 74. Enhancing Operating Room Efficiency: The Impact of ... [https://pmc.ncbi.nlm.nih.gov/articles/PMC11476208/]
- 75. A compact stereotactic system for image-guided surgical ... [https://pmc.ncbi.nlm.nih.gov/articles/PMC8089124/]
- 76. Minimally invasive implantation of scalable high-density ... [https://www.nature.com/articles/s41551-025-01501-w]
- 77. From imaging to precision: low cost and accurate ... [https://www.frontiersin.org/journals/neuroscience/articles/10.3389/fnins.2024.1324669/full]
- 78. Black Box Technology Shines Light on Improving OR ... [https://www.facs.org/for-medical-professionals/news-publications/news-and-articles/bulletin/2023/july-2023-volume-108-issue-7/black-box-technology-shines-light-on-improving-or-safety-efficiency/]
- 79. Photoinitiated CVD antifouling coatings enable long-term ... [https://www.sciencedirect.com/science/article/pii/S0142961225004739]
- 80. The influence of CI electrode array design on ... [https://www.frontiersin.org/journals/neurology/articles/10.3389/fneur.2025.1599369/full]
- 81. Advances in large-scale electrophysiology with high-density ... [https://pubs.rsc.org/en/content/articlehtml/2025/lc/d5lc00058k]
- 82. Automatic OptoDrive for Extracellular Recordings and ... [https://www.eneuro.org/content/12/6/ENEURO.0015-25.2025]
- 83. Development of spontaneous and sensory evoked network ... [https://pmc.ncbi.nlm.nih.gov/articles/PMC12364939/]
- 84. BRAIN 2025: A Scientific Vision - BRAIN Initiative - NIH [http://braininitiative.nih.gov/vision/nih-brain-initiative-reports/brain-2025-scientific-vision]
- 85. DataHigh: Graphical user interface for visualizing and ... [https://pmc.ncbi.nlm.nih.gov/articles/PMC3950756/]
- 86. Spiking dynamics of individual neurons reflect changes in ... [https://www.nature.com/articles/s41467-025-62202-1]
- 87. Less invasive brainwave recording breakthrough [https://resou.osaka-u.ac.jp/en/research/2025/20251003_1]
- 88. Tonotopy [https://en.wikipedia.org/wiki/Tonotopy]
- 89. Tonotopic organization of human auditory cortex - PMC [https://pmc.ncbi.nlm.nih.gov/articles/PMC2830355/]
- 90. A probabilistic atlas of finger dominance in the primary ... [https://www.sciencedirect.com/science/article/pii/S1053811920303669]
- 91. Somatotopic arrangement [https://en.wikipedia.org/wiki/Somatotopic_arrangement]
- 92. S1 somatotopic maps [http://www.scholarpedia.org/article/S1_somatotopic_maps]
- 93. Somatotopic Organization - (Anatomy and Physiology I) [https://fiveable.me/key-terms/anatomy-physiology/somatotopic-organization]
- 94. Neuroimaging paradigms for tonotopic mapping (I) [https://pmc.ncbi.nlm.nih.gov/articles/PMC5548253/]
- 95. A Fine-Scale and Minimally Invasive Marking Method for Use ... [https://pmc.ncbi.nlm.nih.gov/articles/PMC10521347/]
- 96. In vivo localization of chronically implanted electrodes and ... [https://www.nature.com/articles/s41467-020-18472-y]
- 97. Verification of multi-structure targeting in chronic ... [https://www.sciencedirect.com/science/article/pii/S016502702200245X]
- 98. New Colors for Histology: Optimized Bivariate Color Maps ... [https://pmc.ncbi.nlm.nih.gov/articles/PMC4696851/]
- 99. Flexible, scalable, high channel count stereo-electrode for ... [https://www.nature.com/articles/s41467-023-43727-9]
- 100. Analysis of the Technical Accuracy of a Patient-Specific ... [https://pmc.ncbi.nlm.nih.gov/articles/PMC10890199/]
- 101. The comparison of the process of manual and robotic positioning of the electrode performing radiofrequency ablation under the control of a surgical navigation system | Scientific Reports [https://www.nature.com/articles/s41598-020-64472-9]
- 102. Applications of the Stereotaxic Apparatus [https://conductscience.com/applications-of-the-stereotaxic-apparatus/?srsltid=AfmBOooolYEVmx4IdV1O4D8Yb1LlkI7BWPSK1whFU_5gJvq2e51m1otw]
- 103. Robotic System for MRI-Guided Stereotactic Neurosurgery - PMC [https://pmc.ncbi.nlm.nih.gov/articles/PMC4428978/]
- 104. Neurostar Robot Stereotaxic StereoDrive - Robot Stereotaxic instrument [https://robot-stereotaxic.com/motorized-stereotaxic-instrument/]
- 105. Long-term performance of intracortical microelectrode ... [https://www.medrxiv.org/content/10.1101/2025.07.02.25330310v1]
- 106. Longevity and reliability of chronic unit recordings ... - PubMed [https://pubmed.ncbi.nlm.nih.gov/34847547/]
- 107. Microfabrication process for long-term reliable neural ... [https://www.sciencedirect.com/science/article/abs/pii/S0167931719302527]
- 108. Bridging circuit modeling and signal analysis to understand ... [https://www.nature.com/articles/s41467-025-59391-0]
- 109. Top 10 Companies in the Intracranial Electrode Industry (2025) [https://liveindustryinsights.com/2025/09/top-10-companies-in-the-intracranial-electrode-industry-2025-market-leaders-advancing-neurological-therapies/]
- 110. Implantable Neural Probes Market Size 2026 | AI ... [https://www.linkedin.com/pulse/implantable-neural-probes-market-size-2026-ai-highlights-trywe/]
- 111. Neurotechnology Brain Computer Interface Market Size & ... [https://www.mordorintelligence.com/industry-reports/neurotechnology-brain-computer-interface-market]
- 112. Neurosurgery Market Size to Hit USD 5.33 Billion by 2034 [https://www.precedenceresearch.com/neurosurgery-market]
- 113. Micro Electrode Array Market Advanced Analytics Forecast ... [https://www.linkedin.com/pulse/micro-electrode-array-market-advanced-analytics-jklcf]
- 114. Top 14 EEG Hardware Companies Ranked [https://imotions.com/blog/insights/trend/top-14-eeg-hardware-companies-ranked/?srsltid=AfmBOoqXXdb0I7K_E5L8ThOzkUcAjePGTqUt3ToNBv8ijKbLfXy5iGUx]
- 115. Top Stereotaxic Apparatus Companies & How to Compare ... [https://www.linkedin.com/pulse/top-stereotaxic-apparatus-companies-how-compare-them-2025-krpdf]
- 116. The microelectrode array technique - a crucial tool for ... [https://www.sciencedirect.com/science/article/abs/pii/S0079610725000409]
- 117. Development of Micro-Electrode Array Based Tests for ... [https://pmc.ncbi.nlm.nih.gov/articles/PMC3087164/]