A Comprehensive Guide to In Vivo Microdialysis Probe Implantation: Protocol, Optimization, and Applications
This article provides a detailed guide for researchers and drug development professionals on in vivo microdialysis probe implantation.
A Comprehensive Guide to In Vivo Microdialysis Probe Implantation: Protocol, Optimization, and Applications
Abstract
This article provides a detailed guide for researchers and drug development professionals on in vivo microdialysis probe implantation. It covers foundational principles, from the technique's basis in passive diffusion to its application in measuring unbound drug and endogenous compound concentrations in the brain and peripheral tissues. A step-by-step methodological protocol for stereotaxic surgery and implantation in awake, freely behaving animals is outlined, with a focus on chronic preparations and species-specific considerations. Critical troubleshooting sections address pervasive challenges like non-specific binding of hydrophobic compounds, probe recovery calibration, and blood-brain barrier integrity. Finally, the guide explores advanced validation techniques, including combination with PET imaging and LC-MS analysis, to ensure data accuracy and translational relevance in pharmacokinetic and neurochemical research.
Understanding Microdialysis: Principles, Advantages, and Research Applications
The extracellular fluid (ECF) constitutes the internal environment of all multicellular animals, providing the critical medium for substance exchange between the blood and cells [1]. This fluid compartment, comprising approximately 20% of body weight in a young adult male, consists primarily of interstitial fluid that surrounds cells and blood plasma [1]. Passive diffusion serves as a fundamental physical process governing the movement of molecules within this compartment, driven by random molecular motion from areas of higher concentration to areas of lower concentration without cellular energy expenditure [2] [3].
In vivo microdialysis leverages this core principle to sample molecules from the ECF of living tissues. The technique employs semi-permeable membranes that allow molecules to diffuse along their concentration gradients from the ECF into the perfusion fluid, enabling researchers to monitor changes in analyte concentrations over time in awake, freely-behaving animals [4] [5]. This application note details the theoretical foundations, practical protocols, and technical considerations for employing passive diffusion principles in microdialysis experimentation, providing a framework for reliable in vivo sampling of extracellular biomarkers.
Theoretical Foundation
Principles of Passive Diffusion
Passive diffusion represents the simplest mechanism by which molecules cross semi-permeable membranes. During this process, a molecule dissolves in the phospholipid bilayer, diffuses across it, and then dissolves in the aqueous solution at the membrane's opposite side [2]. The net flow of molecules is always down their concentration gradient—from a compartment with a high concentration to one with a lower concentration of the molecule [2]. This process is nonselective, allowing any molecule capable of dissolving in the membrane matrix to cross and equilibrate between the inside and outside of a cell or sampling device [2].
The rate of passive diffusion depends on several key factors:
- Extent of the concentration gradient: Greater concentration differences yield more rapid diffusion rates [3]
- Molecular characteristics: Smaller, hydrophobic molecules diffuse more readily than larger, hydrophilic ones [2]
- Temperature: Higher temperatures increase molecular energy and diffusion rates [3]
- Solvent density: Increased density of the solvent medium decreases diffusion velocity [3]
- Membrane properties: Pore size, thickness, and material composition significantly impact permeability [5]
Molecular Properties Governing Diffusion
Molecular characteristics profoundly influence diffusion capacity through semi-permeable membranes. The phospholipid bilayer presents a hydrophobic barrier that preferentially allows passage of nonpolar, lipid-soluble substances while restricting hydrophilic, charged molecules [2] [3].
Table 1: Molecular Properties Impacting Diffusion Through Semi-Permeable Membranes
| Molecular Characteristic | High Diffusion Capacity | Low Diffusion Capacity | Primary Constraint |
|---|---|---|---|
| Size | Small molecules (<100 Da) | Large molecules (>1000 Da) | Physical exclusion by membrane pores |
| Lipid Solubility | High hydrophobicity | High hydrophobicity | Ability to dissolve in lipid bilayer |
| Charge | Uncharged molecules | Charged molecules | Repulsion by charged membrane components |
| Polarity | Nonpolar substances | Polar substances | Energetic cost of partitioning into hydrophobic environment |
Gases such as O₂ and CO₂, hydrophobic molecules like benzene, and small polar but uncharged molecules including H₂O and ethanol diffuse readily across phospholipid bilayers [2]. In contrast, larger uncharged polar molecules such as glucose and charged molecules of any size require specific transport proteins for membrane crossing [2]. These principles directly inform microdialysis probe design and membrane selection for target analytes.
Microdialysis Methodology
Fundamental Technique
Microdialysis is a minimally invasive sampling technique that employs the principles of passive diffusion to recover molecules from the extracellular space [5]. The core component is a microdialysis probe featuring a semi-permeable membrane at its tip that is implanted into the target tissue [4]. The system is perfused with a solution that closely matches the ionic composition of the extracellular fluid (such as artificial cerebrospinal fluid or Ringer's solution) at flow rates typically ranging from 0.1-5 µL/min [4] [5].
As the perfusion fluid passes through the probe, extracellular molecules diffuse across the membrane along their concentration gradients, collecting in the dialysate that exits through the outlet tubing for subsequent analysis [5]. The technique enables continuous monitoring of analyte concentrations in specific tissue compartments over extended periods, with subjects able to behave normally during sampling [5].
Figure 1: Fundamental principle of microdialysis sampling based on passive diffusion along concentration gradients between extracellular fluid and perfusion medium.
Probe Design and Membrane Characteristics
Microdialysis probes employ a concentric design where perfusion fluid enters through an inlet tubing, flows downward to the probe tip, then travels upward through the space between the dialysis membrane and outer tubing before exiting through the outlet [6]. This design creates a continuous flow path that maintains the concentration gradient essential for efficient sampling.
The molecular weight cut-off (MWCO) of the dialysis membrane is a critical parameter determining which molecules can pass through. Standard probes offer various MWCO options:
- 6-20 kDa: Suitable for small molecules like neurotransmitters, metabolites [6]
- 55-100 kDa: Intermediate size molecules [7]
- 500 kDa-3 MDa: Large molecules such as proteins and peptides [4] [7]
Table 2: Microdialysis Probe Characteristics for Different Molecular Weight Ranges
| Target Analyte Class | Example Molecules | Membrane MWCO | Typical Recovery Range | Optimal Flow Rate |
|---|---|---|---|---|
| Small molecules | Glucose, lactate, acetylcholine | 6-20 kDa | 15-25% [6] | 1-2 µL/min |
| Neurotransmitters | Dopamine, glutamate, GABA | 20 kDa | 10-20% | 0.5-2 µL/min |
| Intermediate peptides | Angiotensin II, substance P | 55-100 kDa | 5-15% [7] | 0.5-1.5 µL/min |
| Large proteins | Tau, α-synuclein, cytokines | 500 kDa-3 MDa [4] | 2-6% [6] | 0.1-0.5 µL/min |
Membrane materials vary in their diffusion characteristics and include polysulfone, polyarylethersulphone, polyethersulfone, and regenerated cellulose [5] [6]. Material selection impacts recovery efficiency, with regenerated cellulose membranes typically used for smaller molecules and polyethersulfone membranes preferred for larger molecules due to their higher porosity and reduced adhesion tendencies [5].
Experimental Protocols
Guide Cannula Implantation Surgery
Objective: To surgically implant a guide cannula for subsequent microdialysis probe insertion in target brain regions of laboratory animals.
Materials Required:
- Stereotaxic apparatus with animal adaptor
- Guide cannula (e.g., CMA polyurethane guides) [7]
- Surgical tools (scalpel, forceps, drill)
- Anesthetic agents (e.g., chloral hydrate, 400 mg/kg intraperitoneal) [4] [8]
- Dental cement and bone screw
- Heating pad for thermal support
- Vet ointment for eye protection
Procedure:
- Anesthetize the animal and confirm anesthetic depth by toe pinch reflex test [4].
- Secure the animal in the stereotaxic apparatus using ear bars and nose clamp, ensuring head stability [4].
- Apply vet ointment to eyes to prevent dryness during anesthesia [4].
- Make a sagittal incision on the skin over the skull and retract tissue to expose the skull surface [4].
- Level the skull in both anterior-posterior and left-right planes using a drill attached to the stereotaxic manipulator [4].
- Identify bregma and lambda landmarks and calculate coordinates for the target brain region using a standard brain atlas [4] [8].
- Drill a burr hole at the target coordinates, ensuring the diameter accommodates the guide cannula [4].
- Drill an additional hole in the contralateral parietal bone and insert a bone screw to help secure the dental cement [4].
- Position the guide cannula assembly on the stereotaxic adaptor and lower the cannula slowly into the brain at the calculated coordinates and depth [4].
- Mix and apply dental cement around the cannula and bone screw, completely covering the exposed skull area [4].
- Allow the cement to fully harden (12-20 minutes) before removing the stereotaxic adaptor [4].
- Insert a dummy probe into the guide cannula to prevent occlusion [4].
- House the animal individually and monitor until regaining consciousness, providing analgesic support as needed [4].
- Allow 1-2 days recovery for acute experiments or up to 2 weeks for sleep-wake studies requiring habituation [4].
Critical Considerations:
- Maintain strict aseptic technique throughout the procedure
- Ensure precise skull leveling for accurate coordinate targeting
- Verify cannula placement depth according to species-specific brain anatomy
- Provide appropriate postoperative analgesia and monitoring
Microdialysis Probe Preparation and Setup
Objective: To prepare and calibrate microdialysis probes for in vivo sampling of extracellular analytes.
Materials Required:
- Microdialysis probes (e.g., CMA 7, 11, or 20 depending on application) [7]
- Syringe pumps (CMA 100/400 or equivalent) [9]
- Perfusion fluid (aCSF or Ringer's solution)
- Bovine serum albumin (BSA) for protein sampling [4]
- Ethanol (70-100%) for probe activation
- Distilled water for flushing
- Fraction collector for sample collection [5]
Procedure:
- Probe Quality Check: Fill a 1 mL syringe with distilled water and connect to the probe outlet. Cover vent holes and depress the plunger gently to infuse water through the probe. Verify that water appears from the probe inlet without membrane leakage [4].
- Probe Activation: Submerge the probe membrane in ethanol (70-100%) for two seconds to condition the membrane, then flush again with distilled water [4].
- Perfusion Buffer Preparation: Prepare artificial CSF (1.3 mM CaCl₂, 1.2 mM MgSO₄, 3 mM KCl, 0.4 mM KH₂PO₄, 25 mM NaHCO₃, 122 mM NaCl, pH 7.35) [4]. For large molecule sampling, add BSA to 4% concentration to prevent analyte adhesion and limit fluid loss through large-pore membranes [4]. Filter through a 0.1 µm syringe filter to remove aggregates [4].
- System Priming: Fill the syringe with perfusion buffer and connect to the inlet tubing. Run the syringe pump to fill the entire tubing system with buffer, eliminating air bubbles [4].
- Push-Pull Setup (for high MWCO membranes): For probes with cut-off >1000 kDa, configure a push-pull system using a syringe pump to perfuse (push) and a roller/peristaltic pump to collect (pull) [4]. This prevents pressure accumulation and ultrafiltration fluid loss [4].
- Flow Rate Optimization: Set appropriate flow rates based on target analytes (0.1-0.5 µL/min for proteins, 1-2 µL/min for small molecules) [5].
- In Vitro Recovery Determination: Before in vivo use, calibrate each probe by placing it in a standard solution with known analyte concentrations. Calculate relative recovery as: (Analyte concentration in dialysate) / (Analyte concentration in standard solution) × 100 [6].
Figure 2: Workflow for microdialysis probe preparation and calibration before in vivo implantation.
In Vivo Microdialysis Sampling
Objective: To collect extracellular analytes from conscious, freely-behaving animals over timed intervals.
Materials Required:
- Microdialysis system with push-pull capability [4]
- Liquid swivel with balance arm for freely-moving animals
- Fraction collector or automated sample handler
- Microvials for sample collection
- Cooling system for sample preservation (4°C)
Procedure:
- Gently remove the dummy probe from the guide cannula and insert the calibrated microdialysis probe, securing it in place [4].
- Begin perfusion with the optimized flow rate and allow the system to equilibrate for 1-2 hours to establish stable baseline conditions [5].
- Connect the outlet tubing to a fraction collector maintained at 4°C to preserve sample integrity [5].
- Collect dialysate samples at predetermined intervals (typically 10-30 minutes depending on analyte stability and concentration) [5].
- For pharmacological interventions, administer compounds systemically or via reverse microdialysis (adding compounds to the perfusion buffer) [4].
- Following sample collection, remove the probe, euthanize the animal, and verify probe placement histologically.
- Store samples at -80°C until analysis if not processed immediately.
Analytical Considerations:
- Select appropriate analytical methods based on target analytes (HPLC-ECD for monoamines, ELISA for proteins, mass spectrometry for untargeted analysis) [5]
- Account for sample dilution and recovery rates when calculating extracellular concentrations
- Include appropriate controls for system validation and background subtraction
The Scientist's Toolkit
Essential Research Reagent Solutions
Table 3: Key Reagents and Materials for Microdialysis Experiments
| Item | Specification/Composition | Function | Application Notes |
|---|---|---|---|
| Artificial CSF | 1.3 mM CaCl₂, 1.2 mM MgSO₄, 3 mM KCl, 0.4 mM KH₂PO₄, 25 mM NaHCO₃, 122 mM NaCl, pH 7.35 [4] | Physiological perfusion fluid matching brain ECF composition | Maintains ionic homeostasis during sampling |
| Ringer's Solution | 148 mM NaCl, 4 mM KCl, 1.2 mM CaCl₂, 0.85 mM MgCl₂ [5] | Alternative perfusion fluid with physiological salt concentrations | Higher calcium than standard aCSF; suitable for neurotransmitter sampling |
| Bovine Serum Albumin | 4% in aCSF [4] | Osmotic agent and blocking protein | Prevents adhesion of hydrophobic molecules; reduces fluid loss through large-pore membranes |
| CMA Microdialysis Probes | Various MWCO (6 kDa - 3 MDa) and membrane lengths (1-30 mm) [7] | Semi-permeable interface for molecular diffusion | Select based on target analyte size and tissue region dimensions |
| Polysulfone Membranes | 30 kDa MWCO custom probes [6] | Semi-permeable barrier for analyte sampling | Suitable for small molecules and peptides; alternative to commercial probes |
| Chloral Hydrate | 400 mg/kg intraperitoneal [4] [8] | Surgical anesthetic for probe implantation | Provides stable anesthesia duration for stereotaxic procedures |
| Dental Cement | Polyurethane-based cranioplastic cement [4] | Secure guide cannula to skull | Creates stable, long-term implantation platform |
Technical Considerations and Limitations
Implantation Trauma and Tissue Response
Probe implantation inevitably causes localized tissue damage, creating a trauma layer adjacent to the probe membrane that alters the normal neurochemical environment [8]. This traumatized tissue demonstrates compromised neurotransmitter release and uptake capacity, potentially distorting measurements of extracellular concentrations [8]. Histological studies reveal that implantation induces both short- and long-term biochemical changes in nearby neural tissue, including alterations in transporter function and neurotransmitter dynamics [8].
The trauma effect is particularly significant for efficiently cleared neurotransmitters like dopamine, where the extraction fraction measured by microdialysis may underestimate actual extracellular concentrations due to impaired uptake mechanisms in the damaged tissue perimeter [8]. To mitigate these effects, researchers should:
- Allow appropriate recovery time between surgery and sampling (1-14 days depending on study design) [4]
- Use the smallest feasible probe diameter to minimize tissue displacement [7]
- Validate measurements with complementary techniques when possible (e.g., voltammetry for monoamines) [8]
Recovery Considerations and Quantitative Interpretation
The concentration of analytes in the dialysate represents only a fraction of their true extracellular concentration, described as the relative recovery [5]. Multiple factors influence recovery efficiency:
- Flow rate: Lower flow rates (0.1-0.5 µL/min) increase relative recovery but extend collection intervals [5]
- Membrane characteristics: Longer membranes and larger pore sizes enhance recovery [5]
- Molecular properties: Larger, more hydrophobic molecules exhibit lower recovery rates [5] [6]
- Tortuosity: Diffusion pathways through the extracellular space are indirect, slowing equilibration [5]
For accurate quantitative assessment, researchers should determine probe recovery individually for each experimental setup using no-net-flux methods or in vitro calibration [8] [6]. The no-net-flux approach involves perfusing the probe with different concentrations of the target analyte and identifying the point where inflow and outflow concentrations equalize, indicating the true extracellular concentration [8].
Advanced Applications: Push-Pull Perfusion for Large Molecules
Traditional microdialysis faces limitations when sampling large molecules such as proteins and peptides due to their slow diffusion characteristics and membrane adhesion tendencies [4]. The push-pull modification addresses these challenges by employing two pumps: one to push perfusion fluid into the probe and another to pull dialysate from the outlet [4]. This configuration prevents pressure accumulation within high MWCO probes that would otherwise cause ultrafiltration and fluid loss into the surrounding tissue [4].
Specialized probes with pressure-canceling vent holes (e.g., AtmosLM probes) further optimize this system by eliminating pressure differentials that could cause membrane leakage [5]. For large molecule sampling, perfusion fluids typically include additives like BSA (0.15-4%) to minimize surface adhesion and maintain stable recovery rates throughout extended sampling periods [4] [5].
In vivo microdialysis is a catheter-based sampling technique that enables continuous monitoring of unbound molecules in the interstitial fluid of specific tissues in awake, freely behaving animals [10] [11]. This methodology is particularly invaluable in preclinical drug development and neuroscience research, as it provides serial data on pharmacologically active drug concentrations and endogenous biomarkers from a well-defined anatomical site over time [12] [10]. A principal strength of this technique is its inherent alignment with the 3Rs principle of animal experimentation—Replace, Reduce, Refine [12]. By allowing for continuous sampling in a single animal and the implantation of multiple probes to sample different tissues or brain regions simultaneously, microdialysis significantly reduces the number of animals needed for statistically powerful experiments while refining methodologies to minimize animal distress [12] [10].
This application note details the core advantages of this approach and provides a detailed protocol for its implementation, enabling researchers to leverage this powerful technique for robust and ethical in vivo research.
Core Advantages and Quantitative Benefits
The integration of continuous sampling in freely moving animals with the 3Rs framework offers tangible and significant benefits for research quality and animal welfare. The table below summarizes these key advantages.
Table 1: Key Advantages of Microdialysis in Freely Behaving Animals
| Advantage | Description | Impact on Research & 3Rs |
|---|---|---|
| Serial Sampling in Awake Animals | Enables collection of data from awake, freely behaving animals, eliminating confounding effects of anesthesia on physiology and behavior [13] [14]. | Refinement: Improves animal welfare and data quality. Provides more physiologically relevant data correlated with behavior [10]. |
| Continuous, Longitudinal Data | Allows for the collection of multiple serial samples from a single animal over hours or days [14] [11]. | Reduction: Each animal serves as its own control, reducing biological variability and the total number of animals required [12]. |
| Multiple-Site Sampling | Permits the implantation of multiple probes in a single animal (e.g., two brain regions or a brain region and a blood vessel) [10]. | Reduction: Maximizes data obtained per animal, drastically reducing the group sizes needed for complex study designs [10]. |
| Sample Cleanliness | The semi-permeable membrane excludes cells and large macromolecules, providing protein-free samples ready for direct analysis [10] [15]. | Refinement: Simplifies analytical procedures and reduces potential sample degradation, leading to more reliable results. |
The quantitative impact of this approach on experimental design is demonstrated in the following table, which outlines feasible configurations in different rodent models.
Table 2: Experimental Configuration and 3Rs Impact
| Parameter | Mouse | Rat | Impact on 3Rs |
|---|---|---|---|
| Maximum Probe/Lines | 2 lines total [10] | 3 lines total [10] | Enables complex, multi-compartment pharmacokinetic/pharmacodynamic (PK/PD) studies with fewer animals. |
| Typical Configuration | 1-2 brain regions, or 1 brain region + jugular vein cannula [10] | 2 brain regions + jugular vein or cisterna magna cannulation [10] | Reduction: A single rat can provide simultaneous data on brain PK in two regions and systemic plasma PK. |
| Experiment Duration | Feasible to sample over weeks [10] | Feasible to sample over weeks, potentially months [10] | Reduction: Long-term studies can be performed with a stable cohort of animals, avoiding the need for multiple cohorts sacrificed at different time points. |
Experimental Workflow and Protocol
The following diagram and detailed protocol describe the standard procedure for conducting a microdialysis experiment in a freely behaving animal, from surgical preparation to sample analysis.
Protocol: In Vivo Microdialysis in Freely Moving Rodents
Title: Continuous Sampling of Brain Interstitial Fluid in Awake, Freely Behaving Rats for PK/PD Analysis.
Objective: To serially collect unbound analyte from the brain extracellular space of a freely behaving rat before and after systemic administration of a test compound, enabling calculation of pharmacokinetic parameters and the unbound brain-to-plasma partition coefficient (Kp,uu).
Materials:
- Animals: Adult Sprague-Dawley or Wistar rats.
- Microdialysis System: Guide cannula, microdialysis probe (e.g., CMA 7, CMA 12), perfusion tubing, syringe pump, fraction collector [13] [16].
- Perfusate: Artificial Cerebrospinal Fluid (aCSF: 145 mM NaCl, 2.68 mM KCl, 1.40 mM CaCl₂, 1.01 mM MgSO₄, 1.55 mM Na₂HPO₄, 0.45 mM NaH₂PO₄, pH 7.4) or Ringer's solution [13] [16].
- Analytical Instrumentation: UPLC-MS/MS system or other sensitive detection method [12] [16].
Procedure:
- Surgical Implantation: Anesthetize the rat and stereotactically implant a guide cannula above the target brain region (e.g., striatum, prefrontal cortex). Secure the cannula to the skull with dental acrylic and skull screws [17] [16].
- Recovery Period: Allow the animal to recover for a minimum of 24-48 hours. This critical period allows for the recovery of the blood-brain barrier and the reduction of acute tissue trauma and inflammation around the implant site, which is essential for obtaining physiologically relevant data [15].
- Probe Insertion and Perfusion: On the experimental day, carefully insert the microdialysis probe through the guide cannula so the semi-permeable membrane extends into the target brain region. Connect the probe to a syringe pump via perfusion tubing and perfuse with aCSF at a low, constant flow rate (e.g., 0.5 - 1.0 µL/min) [13] [16].
- Baseline Sample Collection: Place the animal in a freely moving cage (e.g., equipped with a Raturn system). Allow the system to equilibrate for 1-2 hours. Subsequently, collect dialysate samples at predefined intervals (e.g., 20-60 minutes, collecting 10-30 µL per fraction) into a refrigerated fraction collector to establish baseline analyte levels [13] [14].
- Intervention and Post-Intervention Sampling: Administer the test compound via a predetermined route (e.g., intraperitoneal, oral gavage). Continue collecting serial dialysate samples for the duration of the experiment to capture the PK profile [14].
- Sample Analysis and Data Calculation:
- Immediately store collected samples at -80°C until analysis [13].
- Analyze analyte concentration in each fraction using an appropriate analytical method (e.g., UPLC-MS/MS for drugs, HPLC-ECD for monoamines, ELISA for peptides) [10] [16].
- Calculate the unbound brain concentration (Cu,brain) by correcting the dialysate concentration for the probe's recovery rate. The unbound plasma-to-brain partition coefficient (Kp,uu) is calculated as Kp,uu = AUCu,brain / AUCu,plasma, where AUC is the area under the concentration-time curve for the unbound fraction in brain and plasma, respectively [12].
Troubleshooting Notes:
- Low Analytic Recovery: For hydrophobic compounds prone to non-specific binding to tubing and membranes, consider adding agents like bovine serum albumin (BSA, 0.5-1.5%) or low concentrations of DMSO (0.01-0.1%) to the perfusate to improve recovery [12].
- Probe Calibration: Determine the relative recovery for each probe before in vivo experiments using retrodialysis or other calibration methods to ensure accurate quantification [12] [18].
The Scientist's Toolkit
Successful implementation of a microdialysis study relies on several key reagents and materials. The following table outlines essential solutions and their critical functions.
Table 3: Key Research Reagent Solutions for Microdialysis
| Reagent/Solution | Function | Key Considerations |
|---|---|---|
| Artificial Cerebrospinal Fluid (aCSF) | The physiological perfusate that mimics the ionic composition of brain extracellular fluid, enabling diffusion of analytes without net fluid exchange [12] [11]. | Must be isotonic and buffered to pH 7.4. Ascorbic acid (0.25 mM) may be added as an antioxidant [16]. |
| Bovine Serum Albumin (BSA) | Added to aCSF (typically 0.5-1.5%) to minimize non-specific binding of hydrophobic drugs to the microdialysis apparatus, thereby improving recovery rates [12]. | Critical for obtaining reliable data for compounds with lipophilic characteristics, such as selinexor and ulixertinib [12]. |
| Dimethyl Sulfoxide (DMSO) | Used at low concentrations (e.g., 0.01-0.1%) in the perfusate to enhance the solubility and recovery of highly lipophilic compounds [12]. | Concentration must be kept low to avoid cytotoxic effects and disruption of the blood-brain barrier. |
| Probe Calibration Standards | Solutions of known analyte concentration used in vitro (retrodialysis) to determine the relative recovery of each probe, which is required to calculate true extracellular concentrations [12] [18]. | The recovery rate is probe- and analyte-specific and is vital for translating dialysate concentration to actual in vivo concentration. |
Microdialysis has established itself as a robust and versatile minimally-invasive sampling technique for the continuous measurement of unbound analyte concentrations in the extracellular fluid of virtually any tissue [19]. This powerful method provides researchers with unprecedented access to dynamic biochemical processes in living tissues, enabling both sampling of endogenous molecules and monitoring exogenous compound distribution. The technique's unique capability to quantify pharmacologically active free drug fractions at their site of action has made it indispensable in both preclinical drug development and clinical research [12] [20]. As microdialysis systems have evolved, applications have expanded from fundamental neuroscience to diverse fields including oncology, metabolic disorders, and infectious diseases, with the global microdialysis probe market projected to reach approximately $750 million by 2033, growing at a CAGR of 8.5% [21].
The fundamental principle underlying microdialysis involves the implantation of a small catheter featuring a semipermeable membrane into the tissue of interest. The probe is continuously perfused with an aqueous solution resembling the ionic composition of surrounding tissue fluid at low flow rates (typically 0.1-5 μL/min). Solutes below the membrane's molecular weight cutoff cross this barrier via passive diffusion along concentration gradients, allowing collection of dialysate for analysis [19]. This continuous sampling capability provides unparalleled temporal resolution for monitoring dynamic processes, while the membrane acts as a physical barrier protecting tissue from turbulent flow and high-molecular-weight substances [22].
Table 1: Key Application Areas of Microdialysis
| Application Domain | Primary Analytes Measured | Research Objectives |
|---|---|---|
| Neuroscience & CNS Drug Development | Neurotransmitters (dopamine, serotonin, glutamate, GABA), metabolites, energy substrates (glucose, lactate, pyruvate) [22] [19] | Elucidate neurotransmitter systems in cognition/behavior [17], assess blood-brain barrier penetration [12] [20], measure target engagement |
| Neuro-oncology & Cancer Therapeutics | Chemotherapeutic agents (e.g., erlotinib, temozolomide), metabolites, neurotransmitters with tumor-modulatory effects (glutamate, GABA) [23] [24] [25] | Determine intratumoral drug disposition [23], monitor tumor metabolism (glucose, lactate) [24], identify resistance mechanisms |
| Toxicology & Drug Metabolism | Xenobiotics and their metabolites | Characterize tissue-specific pharmacokinetics/pharmacodynamics, assess organ exposure and toxicity |
| Peripheral Tissue Monitoring | Glucose, hormones, cytokines, drugs | Monitor subcutaneous glucose in diabetes [19], assess topical drug bioavailability in skin [19], measure tissue-specific inflammation |
CNS Neurotransmitter Research Applications
The application of microdialysis in central nervous system research has revolutionized our understanding of neurochemical processes in living brain tissue. Originally developed for and predominantly applied to neuroscience, this technique enables real-time monitoring of neurotransmitter dynamics in specific brain regions during various behavioral states, pharmacological interventions, and disease processes [22]. The ability to simultaneously measure multiple neurotransmitter systems provides crucial insights into their complex interplay underlying cognitive functions and neurological disorders.
Recent methodological advances have significantly expanded the scope of CNS microdialysis applications. A groundbreaking 2025 study demonstrated a novel implementation in awake, behaving non-human primates, allowing simultaneous quantification of multiple neurotransmitters including GABA, glutamate, norepinephrine, epinephrine, dopamine, serotonin, and choline from small sample volumes (<20 μL) during different cognitive states [17]. This approach revealed subtle concentration variations between behavioral states and complex correlation patterns between neurotransmitter pairs, highlighting the sophisticated neurochemical regulation of cognitive processes.
Experimental Protocol: Neurotransmitter Monitoring in Behaving Primates
Research Objective: To simultaneously measure concentration dynamics of multiple cortical neurotransmitters during different cognitive states in awake, behaving rhesus macaques [17].
Materials and Equipment:
- Microdialysis probes with appropriate molecular weight cutoff (typically 20-30 kD)
- Removable guide insets compatible with standard electrophysiology implant
- Precision micropump capable of low flow rates (0.3-1.0 μL/min)
- Artificial cerebrospinal fluid (aCSF) perfusate: 147 mM NaCl, 2.7 mM KCl, 1.2 mM CaCl₂, 0.85 mM MgCl₂ in purified water [20]
- UPLC-ESI-MS (Ultra-Performance Liquid Chromatography with Electrospray Ionization-Mass Spectrometry) system
- Fraction collector for sample preservation
Procedure:
- Probe Implantation: Semi-chronically implant microdialysis guides into target brain region (e.g., visual middle temporal area MT) using removable insets within a standard recording chamber.
- System Equilibration: On experimental day, implant probes and perfuse with aCSF at 0.5 μL/min for 1-2 hours to establish baseline.
- Sample Collection: Collect dialysate fractions at 30-60 minute intervals during defined behavioral states (e.g., 'active' during cognitive tasks vs. 'inactive' during rest).
- Sample Analysis: Analyze samples using UPLC-ESI-MS with optimized methods for simultaneous neurotransmitter quantification.
- Data Analysis: Normalize neurotransmitter concentrations, calculate changes between behavioral states, and determine correlation patterns between neurotransmitter pairs.
Critical Considerations:
- Maintain consistent sample handling and storage conditions to prevent analyte degradation
- Use appropriate calibration methods (e.g., no-net-flux) to determine in vivo recovery rates
- Employ statistical analyses accounting for multiple comparisons when examining multiple neurotransmitters
Cancer Drug Penetration and Intratumoral Disposition
The application of microdialysis in oncology has emerged as a powerful approach to overcome the critical challenge of determining whether chemotherapeutic agents adequately penetrate tumor tissue to reach therapeutic concentrations at their site of action [23]. This is particularly crucial for brain tumors where the blood-brain barrier (BBB) and blood-tumor barrier significantly restrict drug access, contributing to the disappointing clinical results of many promising neuro-oncology clinical trials [23] [24]. Microdialysis enables direct measurement of unbound, pharmacologically active drug fractions within tumor interstitial fluid, providing critical data that cannot be inferred from plasma pharmacokinetics or even cerebrospinal fluid measurements [23] [20].
In brain cancer research, microdialysis has been applied to study various chemotherapeutic agents including temozolomide, erlotinib, and other targeted therapies [23] [24]. These investigations have revealed that drug concentrations in tumor ECF often represent only a fraction of plasma levels, with considerable inter-individual variability [23]. Furthermore, studies have established relationships between intratumoral drug concentrations and target modulation, as demonstrated in a clinical trial where patients receiving erlotinib 150 mg/day failed to achieve adequate intratumoral levels or inhibit EGFR phosphorylation, resulting in no clinical benefit [23]. Beyond monitoring drug disposition, microdialysis also enables characterization of the tumor metabolic microenvironment, with measurements of glucose, lactate, glutamate, and glycerol providing insights into bioenergetic states and response to therapy [24].
Experimental Protocol: Assessing Anticancer Drug Brain Penetration
Research Objective: To determine the unbound brain-to-plasma partition coefficient (Kp,uu) of hydrophobic anticancer drugs using cerebral microdialysis in rodent models [12].
Materials and Equipment:
- CMA7 or CMA8 microdialysis probes (CMA Microdialysis) or MD-2211 probes (Bioanalytical Systems Inc.)
- Precision syringe pump with low pulsation
- Fluorinated ethylene propylene (FEP) or polyetheretherketone (PEEK) tubing to minimize nonspecific binding
- Ringer's solution with 0.5%-1.5% bovine serum albumin (BSA), potentially with 0.01%-0.1% DMSO for hydrophobic compounds
- UPLC-MS/MS system for drug quantification
- Temperature-controlled fraction collector
Procedure:
- Probe Implantation: Stereotactically implant microdialysis guide cannula into target brain region (e.g., striatum, tumor tissue) under anesthesia.
- In Vivo Recovery Determination: After probe insertion, perform retrodialysis calibration by perfusing with drug solution (e.g., 100 ng/mL) at 0.5 μL/min and calculating recovery as (Cperfusate - Cdialysate)/Cperfusate.
- Experimental Sampling: Following systemic drug administration, perfuse probes with blank aCSF or Ringer's solution containing BSA at 0.5 μL/min.
- Simultaneous Blood Sampling: Collect plasma samples at time points matching dialysate collection intervals.
- Sample Analysis: Quantify drug concentrations in dialysate and plasma using UPLC-MS/MS.
- Data Calculation: Calculate Kp,uu as AUCbrain,ECF/AUCplasma,unbound, where AUC represents area under the concentration-time curve.
Critical Considerations:
- For hydrophobic compounds (e.g., actinomycin D, selinexor, ulixertinib), include surface modification strategies and additive to minimize nonspecific binding
- Verify drug stability under experimental conditions (temperature, light exposure)
- Perform nominal concentration tests to assess drug loss due to adsorption to system components
Table 2: Microdialysis Calibration Methods for Drug Disposition Studies
| Calibration Method | Principle | Advantages | Limitations | Applications |
|---|---|---|---|---|
| Retrodialysis [12] [19] | Perfuse with drug solution and measure disappearance from probe | Accounts for in vivo mass transfer resistance; relatively simple | Requires drug-free tissue (not for endogenous compounds); assumes symmetric diffusion | Exogenous compounds in clinical/preclinical settings |
| No-Net-Flux [19] | Perfuse with multiple drug concentrations and determine no-net-flux point | Highly accurate at steady-state; direct measure of extracellular concentration | Time-consuming; requires steady-state conditions | Endogenous compounds; validation studies |
| Low-Flow-Rate Method [19] | Measure recovery at different flow rates and extrapolate to zero flow | Conceptually straightforward | Long collection times for sufficient sample volume; impractical for unstable compounds | Small molecules with adequate stability |
| Dynamic No-Net-Flux [19] | Combine data from multiple subjects perfused with single concentrations | Enables recovery determination under non-steady-state conditions | Requires multiple subjects/animals; complex experimental design | Drug challenge studies with endogenous compounds |
The Scientist's Toolkit: Essential Research Reagent Solutions
Successful microdialysis experiments require careful selection of specialized materials and reagents optimized for specific research applications. The appropriate choice of probe characteristics, perfusion solutions, and analytical methods significantly impacts data quality and experimental outcomes. Current market analysis indicates a growing demand for multi-channel microdialysis probes that enable simultaneous monitoring of multiple brain regions or analytes, with innovations focusing on enhanced sensitivity, selectivity, and biocompatibility [21] [26].
Table 3: Essential Research Reagents and Materials for Microdialysis Applications
| Category | Specific Products/Solutions | Function & Application Notes |
|---|---|---|
| Microdialysis Probes | Single-channel, dual-channel, multi-channel probes [21] [26] | Sampling from extracellular fluid; selection based on target region size and desired spatial resolution |
| Membrane Types | CMA 20 (20 kD cutoff), CMA 100 (100 kD cutoff) [24] | Molecular weight cutoff determines analyte range; high cutoff membranes enable protein/peptide sampling |
| Perfusion Solutions | Artificial cerebrospinal fluid (aCSF), Ringer's solution, with/without carrier proteins (0.5-1.5% BSA) [12] [20] | Maintain tissue homeostasis; BSA reduces nonspecific binding of hydrophobic compounds |
| Calibration Standards | Analytical grade neurotransmitters, drug compounds, isotope-labeled internal standards | Quantification of absolute extracellular concentrations; correction for recovery variations |
| Analytical Instruments | UPLC-ESI-MS [17], UPLC-MS/MS [12], HPLC with electrochemical detection | High-sensitivity quantification of multiple analytes in small volume samples |
| System Components | Fluorinated ethylene propylene (FEP) tubing [12], precision syringe pumps, fraction collectors | Minimize analyte adsorption; ensure consistent low flow rates; maintain sample integrity |
Advanced Methodological Considerations
Challenges and Optimization Strategies
The application of microdialysis, particularly for hydrophobic compounds or in clinical settings, presents several methodological challenges that require careful consideration and optimization. Hydrophobic drugs with pronounced nonspecific binding to microdialysis system components represent a particular challenge, leading to low recovery rates and substantial carry-over effects [12]. Comprehensive investigations with compounds such as actinomycin D, selinexor, and ulixertinib have demonstrated that strategies including surface coating and optimized materials can significantly enhance data reliability [12].
For clinical applications in neuro-oncology, microdialysis has been safely used in patients intraoperatively, in intensive care units, and increasingly in ambulatory settings [24]. The development of portable, low-volume micropumps that can be worn by ambulatory patients has expanded monitoring possibilities, with typical perfusion rates now at 0.3 μL/min enabling 100% fractional recovery for many analytes [24]. When applying microdialysis in pathological tissue such as brain tumors, researchers must consider that tortuosity (the geometric complexity of extracellular space) differs from normal brain, potentially affecting analyte recovery and requiring cautious data interpretation [24].
Integration with Complementary Techniques
The research value of microdialysis is significantly enhanced when integrated with complementary analytical and imaging techniques. The combination of microdialysis with ultra-performance liquid chromatography and mass spectrometry enables simultaneous measurement of multiple neurotransmitters and metabolites from small sample volumes, as demonstrated in non-human primate studies quantifying GABA, glutamate, norepinephrine, epinephrine, dopamine, serotonin, and choline from <20 μL samples [17]. This multi-analyte capability provides comprehensive insights into complex neurochemical interactions that would be difficult to discern from single-analyte approaches.
Furthermore, the integration of microdialysis with modern imaging techniques such as positron emission tomography allows correlation of extracellular drug concentrations with intracellular distribution and target engagement [19]. This combined approach is particularly valuable in oncology drug development, where it can elucidate relationships between drug penetration, target modulation, and therapeutic response. As microdialysis continues to evolve, emerging trends include the development of smart probes with integrated sensors, wireless systems for chronic monitoring, and expanded applications in novel therapeutic areas including immunology and metabolic disorders [21] [26].
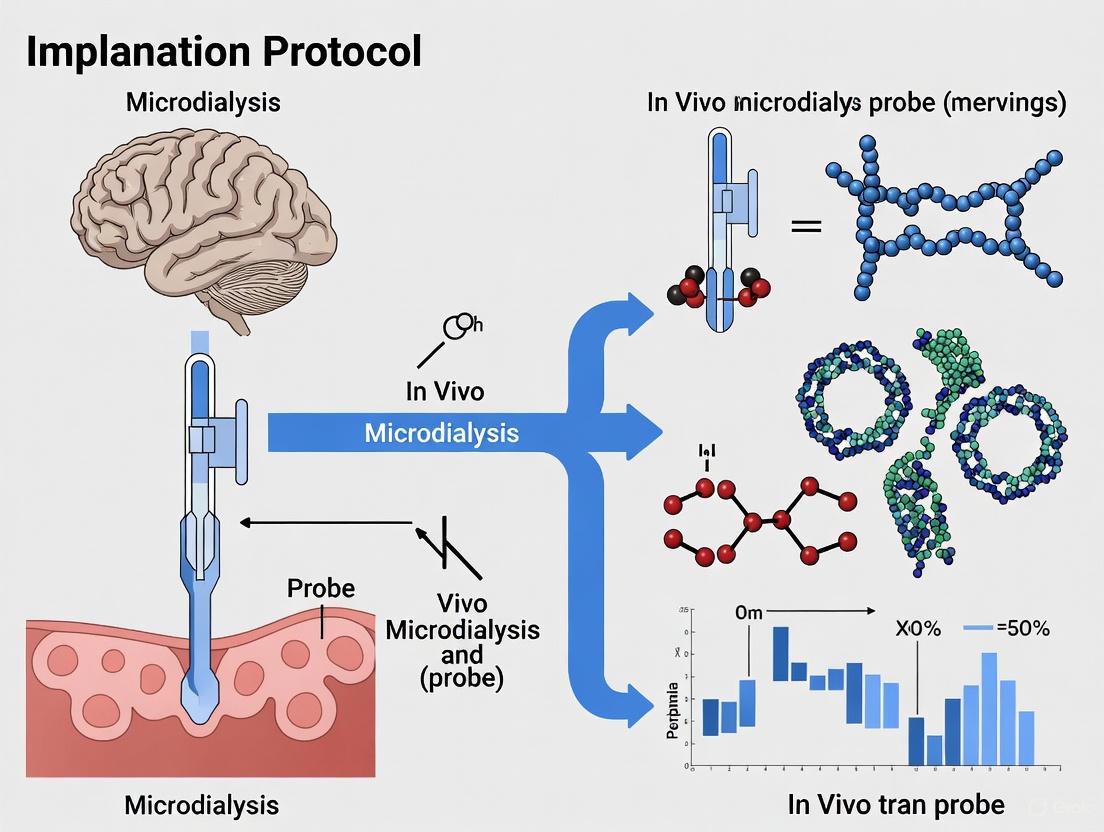
In vivo microdialysis is a minimally invasive sampling technique critical for continuous monitoring of unbound analyte concentrations in the extracellular fluid of specific tissues [12] [13]. The reliability and validity of data generated from microdialysis experiments are fundamentally governed by the appropriate selection and configuration of the microdialysis probe. This application note details the essential components of microdialysis probes—membrane types, molecular weight cut-off (MWCO), and geometric configurations—within the context of a broader thesis on in vivo implantation protocols. Aimed at researchers, scientists, and drug development professionals, this document provides structured quantitative data, detailed experimental protocols, and visual tools to guide probe selection and optimization, ensuring the acquisition of physiologically relevant and reproducible data.
Core Probe Components and Characteristics
The performance of a microdialysis probe is determined by the interplay of its three core physical characteristics: the membrane material, the molecular weight cut-off, and the probe's physical configuration.
Membrane Types and Material Properties
The membrane material is pivotal in determining analyte recovery and susceptibility to fouling. Different materials offer distinct advantages and limitations.
- Cellulose-Based Membranes (Cuprophane/Regenerated Cellulose): These are traditional, hydrophilic membranes commonly used in neuroscientific applications. An example is the CMA/11 probe with a 1 mm cuprophane membrane [27]. Their hydrophilic nature minimizes non-specific binding for many hydrophilic compounds but may be less suitable for hydrophobic molecules [12].
- Polyethersulfone (PES) Membranes: PES membranes, such as those found in the MAB 4.15.2 probe, are another common choice [27]. They offer good mechanical stability.
- Polysulfone (PSU) and Modified Membranes: Membranes fabricated from polysulfone, often with additives like polyvinylpyrrolidone (PVP), are widely used [28]. PVP enhances hydrophilicity and hemocompatibility, reducing undesired protein fouling. These membranes can be further modified with antifouling surface treatments, such as mono(ethylene glycol) (MEG) silane, to create a hydrophilic barrier that prevents protein adsorption and pore occlusion, thereby maintaining permeability in complex biological environments like blood serum [28].
- Polyacrylonitrile Membranes: These membranes have been used in "loop type" probes designed for subcutaneous tissue, offering another material option for specific applications [29].
Table 1: Common Microdialysis Membrane Materials and Their Properties
| Membrane Material | Key Properties | Advantages | Considerations | Common Applications |
|---|---|---|---|---|
| Cuprophane/Regenerated Cellulose | Hydrophilic | Low non-specific binding for hydrophilic analytes | Potential for higher biofouling; challenged by hydrophobic drugs | Neuroscience; sampling of neurotransmitters [13] [27] |
| Polyethersulfone (PES) | Mechanically robust, moderate hydrophilicity | Good chemical stability | May require optimization for hydrophobic compounds | General in vivo sampling [27] |
| Polysulfone (PSU)/PVP Blend | Can be engineered for asymmetry and porosity | Tunable permeability; amenable to antifouling coatings | Native form can be hydrophobic | Hemodialysis; sampling from complex fluids [28] |
| Surface-Modified Membranes | Hydrophilic antifouling layer (e.g., MEG) | Significantly reduced protein adsorption and fouling | Coating process adds complexity | Long-term implantation; sampling from serum/blood [28] |
Molecular Weight Cut-Off (MWCO)
The MWCO is a critical parameter that defines the size-selectivity of the membrane.
- Definition: MWCO is defined as the lowest molecular weight (in Daltons) at which 90% of a solute is retained by the membrane [30]. It is important to note that this definition is not absolute and can sometimes refer to 80% retention [30].
- Selection Guidance: The MWCO must be selected to retain large macromolecules (like proteins) while allowing the analyte of interest to pass through freely. Commercially available microdialysis probes typically offer MWCOs ranging from 1,000 to 300,000 Da [30]. For neurochemical monitoring, common MWCOs are around 6 kDa and 13 kDa [13] [27]. For sampling drugs or metabolites, the membrane's MWCO should be significantly larger than the molecular weight of the target analyte to ensure efficient recovery.
- Limitations: MWCO is a useful guide but has limitations. The value is often determined using standard molecules like dextrans or polyethylene glycol, which may have different geometries (e.g., linear vs. globular) compared to the target analyte, affecting actual retention [31]. Furthermore, membrane-analyte interactions such as adsorption can alter effective retention, particularly for hydrophobic compounds [12] [31].
Table 2: Typical MWCO Ranges and Applications
| MWCO Range | Typical Analytic Categories | Example Applications |
|---|---|---|
| 1 - 6 kDa | Small molecules, neurotransmitters, drugs, most amino acids | Neurotransmitter monitoring (e.g., dopamine, acetylcholine); pharmacokinetic studies of small molecule drugs [13] [32] |
| 10 - 30 kDa | Peptides, small proteins, larger drug molecules | Cytokine sampling; biomarker discovery in pathological tissues |
| > 50 kDa | Larger proteins and biotherapeutics | Sampling of antibodies or protein-based therapeutics in tumors |
Probe Configurations and Dimensions
The physical design of the probe influences its fluid dynamics, recovery efficiency, and tissue compatibility.
- Concentric Design: This is the most common configuration for cerebral and tissue microdialysis [12] [27]. It features a concentric arrangement where an inner cannula delivers the perfusate to the tip of the probe, which is surrounded by a semi-permeable membrane. The dialysate then flows back through an outer shaft. This design is robust and widely used in commercial systems like those from CMA Microdialysis [33].
- Side-by-Side (Linear) Design: In this configuration, the inlet and outlet tubing run parallel, with a section of the membrane between them forming the "window" for dialysis [33] [27]. This design can be fabricated in-lab and allows for longer membrane lengths, which can increase relative recovery [27] [29].
- Loop-Type Probes: These probes utilize longer membranes (e.g., 20–100 mm) arranged in a loop, significantly increasing the membrane surface area. This design provides higher relative recovery (>50%) at higher flow rates (>5 µL/min) and is particularly useful for sampling from subcutaneous tissue in therapeutic drug monitoring [29].
- Microfabricated Probes: Emerging technologies allow for the fabrication of ultra-small probes in silicon. These probes can be as small as 45 µm thick and 180 µm wide, drastically reducing tissue damage and enabling sampling from microenvironments not accessible with conventional probes [32]. They incorporate a buried U-shaped microfluidic channel and a nanoporous membrane, representing a significant advancement in spatial resolution [32].
Table 3: Microdialysis Probe Configurations and Performance Characteristics
| Probe Configuration | Typical Dimensions | Relative Recovery | Advantages | Limitations |
|---|---|---|---|---|
| Concentric | Diameter: >220 µm [32]; Membrane: 1-4 mm | Varies with flow rate and MWCO; e.g., ~8.9% for cocaine in brain at 1.2 µL/min [34] | Standard, robust design; suitable for deep tissue implantation | Larger diameter causes more tissue damage; limited design flexibility |
| Side-by-Side (Linear) | Membrane length can be customized (e.g., 2 mm [27]) | Can be optimized via membrane length and flow rate | Simpler construction; suitable for custom lab fabrication | Potentially less robust for certain implantations |
| Loop-Type | Membrane length: 20-100 mm [29] | High; >50% at >5 µL/min [29] | High recovery rates; suitable for subcutaneous space | Larger size may not be suitable for delicate tissues like brain |
| Microfabricated | e.g., 45 µm thick × 180 µm wide [32] | Low (2-7%) at very low flow rates (100 nL/min) [32] | Minimal tissue damage; high spatial resolution; potential for functional integration | Complex fabrication; lower recovery requires highly sensitive analytics |
Experimental Protocols for Probe Characterization
Ensuring the reliability of microdialysis data requires rigorous pre-experimental characterization of the probes. The following protocols are essential for quantifying recovery and identifying potential issues like analyte adsorption.
Protocol for In Vitro Recovery Determination via Retrodialysis
This method is used to estimate the in vivo recovery of a probe for an exogenous compound prior to an animal experiment [12].
1. Principle: The probe is immersed in a solution containing the analyte of interest, which is also included in the perfusate. The disappearance of the analyte through the membrane (retrodialysis) is measured, and the relative recovery is calculated based on the difference between the perfusate concentration and the dialysate concentration.
2. Research Reagent Solutions:
- Perfusate: Ringer's solution or artificial cerebrospinal fluid (aCSF).
- Analyte Stock Solution: A known concentration of the target drug/compound dissolved in perfusate.
- External Medium: The same analyte solution as the perfusate, maintained at a known concentration in a beaker.
- Equipment: Microdialysis pump, fraction collector, analytical instrument (e.g., UPLC-MS/MS).
3. Step-by-Step Procedure:
1. Prepare a solution of the analyte (e.g., 100 ng/mL) in Ringer's solution. For hydrophobic compounds, adding a carrier protein like Bovine Serum Albumin (BSA, 0.5%-1.5%) or a low concentration of organic solvent (e.g., 0.01-0.1% DMSO) may be necessary to minimize non-specific binding [12].
2. Immerse the microdialysis probe in a beaker containing the same analyte solution (the external medium). Maintain the solution at a constant temperature (37°C) with continuous, gentle stirring.
3. Perfuse the probe with the analyte solution at the desired flow rate (e.g., 0.5-1.0 µL/min) using a precision pump.
4. Allow the system to equilibrate for approximately 1 hour.
5. Collect three or more consecutive dialysate fractions over defined intervals (e.g., 1 hour each).
6. Analyze the concentration of the analyte in the dialysate fractions (Cdialysate) and the original perfusate (Cperfusate) using a sensitive analytical method.
7. Calculate the relative recovery (RR) using the formula for retrodialysis:
RR (%) = [(C_perfusate - C_dialysate) / C_perfusate] × 100 [12].
Protocol for Assessing Analyte Adsorption to the System
Hydrophobic compounds are prone to non-specific binding (adsorption) to the various surfaces of the microdialysis system (tubing, probe, collection vials), which can lead to significant analyte loss and underestimation of true concentrations [12].
1. Principle: A solution with a known, precise concentration of the analyte is passed through the entire microdialysis setup (or its components), and the recovered concentration is measured. The recovery rate indicates the degree of adsorption.
2. Research Reagent Solutions:
- Test Solution: A known concentration of the analyte (e.g., 100 ng/mL) in Ringer's solution or aCSF.
- Equipment: Microdialysis syringe, tubing (e.g., FEP, PEEK), collection vials (polypropylene, glass), analytical instrument.
3. Step-by-Step Procedure:
- Nominal Concentration Test: Transfer the prepared test solution into different types of collection vials (e.g., polypropylene, plastic microdialysis tubes, glass). Analyze the concentration in each vial after transfer. Recovery is calculated as: (Measured Concentration / Prepared Concentration) × 100 [12]. This identifies losses due to vial adsorption.
- Tubing and System Adsorption Test:
1. Load the test solution into a microdialysis syringe.
2. Pump the solution through a defined length (e.g., 1 m) of the intended tubing (e.g., FEP or PEEK) at the experimental flow rate.
3. Collect samples at the outlet at multiple time points.
4. Also, collect samples directly from the syringe before and after perfusing the tubing.
5. Analyze all samples and calculate recovery for each step to pinpoint the source of adsorption [12].
Visualization and Decision Support
Probe Selection and Optimization Workflow
The following diagram outlines a logical workflow for selecting and optimizing a microdialysis probe based on experimental goals and analyte properties.
The Scientist's Toolkit: Essential Research Reagent Solutions
The following table details key materials and reagents essential for the setup and execution of microdialysis experiments, particularly those involving challenging hydrophobic compounds.
Table 4: Key Research Reagent Solutions for Microdialysis
| Reagent/Material | Function/Description | Application Notes |
|---|---|---|
| Artificial Cerebrospinal Fluid (aCSF) | Perfusate that mimics the ionic composition of brain extracellular fluid. Contains NaCl, KCl, CaCl₂, MgSO₄, and buffers [13] [27]. | Standard perfusate for cerebral microdialysis; ensures physiological ionic environment. |
| Ringer's Solution | A balanced salt solution used as a perfusate. | Can be used as an alternative to aCSF; composition can be modified [12]. |
| Bovine Serum Albumin (BSA) | Carrier protein added to perfusate or solutions. | Used at 0.5%-1.5% to minimize non-specific binding of hydrophobic drugs to the system [12]. |
| Dimethylsulfoxide (DMSO) | Organic solvent for solubilizing compounds. | Used at low concentrations (e.g., 0.01-0.1%) to enhance the solubility of hydrophobic drugs in aqueous perfusates [12]. |
| Fluorinated Ethylene Propylene (FEP) Tubing | Plastic tubing for connecting the syringe pump to the probe. | Compared to Polyetheretherketone (PEEK) for its adsorption properties [12]. FEP may exhibit lower binding for some analytes. |
| Polyetheretherketone (PEEK) Tubing | Alternative plastic tubing known for high strength and biocompatibility. | Commonly used; adsorption tests are recommended to select the best tubing for a specific analyte [12]. |
| Antifouling Surface Modifiers | e.g., mono(ethylene glycol) silane. | Forms a hydrophilic monolayer on membrane surfaces to prevent protein adsorption and fouling, crucial for long-term studies in serum or blood [28]. |
Step-by-Step Implantation Protocol: From Stereotaxic Surgery to Chronic Sampling
The success of an in vivo microdialysis experiment is fundamentally determined during the pre-implantation planning phase, specifically through the appropriate selection of the probe and its semipermeable membrane. This selection must be meticulously aligned with the chemical properties of the target analyte, the biological model, and the experimental timeframe. An unsuitable probe can lead to inadequate recovery, significant analyte loss due to non-specific binding, and ultimately, unreliable data. This document provides a structured framework for researchers to navigate the critical parameters of probe and membrane selection, ensuring the acquisition of pharmacologically relevant data from the outset.
The core principle of microdialysis involves the diffusion of substances across a semipermeable membrane driven by a concentration gradient [12]. The probe assembly, encompassing the membrane, tubing, and cannula, is implanted into the target tissue, where a perfusate is circulated at a low, constant flow rate. The unbound analyte in the extracellular fluid passively diffuses into the dialysate, which is collected for analysis [12]. The efficiency of this exchange—the recovery rate—is vulnerable to numerous factors, with probe configuration and membrane composition being paramount.
Key Selection Parameters for Probes and Membranes
Selecting the optimal probe and membrane requires a systematic evaluation of several interconnected factors. The table below summarizes the primary considerations and their implications for experimental design.
Table 1: Key Parameters for Probe and Membrane Selection
| Parameter | Considerations | Impact on Experiment |
|---|---|---|
| Analyte Properties | Molecular weight/size (Da), hydrophobicity, chemical stability (e.g., photostability, thermostability) [12]. | Determines required Molecular Weight Cut-Off (MWCO) and membrane material; hydrophobic compounds require specialized materials to minimize non-specific binding (NSB) [12]. |
| Molecular Weight Cut-Off (MWCO) | Membrane pore size rating; typically 20 kDa for small molecules like neurotransmitters [35] to 100 kDa [36] or 1,000 kDa for peptides/proteins [37]. | Must be sufficiently high to allow analyte passage but low enough to exclude macromolecules and debris that could foul the membrane. |
| Membrane Material | Cuprophane (cellulose), Polyethersulfone (PES), Polyacrylonitrile (PAN), polysulfone [37] [12]. | Influences biocompatibility, recovery efficiency, and propensity for NSB; material choice is critical for hydrophobic compounds [12]. |
| Animal Model & Sampling Site | Species (mouse, rat, etc.), target brain region or peripheral tissue, freely moving vs. anesthetized [37]. | Dictates probe physical dimensions (length, shaft size, weight) and configuration (cannula-based for chronic, linear for peripheral tissues) [37]. |
| Experimental Duration | Acute (hours, under anesthesia) vs. Chronic (days, in freely moving animals) [37]. | Determines probe type and need for a guide cannula; chronic implants risk fouling and foreign body reaction, potentially affecting calibration over time [38]. |
Probe Type Selection Based on Experimental Model
The choice of probe is critically dependent on the experimental model and design. Manufacturers offer a range of probes tailored to specific applications:
- Chronic Experiments in Freely Moving Rodents: For studies involving dopamine, serotonin, acetylcholine, or other small molecules in freely moving animals, cannula-style probes are essential. The CX-i series is optimized for mice due to its lightweight and narrow body, while the FZ probe is ideal for rats or longer mouse experiments, featuring a locking mechanism to prevent dislodgement [37]. These probes are used with a guide cannula that is surgically implanted and protected with a dummy probe during recovery. On the experimental day, the active probe is inserted in seconds, minimizing animal stress [37].
- Acute Experiments Under Anesthesia: For short-term studies in anesthetized animals, the DZ probe is a compact option designed for direct implantation without a guide cannula, making it ideal for use in stereotaxic frames [37].
- Large Molecule Sampling: To measure peptides, proteins, or antibodies, specialized probes like the AtmosLM PEP probe with a 1 million Dalton MWCO membrane are required. These may also include features like a vent to equalize internal pressure and prevent unwanted convection, thereby improving sampling accuracy [37].
- Peripheral Tissue and Specialized Applications: For dermal or vascular work, linear probes with a built-in needle are available to simplify implantation [37]. Furthermore, metal-free probe series exist for studies that involve concurrent MRI or PET imaging, preventing signal interference [37].
Membrane Selection for Analyte-Specific Challenges
The membrane material is a key determinant of recovery and data validity, especially for challenging analytes.
- Hydrophobic Compounds: Drugs like ulixertinib, selinexor, and actinomycin D exhibit a pronounced tendency for non-specific binding to microdialysis system components (tubing, membrane), leading to low recovery and substantial carry-over effects [12]. Mitigation strategies include the use of surface coatings, optimized membrane materials, and the addition of agents like bovine serum albumin (BSA, 0.5%-1.5%) or DMSO (0.01%-0.1%) to the perfusate to reduce binding [12].
- Neuropeptides and Proteinaceous Analytes: The detection of low-concentration, labile peptides like enkephalins requires high-sensitivity methods. While MWCO is a primary factor, specialized analytical techniques such as methionine oxidation followed by solid-phase extraction and nano-liquid chromatography/mass spectrometry (nLC-MS) are employed to stabilize and accurately quantify these molecules [39].
Quantitative Data and Calibration Methods
Accurate quantification requires calibrating the recovery efficiency of each probe, which is the ratio between the dialysate concentration and the actual extracellular concentration [12]. The choice of calibration method depends on the analyte and experimental constraints.
Table 2: Microdialysis Probe Calibration Methods
| Calibration Method | Principle | Advantages | Disadvantages | Calculation |
|---|---|---|---|---|
| In Vitro Dialysis [12] | Probe immersed in a stirred solution of known analyte concentration. | No animals needed; easy to control conditions. | Does not account for in vivo mass transfer resistance in tissue. | RR = C_dialysate / C_external |
| Retrodialysis (In Vivo/In Vitro) [12] [38] | An internal standard (or the drug itself) is added to the perfusate and its disappearance is measured. | Accounts for mass transfer resistance in vivo; relatively straightforward. | Requires a drug-free brain (for in vivo); assumes diffusion is symmetric. | RR = (C_perfusate - C_dialysate) / C_perfusateC_ECF = C_dialysate / RR |
| No-Net-Flux Method [12] | The probe is perfused with varying concentrations of the analyte to find the point where there is no net flux. | Well-investigated; provides a direct measure. | Requires a steady state and a large number of samples/animals. | (Intercept calculation from a concentration curve) |
| Ultra-Slow Flow Rate Method [12] | The flow rate is reduced to a very low level (e.g., 0.1-0.3 µL/min) to increase equilibration. | Increases recovery rate; useful for low-flow applications. | Results in very small sample volumes, demanding highly sensitive analytics. | RR = (1 - exp(-PeAQ)) × 100 |
Experimental Protocols for Probe Setup and Validation
Protocol: In Vitro Probe Recovery Assessment via Retrodialysis
This protocol is used to determine the baseline recovery of a probe for a specific analyte prior to in vivo experimentation [12].
- Preparation: Immerse the microdialysis probe in a beaker containing a stirred blank Ringer's solution, maintained at 37°C. For hydrophobic compounds, add BSA (e.g., 0.5%-1.5%) or DMSO to the solution to mimic in vivo conditions and minimize NSB [12].
- Perfusion: Perfuse the probe with a solution of the target analyte (e.g., 100 ng/mL) at the intended experimental flow rate (e.g., 0.5 μL/min) using a precision syringe pump.
- Equilibration: Allow the system to equilibrate for a sufficient period (e.g., 60-90 minutes) to ensure stable diffusion.
- Sample Collection: Collect three consecutive dialysate fractions at defined intervals (e.g., 1 hour).
- Analysis and Calculation: Quantify the analyte concentration in the dialysate (Cdialysate) and the original perfusate (Cperfusate) using a sensitive analytical method (e.g., UPLC-MS/MS). Calculate the relative recovery (RR) using the formula:
RR = (C_perfusate - C_dialysate) / C_perfusate
Protocol: Surgery and Probe Implantation in Rodent Brain
This protocol details the stereotaxic implantation of a microdialysis probe for sampling in the brain, such as the medial Prefrontal Cortex (mPFC) or Nucleus Accumbens (NAc) [40] [35] [41].
- Anesthesia and Positioning: Deeply anesthetize the rodent (e.g., using isoflurane at 4% for induction, 2-3% for maintenance) and securely mount it in a stereotaxic instrument. Place the animal on a heating pad to maintain body temperature.
- Surgical Exposure: Make a sagittal incision to expose the skull. Clean and dry the skull surface. Identify Bregma and Lambda and level the skull.
- Guide Cannula Implantation (For Chronic Studies): For chronic studies in freely moving animals, drill a hole for the guide cannula above the target region. Implant the guide cannula (e.g., AG guide for FZ probes) and secure it to the skull with anchoring screws and dental cement [37]. Insert a dummy probe to maintain patency.
- Probe Implantation (Acute or Post-Recovery):
- For acute studies: Drill a hole at the calculated stereotaxic coordinates. Gently lower the probe (e.g., a DZ probe) directly into the brain tissue [37].
- For chronic studies: After a recovery period (e.g., 48 hours), gently remove the dummy probe and insert the active microdialysis probe (e.g., CX or FZ) through the guide cannula [37].
- Perfusion and Securing: Throughout the implantation, continuously perfuse the probe with artificial cerebrospinal fluid (aCSF; e.g., 149 mM NaCl, 2.8 mM KCl, 1.2 mM CaCl₂, 1.2 mM MgCl₂, 0.25 mM ascorbic acid, 5.4 mM D-glucose, pH 7.2-7.4) [40] at a minimal flow rate. Once correctly positioned, secure the probe assembly to the skull with additional dental cement.
- Recovery and Experiment: Allow the animal to recover in its home cage for the prescribed time before commencing microdialysis sampling.
Workflow Visualization
The following diagram illustrates the core decision-making process for selecting a microdialysis probe based on experimental parameters.
Diagram 1: Probe Selection Workflow
The following diagram outlines the key stages of a microdialysis experiment, from preparation to data analysis.
Diagram 2: Microdialysis Experimental Workflow
The Scientist's Toolkit: Research Reagent Solutions
A successful microdialysis experiment relies on a suite of specialized reagents and materials. The following table details essential components and their functions.
Table 3: Essential Research Reagents and Materials for Microdialysis
| Reagent/Material | Function/Application | Example Protocols & Notes |
|---|---|---|
| Artificial Cerebrospinal Fluid (aCSF) [40] | Standard perfusate solution that mimics the ionic composition of brain extracellular fluid, minimizing tissue disturbance during sampling. | 149 mM NaCl, 2.8 mM KCl, 1.2 mM CaCl₂, 1.2 mM MgCl₂, 0.25 mM ascorbic acid, 5.4 mM D-glucose (pH 7.2-7.4) [40]. |
| Ringer's Solution [35] | A physiological salt solution commonly used as a perfusate, sometimes with modifications like Lactated Ringer's [36]. | Consists of (in mmol/l): 140 NaCl, 1.2 CaCl₂, 3.0 KCl, 1.0 MgCl₂ [35]. |
| Bovine Serum Albumin (BSA) [12] | Added to perfusate (0.5%-1.5%) to saturate non-specific binding sites on tubing and membrane, crucial for recovering hydrophobic drugs [12]. | Used in retrodialysis calibration and in vivo sampling for compounds like actinomycin D and ulixertinib [12]. |
| Dimethyl Sulfoxide (DMSO) [12] | Organic solvent used in low concentrations (e.g., 0.01-0.1%) to enhance the solubility of highly hydrophobic compounds in aqueous perfusates [12]. | Requires careful optimization to avoid cellular toxicity and ensure compatibility with the analytical system. |
| Internal Standards (for calibration) [12] [38] | Used in retrodialysis to determine in vivo recovery. The loss of the standard from the perfusate is assumed to equal the recovery of the analyte. | Examples include 2-deoxyglucose (for metabolism assessment), antipyrine, and vitamin B12 [38]. Isotopically labeled standards (e.g., D4-Met-Enk) are used for LC-MS [39]. |
| Perchloric Acid [41] | Added to collection vials to stabilize easily oxidizable neurotransmitters like dopamine, preventing degradation prior to analysis. | Samples are collected directly into a small volume (e.g., 10 µL) of 0.1 M perchloric acid [41]. |
| High MWCO Membranes (e.g., AtmosLM PEP) [37] | Specialized membranes with a high molecular weight cut-off (e.g., 1,000 kDa) for sampling large biomolecules like peptides, proteins, and antibodies. | Feature a vent to equalize internal pressure, preventing convection and improving accuracy for large molecules [37]. |
| Custom-Microdialysis Probes [37] [39] | Probes can be customized with alternative membrane materials (PES, PAN), shaft sizes, and membrane lengths to suit specific experimental needs [37]. | Custom, smaller probes can be fabricated to minimize tissue damage, similar to fiber photometry probes [39]. |
Animal Preparation and Anesthesia Protocols for Rodents and Larger Species
In vivo microdialysis is a cornerstone technique for monitoring the chemistry of the extracellular space in living tissues, enabling the sampling of unbound analytes such as neurotransmitters, hormones, and pharmaceuticals directly from the site of action [42]. The successful implantation of a microdialysis probe and the subsequent acquisition of physiologically relevant data are critically dependent on appropriate animal preparation and the selection of an anesthetic protocol that ensures animal welfare while minimizing interference with the experimental outcomes. The choice of anesthesia is a significant confounder, as it can modulate neurovascular coupling, cerebral blood flow, and baseline neuronal metabolism, thereby threatening the scientific validity of the data [43]. This application note provides a detailed framework for animal preparation and anesthesia protocols tailored for microdialysis probe implantation in both rodents and larger species, framed within the context of a broader thesis on in vivo microdialysis research.
Anesthesia Protocols for Rodents
Selecting an appropriate anesthetic regimen is paramount for rodent models. The ideal protocol provides stable surgical anesthesia, minimizes physiological disturbances, and, where possible, allows for a swift recovery to enable studies in awake, freely moving animals.
Inhalant Anesthesia: Isoflurane
Inhalant anesthesia, particularly with isoflurane, is widely used due to its reliability and the capacity for rapid induction and recovery [44].
- Procedure: Mice are anesthetized with isoflurane delivered in 100% oxygen at a flow rate of 0.6 L/min. A delivered concentration of 1.3%, which is the EC50 for B6 mice, is used as a target for surgical anesthesia. The concentration should be adjusted based on the monitoring of physiological parameters to maintain a consistent plane of anesthesia [13].
- Monitoring and Maintenance: Core body temperature and breathing rate should be recorded at regular intervals (e.g., every 12.5 minutes) and maintained within a physiological range throughout the procedure using a heating pad [13].
- Application: This method is suitable for acute sample collection during anesthesia. For recovery surgeries and experiments in awake animals, the probe is inserted after the animal has recovered from the anesthetic [13].
Injectable Anesthesia Protocols
Injectable combinations are valuable, especially in environments where vaporizer systems are impractical. Recent studies have systematically compared various mixtures for surgical procedures.
Table 1: Comparison of Injectable Anesthetic Protocols for Mouse Surgery
| Anesthetic Combination | Dosage and Route | Surgical Anesthesia Duration (median, min) | Key Characteristics | Reversal Agent |
|---|---|---|---|---|
| Ketamine-Medetomidine | Ketamine (100 mg/kg) + Medetomidine (0.3 mg/kg) [44] | 120 {100-125} [44] | Longest surgical duration; requires analgesia supplementation. | Atipamezole (0.3 mg/kg, s.c.) [44] |
| Alfaxalone-Medetomidine | Alfaxalone (80 mg/kg, s.c.) + Medetomidine (0.3 mg/kg, s.c.) [44] | 53 {25-100} [44] | Reliable for surgical cardiac models; compatible with reversal. | Atipamezole (0.3 mg/kg, s.c.) [44] |
| Alfaxalone-Mede-Buprenorphine | Alfaxalone (80 mg/kg) + Medetomidine (0.3 mg/kg) + Buprenorphine (0.075 mg/kg), s.c. [44] | Similar to Alfaxalone-Mede [44] | Provides enhanced analgesia; recommended for ischemia-reperfusion surgery. | Atipamezole (0.3 mg/kg, s.c.) [44] |
- General Procedure for Injectables: Drugs are extemporaneously diluted in saline (0.9%). After injection, mice are placed back in their cage until the righting reflex is lost. They are then positioned on a heating pad (target 37.5°C) and provided with 30% O2-enriched air via a mask [44].
- Reversal of Anesthesia: Administration of atipamezole (an α2-adrenergic receptor antagonist) significantly reduces both recovery time and total immobilization time, which is beneficial for animal welfare [44].
Anesthesia and Protocols for Larger Species
While the principles of anesthesia are similar, working with larger species like non-human primates (NHPs) requires specialized approaches for prolonged experiments in awake, behaving animals.
- Chronic Implantation for Awake Behaving Studies: A semi-chronic implantation method is used in rhesus macaques. Guide cannulae are implanted stereotactically, allowing for the insertion of microdialysis probes via removable insets while the animal is awake and engaged in cognitive tasks [17]. This setup permits reliable, simultaneous measurements of multiple neurotransmitters from small sample volumes (<20 µl) in the sensory cortex during different behavioral states [17].
- Anesthetic Management: General anesthesia is required for the initial survival surgery to implant the guide cannula. Although specific protocols for NHPs are not detailed in the provided results, the principles of maintaining physiological stability and aseptic conditions are paramount.
Comprehensive Experimental Workflow for Rodent Microdialysis
The following diagram illustrates the key decision points and procedural steps for conducting a microdialysis experiment, from animal preparation to data collection.
The Scientist's Toolkit: Key Research Reagent Solutions
Successful microdialysis experiments rely on a suite of specialized materials and reagents. The following table details essential components and their functions.
Table 2: Essential Materials and Reagents for In Vivo Microdialysis
| Item | Function and Description | Example Specifications |
|---|---|---|
| Microdialysis Probe | The core sampling unit; a concentric catheter with a semipermeable membrane that allows diffusion of analytes [42]. | CMA 7 probe (Cuprophane, 1 mm membrane, 6-kDa cutoff) [13]; CMA 12 for vmPFC in rats [45]. |
| Guide Cannula | A permanently implanted guide tube affixed to the skull, allowing for the precise insertion of the probe into the target brain region [46]. | CMA 12 guide cannula for rats [45]. |
| Perfusate | A physiological salt solution perfused through the probe to equilibrate with the extracellular fluid [42]. | Ringer's solution [13] or artificial cerebrospinal fluid (aCSF: 147 mM NaCl, 1.26 mM CaCl2, 2.5 mM KCl, 1.18 mM MgCl2) [45]. |
| Microsyringe Pump | Drives the perfusate through the system at a constant, very low flow rate to ensure consistent sampling [47]. | Flow rates of 0.5 - 2.0 µL/min are typical [13] [47] [45]. |
| Analgesics | Used to manage post-operative pain and as part of some anesthetic protocols to improve animal welfare and data stability. | Buprenorphine (0.075 mg/kg, s.c.) [44]. |
| Anesthetic Reversal Agent | Antagonizes the effects of certain anesthetics (e.g., α2-agonists) to accelerate recovery. | Atipamezole (0.3 mg/kg, s.c.) [44]. |
Detailed Methodologies for Key Experiments
Protocol: Stereotaxic Implantation of a Guide Cannula in the Rat Prefrontal Cortex
This protocol is adapted from established methods for implanting guide cannulae in the rat brain [45].
- Anesthesia: Induce anesthesia with 2% isoflurane delivered in oxygen (0.6 L/min). Inject a local anesthetic (e.g., lidocaine with epinephrine) subcutaneously at the incision site.
- Stereotaxic Positioning: Secure the animal in a stereotaxic frame maintaining anesthesia. Ensure the skull is level.
- Surgical Exposure: Make a midline scalp incision and clean the exposed skull surface.
- Drilling and Implantation: Using stereotaxic coordinates from a rat brain atlas (e.g., Paxinos and Watson), drill holes for the guide cannulae (e.g., for vmPFC: A 3.2 mm; L ±0.8 mm; DV 2.0 mm from bregma). Slowly lower the guide cannulae into place over a 3-minute period to minimize tissue damage.
- Fixation: Affix the cannulae to the skull using three stainless steel screws and dental acrylic.
- Post-operative Care: Administer analgesics (e.g., buprenorphine) and allow the animal to recover for a minimum of 3-7 days before commencing microdialysis experiments [45].
Protocol: Conducting Microdialysis in a Freely Moving Rat
This protocol outlines the procedure for sampling in a recovered, awake animal [47] [45].
- Habituation: Following recovery from surgery, place the animal in the test chamber for one or more habituation sessions (e.g., 3.5 hours daily) to acclimate it to the environment and tethering.
- Probe Insertion: On the experiment day, carefully insert a fresh microdialysis probe through the pre-implanted guide cannula into the target brain region (e.g., the striatum or vmPFC) while the animal is awake and freely moving.
- Perfusion and Equilibration: Perfuse the probe with aCSF or Ringer's solution at a constant flow rate (e.g., 1.0 - 2.0 µL/min). Allow the system to equilibrate for a prolonged period (e.g., 3-5 hours) to establish a stable baseline after the initial tissue perturbation caused by probe insertion [47] [45].
- Sample Collection: Collect baseline dialysate samples (e.g., 20-25 µL every 20 minutes). Subsequently, administer the experimental intervention (e.g., intravenous drug infusion) and continue collecting samples. Collect samples directly into microvials on dry ice and store them at -80°C until analysis [13] [47].
- Analysis: Analyze the samples using highly sensitive analytical techniques such as UPLC-ESI-MS for neurotransmitters or UPLC-MS/MS for pharmaceuticals [12] [17].
Stereotaxic surgery for the implantation of guide cannulas is a foundational technique in neuroscience, enabling researchers to deliver substances or implant probes into specific brain regions of awake, freely moving animals [48]. This methodology is particularly crucial for in vivo microdialysis, a powerful technique that allows for the continuous measurement of unbound drug concentrations and neurotransmitters in the brain extracellular fluid [12] [35]. When framed within the context of microdialysis probe implantation protocol research, a precise and reliable surgical procedure is paramount for collecting valid and reproducible data. This application note provides a detailed, actionable protocol for guide cannula implantation, drawing upon current methodologies and best practices to support researchers, scientists, and drug development professionals in this critical area.
The Scientist's Toolkit: Essential Materials and Reagents
The following table catalogs the core materials required for successful stereotaxic surgery and microdialysis probe implantation.
Table 1: Key Research Reagent Solutions and Essential Materials
| Item Category | Specific Examples & Specifications | Function and Application Note |
|---|---|---|
| Stereotaxic Apparatus | Rodent stereotaxic frame, guide cannula holder, ear bars, anterior mount [48] [49] | Provides precise three-dimensional positioning and stabilization of the animal's head for accurate targeting of brain structures. |
| Cannula Assemblies | Guide cannulas (e.g., 26 gauge, 1 mm cannula distance); Internal/dummy cannulas (e.g., 33 gauge) [48] [41] | Guide cannulas provide a permanent conduit to the target brain region. Dummy cannulas prevent occlusion, and internal cannulas are used for drug microinjection. |
| Surgical Instruments | Scalpel, forceps, needle drivers, scissors, screwdriver, 35 mm serrefines [48] | For performing the incision, tissue reflection, and other manual aspects of the surgical procedure. |
| Drilling System | Dental drill with foot pedal; 1 mm and 2.38 mm drill bits [48] [49] | For creating a burr hole in the skull for cannula insertion and holes for anchor screws. |
| Anesthesia & Analgesia | Isoflurane anesthetic machine with induction chamber and nose cone; Buprenorphine (0.1 mg/kg) [48] [35] [49] | Ensures the animal is unconscious and pain-free during surgery and during the post-operative recovery period. |
| Anchor & Cement Kit | 1 mm skull screws; Fast-curing dental acrylic resin (powder and liquid) [48] [49] | Skull screws provide mechanical anchor points. Dental cement forms a head cap that permanently secures the cannula assembly to the skull. |
| Implant Guides | Lightweight surgical titanium guides (e.g., Thorlabs OGL, OGF) [50] | Commercial guides designed to improve adhesion and stability of implanted devices via roughened surfaces and weep holes for cement. |
| Microdialysis Probes | Custom-made or commercial probes (e.g., CMA Microdialysis); cellulose membrane with a defined cut-off (e.g., 20 kDa) and active length (e.g., 2 mm) [40] [35] [39] | The core component of microdialysis, featuring a semi-permeable membrane that allows diffusion of analytes into the dialysate. |
| Perfusion System | Microperfusion pump (e.g., U-864 Syringe Pump), connector tubing, artificial cerebrospinal fluid (aCSF) or Ringer's solution [40] [35] [41] | Delivers perfusate at a controlled, low flow rate (e.g., 0.5-2.0 µL/min) to the probe and collects the dialysate. |
Stereotaxic Coordinate Selection
Selecting the correct stereotaxic coordinates is the most critical step for accurately targeting the brain region of interest. Coordinates are measured in millimeters relative to bregma, the landmark on the skull where the coronal and sagittal sutures converge [48]. The table below summarizes validated coordinates from recent literature for different brain regions and model organisms.
Table 2: Stereotaxic Coordinates for Guide Cannula and Probe Placement
| Brain Region | Species | Anterior/Posterior (AP) | Medial/Lateral (ML) | Dorsal/Ventral (DV) | Citation |
|---|---|---|---|---|---|
| Dorsomedial Hypothalamus (DMH) | Young Rat (P28-30) | -2.0 mm to -2.25 mm | ±0.5 mm | -6.0 mm to -6.75 mm (from skull surface) | [48] |
| Medial Prefrontal Cortex (mPFC) | Rat | +2.0 mm | ±0.5 mm | -4.0 mm (from skull surface) | [40] |
| Nucleus Accumbens (NAc) Core-Shell | Rat | +1.85 mm | -1.4 mm | -7.8 mm (from dura mater) | [35] |
| Nucleus Accumbens (NAc) | Rat | +1.7 mm | ±1.7 mm (6° angle) | -5.8 mm | [41] |
| Nucleus Accumbens Shell (NAcSh) | Mouse | Anterior/Posterior and Medial/Lateral coordinates are region-specific. Dorsal/Ventral is target-depth dependent. | [39] |
Detailed Surgical Protocol
Pre-Surgical Preparation
- Instrument Sterilization: Sterilize all surgical instruments using a hot bead sterilizer (15 seconds) and/or chemical sterilants like 0.5% Baxedin Pre-Op and 100% ethanol [48].
- Setup: Turn on the heating pad and lamp to maintain the animal's body temperature. Set up the stereotaxic frame and secure the guide cannula into its holder on the stereotaxic arm. Prepare sterile saline (2 ml, warmed to ~37°C) and analgesic (e.g., 0.1 ml of 0.1 mg/kg buprenorphine) for subcutaneous injection [48].
- Anesthesia Induction: Induce anesthesia in the animal (e.g., rat or mouse) using isoflurane (3.5-4.0%) in an induction chamber. Transfer the deeply anesthetized animal to the stereotaxic frame, securing the head using ear bars and an anterior mouth holder. Maintain anesthesia with 2.0-3.0% isoflurane via a nose cone [48] [35].
- Animal Monitoring: Insert a lubricated rectal thermometer and carefully monitor body temperature throughout the procedure, maintaining it at approximately 37°C using the heating pad [48] [49].
- Pre-operative Care: Shave the scalp from the neck to behind the eyes. Apply an antiseptic (e.g., 0.5% Baxedin Pre-Op) and a topical anesthetic (e.g., 2% Xylocaine) to the shaved area. Apply a tear gel to prevent corneal drying. Administer the pre-warmed saline and analgesic subcutaneously [48].
Surgical Approach and Cannula Implantation
The following diagram illustrates the key stages of the stereotaxic surgery workflow.
Figure 1: Stereotaxic surgery workflow for guide cannula implantation.
- Incision and Skull Exposure: Using a scalpel, make a mid-sagittal incision (1-2 cm long) on the scalp. Use hemostats or serrefines to retract the skin and expose the skull [48] [49].
- Identify Bregma and Level the Skull: Clear the skull surface of connective tissue and dry it using sterile cotton swabs. Clearly identify the bregma landmark. Ensure the skull is level in both the anterior-posterior and medial-lateral planes by verifying the dorsal-ventral coordinate of bregma and lambda are equal [48] [49].
- Targeting and Drilling:
- Position the guide cannula above bregma and zero the stereotaxic coordinates. Then, move the cannula to the pre-determined target coordinates (see Table 2) and mark the skull with a fine-tip permanent marker [48].
- Lift the cannula and use an electric drill with a 1 mm drill bit to create a hole for an anchor screw anterolateral to the target site. Insert a 1 mm screw, but do not fully tighten it [48].
- Drill the main burr hole at the target site using a larger drill bit (e.g., 2.38 mm). Use a sterile needle to gently puncture the dura mater to facilitate cannula insertion [48] [49].
- Cannula Placement and Fixation:
- Return the guide cannula to the recorded target coordinates. Slowly lower the cannula to the final dorsal-ventral coordinate [48].
- Ensure the skull is completely dry. Mix dental acrylic cement and apply it around the base of the guide cannula, over the anchor screw, and the exposed skull, forming a stable head cap. Allow the cement to fully harden [48] [49].
- Wound Closure and Recovery: Once the cement is set, carefully release the cannula from the stereotaxic arm holder. Suture the skin incision around the implant [48]. Remove the animal from the frame and place it in a warm, clean cage for recovery. Monitor the animal closely until it regains consciousness and provide post-operative analgesia as required [49].
Microdialysis Probe Placement
Following a recovery period (typically 48 hours to one week [35] [49]), the microdialysis experiment can be initiated.
- Probe Insertion: Remove the dummy cannula from the guide cannula. Gently insert the microdialysis probe, ensuring it extends to the target depth beyond the guide cannula tip [41].
- Perfusion and Equilibration: Connect the probe to a microperfusion pump via tubing. Perfuse the probe with aCSF or Ringer's solution at a slow, controlled flow rate (e.g., 0.5-2.0 µL/min). Allow the system to equilibrate for a substantial period (e.g., 1-2 hours, or overnight) to establish a stable baseline before sample collection begins [35] [41] [39].
- Sample Collection: Collect dialysate samples at defined intervals (e.g., every 10-20 minutes) into microvials. Samples are typically stored at -80°C until analysis via techniques such as UPLC-MS/MS or HPLC [12] [35] [39].
Critical Technical Considerations and Troubleshooting
- Species and Age-Specific Coordinates: Stereotaxic coordinates are not universal. They vary significantly by species, strain, age, and weight. The coordinates for a young rat (100-120 g) targeting the DMH are different from those used for an adult animal [48]. Always consult a species-specific brain atlas and validate coordinates in your laboratory.
- Minimizing Tissue Trauma: The implantation of any device causes tissue trauma, which can affect neurotransmitter levels during the acute recovery phase. Allowing sufficient recovery time (e.g., 48 hours) after probe implantation before starting experiments helps to normalize the extracellular environment and improves data reliability [35] [49].
- Challenges with Hydrophobic Compounds: Hydrophobic drugs are prone to non-specific binding (NSB) to the components of the microdialysis system (tubing, probe membrane), leading to low recovery rates and substantial carry-over effects [12]. To mitigate this, employ strategies such as:
Mastering the stereotaxic surgical procedure for guide cannula implantation is a prerequisite for obtaining high-quality, interpretable data from in vivo microdialysis studies. This protocol outlines a robust methodology, from pre-surgical planning to post-operative care, emphasizing the importance of precise coordinate selection, aseptic technique, and careful animal monitoring. By adhering to these detailed application notes and considering the critical technical aspects, researchers can ensure successful and reproducible probe placements, thereby advancing our understanding of neurochemical dynamics in the living brain.
Post-surgical recovery is a critical period in neuroscience research involving in vivo microdialysis probe implantation. The quality of care provided during this phase directly impacts animal welfare, data integrity, and experimental outcomes. Establishing stable baseline conditions is paramount for collecting meaningful neurochemical data, as physiological stress from surgery or inadequate recovery can significantly alter neurotransmitter levels and compromise results. This protocol provides comprehensive guidelines for the post-operative care of laboratory animals, specifically tailored to the requirements of microdialysis studies, with emphasis on establishing the stable physiological and behavioral baseline necessary for reliable data collection.
Post-Surgical Monitoring and Assessment
Immediate post-operative monitoring forms the foundation for successful recovery and baseline establishment. A systematic approach to assessment ensures early detection of complications and timely intervention.
Table 1: Post-Operative Monitoring Schedule and Parameters
| Time Period | Physiological Parameters | Behavioral Parameters | Clinical Signs of Concern |
|---|---|---|---|
| First 24 hours | Heart rate, respiratory rate, temperature; check every 30-60 mins until fully conscious [51]. | Level of consciousness, response to stimuli [51]. | Uncontrolled bleeding, seizure, non-responsiveness [52]. |
| Days 1-3 | Daily body weight; monitor food and water intake [53]. | Appetite, drinking behavior, voluntary movement, posture [53]. | Refusal of food/water after 24 hours, signs of pain (e.g., inability to settle, hiding, not eating) [54] [53]. |
| Days 3-14+ | Continued daily weight tracking; monitor incision site [52]. | Gradual return to normal activity, interest in environment [52]. | Incision redness, swelling, discharge, odor; lethargy; dehiscence [52] [54]. |
Behavioral Assessment for Baseline Establishment
Beyond basic health monitoring, specific behavioral assessments are crucial for determining when an animal has returned to a stable baseline suitable for experimental procedures like microdialysis. Animals should be housed individually post-surgery to allow for accurate monitoring and to prevent cage-mates from interfering with the incision site [4]. For studies where habituation to the experimental environment is critical, such as sleep-wake studies, a recovery period of at least two weeks is recommended before commencing experiments [4]. Other study types may proceed with a shorter recovery period (e.g., 1-2 days) if the animal's health status permits [4].
Key behavioral indicators of a stable baseline include:
- Normal Grooming and Feeding Behaviors: The animal engages in self-care and maintains a consistent appetite [53].
- Exploratory Activity: Displays normal, non-stereotyped interest in its environment [17].
- Absence of Pain-Related Behaviors: No vocalizing, self-mutilation, or excessive lethargy [54].
Post-Operative Care Protocols
Pain Management and Medication
Effective analgesia is both an ethical imperative and a methodological necessity, as pain is a significant confounder in neurochemical studies.
- Pre-Emptive and Post-Operative Analgesia: The use of meloxicam (an NSAID) at induction and buprenorphine (an opioid) upon recovery and BID for at least 24 hours is recommended [4]. Non-steroidal anti-inflammatory drugs (NSAIDs) like carprofen can be administered if the animal appears to be in pain during the recovery period [4].
- Administration Protocol: Medications must be administered exactly as prescribed in terms of dose, frequency, and duration [54]. A plastic pill box can help manage the schedule. If a dose is missed, the next dose should be given at the scheduled time; doses should not be doubled up [54].
- Critical Safety Warning: Human pain medications such as aspirin, acetaminophen (Tylenol), and ibuprofen (Advil/Motrin) can be toxic or fatal to pets and laboratory animals and must never be administered [54] [53].
Wound and Incision Care
The surgical site, typically the location of the guide cannula, requires diligent monitoring to prevent infection and ensure proper healing.
- Daily Monitoring: Inspect the incision daily for signs of infection, including redness, swelling, discharge (pus), foul odor, or excessive licking [52].
- Preventing Self-Trauma: An Elizabethan collar (E-collar) or similar device must be used to prevent the animal from licking or chewing the incision, which can introduce infection or cause dehiscence [52] [54]. Inflatable or fabric collars may be alternatives, but their efficacy must be verified based on the incision's location [54].
- Hygiene: The incision must be kept clean and dry. If it becomes soiled, it should be gently cleaned with a saline solution [54]. Bathing is prohibited until the incision is fully healed and sutures are removed [52].
Activity Restriction and Environmental Management
Restricting movement is crucial for preventing probe displacement, guide cannula damage, and incision disruption.
- Strict Confinement: Activity must be restricted for a specified period, ranging from days to weeks depending on the procedure [54] [53]. For microdialysis implants, this is critical during the initial healing phase. Animals should be housed in a quiet, warm recovery space away from high-traffic areas [52] [53]. Using a leash for bathroom breaks, even indoors, is recommended for larger animals [52].
- Cage-Rest (Crate-Rest) Implementation: For procedures requiring extreme movement limitation, such as orthopedic surgeries, cage-rest may be necessary [53]. The enclosure must be large enough for the animal to stand up and turn around comfortably, with space for food and water dishes without risk of spillage [53].
- Environmental Enrichment: To ensure compliance with activity restriction, provide mental stimulation through food puzzles, Kong-type toys stuffed with safe treats, or interactive toys that do not require physical exertion [54].
Establishing Baseline for Microdialysis Experiments
The ultimate goal of post-surgical recovery in this context is to establish a physiologically and behaviorally stable subject for microdialysis sampling.
Recovery and Habituation Timeline
The following workflow outlines the key stages from surgery to baseline data collection.
Pre-Experimental Microdialysis Setup
Prior to baseline sample collection, specific preparatory steps must be taken to ensure the functionality of the microdialysis system.
- Probe Quality Check: Fill a 1mL syringe with distilled water and connect it to the probe's outlet. Cover the vent holes and depress the plunger gently. Water should appear from the probe inlet without any membrane leakage [4].
- Probe Activation: Submerge the probe membrane in 70-100% ethanol for two seconds, then flush with distilled water again using a syringe [4].
- Perfusion Buffer Preparation: Prepare an artificial cerebrospinal fluid (aCSF: 1.3 mM CaCl₂, 1.2 mM MgSO₄, 3 mM KCl, 0.4 mM KH₂PO₄, 25 mM NaHCO₃, 122 mM NaCl, pH=7.35). To prevent protein adhesion, add Bovine Serum Albumin (BSA). A 4% BSA solution is recommended for this purpose, prepared by diluting a 30% BSA stock with aCSF immediately before use [4]. Note: BSA can aggregate easily; avoid vortexing or vigorous stirring. Filter the buffer through a 0.1 µm syringe filter unit prior to use [4].
- System Setup (Push-Pull Mode): Probes with high molecular weight cut-off membranes require a push-pull mode to avoid fluid loss from pressure buildup [4].
- Connect the inlet tubing to a syringe pump ("push") and the outlet tubing to a roller or peristaltic pump ("pull") [4].
- Fill a syringe with the prepared perfusion buffer and connect it to the inlet line via a blunt-end needle.
- Run the syringe pump to fill the entire tubing with buffer, ensuring no air bubbles are present.
Table 2: Experimental Timeline and Key Parameters for Microdialysis Baseline Collection
| Experimental Phase | Timeline | Key Parameters | Acceptance Criteria for Baseline |
|---|---|---|---|
| Surgical Recovery | 1-14 days post-surgery [4] [41] | Health status, normal behavior, healed incision. | Animal healthy, alert, and behaving normally. |
| Probe Insertion | 12 hours before experiment [41] | Probe placement in target region. | Correct stereotaxic coordinates verified. |
| System Equilibration | ~2 hours post-insertion [41] | Flow rate stabilization. | Stable fluid flow at probe outlet. |
| Baseline Sample Collection | 2+ hours (e.g., 20-min samples) [41] | Analyte concentrations (e.g., DA, Glu). | Concentrations stable across 3-4 consecutive samples. |
The Scientist's Toolkit: Essential Materials for Post-Surgical Care and Microdialysis
Table 3: Research Reagent and Material Solutions for Post-Surgical Recovery and Microdialysis
| Item | Function/Application | Specific Examples / Notes |
|---|---|---|
| Analgesics | Pain management to minimize stress and establish physiological baseline. | Meloxicam (NSAID), Buprenorphine (Opioid) [4]. |
| Antiseptics | Maintain aseptic conditions at the incision site. | 70% Ethanol (for probe activation and surface cleaning) [4]. |
| Elizabethan Collar (E-Collar) | Prevent self-trauma of the surgical site. | Plastic, fabric, or inflatable designs; ensure it prevents animal from reaching the wound [54]. |
| Microdialysis Probe | Sampling molecules from the brain interstitial fluid. | Probes with high molecular weight cut-off (e.g., 1,000 kDa) for proteins [4]. |
| Perfusion Buffer | Mimics cerebrospinal fluid; medium perfused through the probe. | Artificial CSF (aCSF). Add 4% BSA to prevent analyte adhesion [4]. |
| Syringe & Roller Pumps | Drive fluid through the microdialysis system in push-pull mode. | Syringe pump for inlet ("push"), roller/peristaltic pump for outlet ("pull") [4]. |
Meticulous post-surgical care is not merely an animal welfare obligation but a fundamental component of robust scientific methodology in in vivo microdialysis research. By systematically implementing these protocols for health monitoring, pain management, activity restriction, and environmental control, researchers can ensure animal well-being while establishing the stable baseline conditions required for the collection of reliable, high-quality neurochemical data. Adherence to this comprehensive guide will significantly contribute to the validity and reproducibility of findings in neuroscience and drug development.
Perfusate Composition and Flow Rate Optimization for Maximum Recovery
In vivo microdialysis is a powerful sampling technique for monitoring dynamic changes in the extracellular concentrations of neurotransmitters, drugs, and metabolites in specific tissues of living animals. The technique involves implanting a probe with a semi-permeable membrane into the target tissue and perfusing it with a physiological solution at a controlled flow rate. Molecules from the extracellular fluid diffuse across the membrane into the perfusate, which is then collected for analysis. The efficiency of this process, quantified as recovery, is critically dependent on both the composition of the perfusate and the flow rate used. Recovery is defined as the concentration of a substance in the dialysate expressed as a percentage of its true concentration in the interstitial fluid [55]. Optimizing these parameters is essential for obtaining reliable, quantifiable data, particularly for compounds with challenging physicochemical properties such as lipophilicity. This document, framed within broader thesis research on in vivo microdialysis probe implantation protocols, provides detailed application notes and experimental protocols for maximizing microdialysis recovery.
Key Factors Affecting Microdialysis Recovery
The recovery of an analyte is influenced by a complex interplay of factors related to the probe design, the physicochemical properties of the analyte, and the operational parameters. Understanding these factors is a prerequisite for effective optimization.
Probe and Physicochemical Factors:
- Membrane Surface Area: A longer membrane provides a greater surface area for diffusion, resulting in a higher relative recovery [55].
- Molecular Properties: The molecular weight, size, charge, and lipophilicity of the analyte significantly impact its diffusion rate through the extracellular matrix and the dialysis membrane. Hydrophobic compounds are particularly challenging due to non-specific binding (NSB) to system components [12].
- Membrane Pore Size (Molecular Weight Cut-Off): The membrane's cut-off should be at least 3-4 times larger than the molecular weight of the target molecule to ensure efficient diffusion [55].
Operational Parameters:
- Perfusate Flow Rate: This parameter has a dual effect. Relative recovery (the concentration in the dialysate) is highest at very low flow rates and decreases exponentially as the flow rate increases. Conversely, absolute recovery (the mass of substance collected per unit time) is zero at a zero flow rate, increases to a maximum at a moderate flow rate, and then decreases again at high flow rates [55] [56].
- Perfusate Composition: The ionic composition, pH, and osmolarity of the perfusate must be carefully matched to the interstitial fluid of the target tissue to minimize perturbation of the local environment and ensure accurate sampling. Deviations can alter basal outflow and pharmacological responsiveness of neurotransmitters [57].
The following diagram illustrates the logical relationship between these key factors and their combined impact on the ultimate goal of maximizing recovery.
Impact of Flow Rate on Relative Recovery
The relationship between flow rate and relative recovery is fundamental to microdialysis. The table below summarizes general principles and quantitative findings.
Table 1: Flow Rate Impact on Recovery
| Flow Rate (µL/min) | Effect on Relative Recovery | Effect on Absolute Recovery | Key Evidence and Applications |
|---|---|---|---|
| Low (e.g., 0.1 - 0.5) | High. Allows more time for analyte equilibration across the membrane [55]. | Low. Smaller sample volume collected per time unit [55]. | Recommended for maximizing concentration in the dialysate, especially for low-abundance analytes. |
| High (e.g., 2.0 - 4.0) | Low. Insufficient time for equilibration, leading to diluted samples [58]. | Higher. More volume is processed, potentially collecting more mass per minute [55]. | Used when higher temporal resolution or sample volume is prioritized over concentration [58]. |
| Optimization Principle | Inversely exponential relationship. Relative recovery increases as flow rate decreases [55] [56]. | Parabolic relationship. Absolute recovery reaches a maximum at a moderate flow rate. | The optimal flow rate is a balance between obtaining a concentrated sample and a sufficient volume for analysis. |
Perfusate Composition and Recovery Enhancement Strategies
The standard perfusate is an aqueous solution mimicking interstitial fluid, such as Ringer's solution or artificial cerebrospinal fluid (aCSF). For problematic compounds, modifications are necessary.
Table 2: Perfusate Composition and Recovery Enhancement
| Perfusate Modifier | Mechanism of Action | Target Analytes | Reported Efficacy & Key Considerations |
|---|---|---|---|
| pH Adjustment | Adjusts pH to a value that maximizes the solubility and minimizes non-specific binding of the target analyte [59]. | Lipophilic compounds insoluble at physiological pH (e.g., Ketoconazole, Tretinoin) [59]. | In vitro recovery increased 2-8 times compared to physiological pH. Well-tolerated in vivo, but efficacy must be verified in vivo [59]. |
| Macromolecular Additives (e.g., BSA) | Acts as a carrier for lipophilic compounds and blocks adsorption sites on the membrane and tubing, reducing NSB [12] [60]. | Hydrophobic drugs (e.g., Actinomycin D, Selinexor) [12]. | Essential for many hydrophobic drugs. Requires cleaning steps before HPLC analysis. Concentrations of 0.5%-1.5% BSA are common [59] [12]. |
| Organic Solvents (e.g., PEG, Ethanol) | Increases the solubility of lipophilic compounds in the aqueous perfusate [61]. | Fat-soluble ingredients. | May diffuse into tissue, altering the local microenvironment. Can cause tissue irritation [61]. |
| Microemulsions (O/W) | Nanoscale oil droplets in water act as sinks for lipophilic compounds, dramatically improving their extraction into the perfusate [61]. | Fat-soluble drugs (e.g., Evodiamine, Rutaecarpine) [61]. | Superior recovery (~50-58%) compared to PEG or ethanol solutions. Good biocompatibility and minimal tissue dispersion [61]. |
| Ionic Composition | Matches the ionic environment of the target tissue (e.g., Ca²⁺ at 1.2 mM for brain ECF) to maintain normal tissue function and basal analyte levels [57]. | All analytes, especially neurotransmitters like Dopamine. | Using plasma-like ion levels (higher Ca²⁺) alters basal dopamine outflow and pharmacological responsiveness [57]. |
Experimental Protocols for Optimization
Workflow for Systematic Optimization
The following diagram outlines a generalized workflow for optimizing perfusate and flow rate, integrating the key experiments described in the subsequent protocols.
Protocol 1: Assessing Non-Specific Binding (NSB)
Objective: To quantify and mitigate the loss of the target analyte due to adsorption to the microdialysis system components (syringes, tubing, probe) [12].
Materials:
- Microdialysis pump and syringes.
- Different tubing materials (e.g., FEP, PEEK).
- Collection vials (e.g., polypropylene, glass).
- Standard solution of the target analyte in Ringer's solution.
- UPLC-MS/MS or other sensitive analytical instrument.
Method:
- Nominal Concentration Test: Prepare a solution with a known, precise concentration of the analyte (e.g., 100 ng/mL). Transfer this solution through the entire fluid path (syringe, tubing) and into different collection vials. Measure the concentration in the collected samples. Calculate recovery using the formula below. This identifies which components cause the most significant drug loss [12].
- Formula:
Recovery (%) = (Measured Concentration / Prepared Concentration) × 100
- Formula:
- Tubing and Retention Test: Pump the standard solution through a 1-meter length of the candidate tubing (e.g., FEP or PEEK) at the intended flow rate (e.g., 0.5 µL/min). Collect samples at the outlet at multiple time points. Also, measure the concentration in the syringe before and after perfusion. Calculate recovery to evaluate dynamic binding to the tubing [12].
Interpretation and Solution: If recovery is significantly below 100%, NSB is substantial. Mitigation strategies include:
- Surface Coating: Pre-treat the system with a blocking agent like BSA (0.5%-1.5%) [12].
- Material Selection: Use tubing and probes with materials that exhibit lower binding for your analyte.
- Additives: Include a carrier protein like BSA or a microemulsion in the perfusate to compete for binding sites [12] [61].
Protocol 2: In Vitro Recovery vs. Flow Rate Profiling
Objective: To determine the relationship between flow rate and relative recovery for the target analyte under controlled conditions.
Materials:
- Microdialysis pump and probe.
- In vitro chamber with a stirred standard solution of the analyte.
- Temperature-controlled environment (37°C).
Method:
- Immerse the probe in a well-stirred standard solution of the analyte maintained at 37°C.
- Perfuse the probe with a blank perfusate (e.g., aCSF) at a series of increasing flow rates (e.g., 0.2, 0.5, 1.0, 2.0 µL/min).
- At each flow rate, allow sufficient time for equilibration (e.g., 15-30 minutes), then collect 3-5 dialysate samples.
- Measure the analyte concentration in the dialysate (Cdialysate) and the standard solution (Cstandard).
- Calculate relative recovery at each flow rate:
- Formula:
Relative Recovery (%) = (C<sub>dialysate</sub> / C<sub>standard</sub>) × 100[55]
- Formula:
Interpretation: Plot recovery against flow rate. This curve will guide the selection of a flow rate that provides the best compromise between a high relative recovery and a sufficient sample volume for your analytical method.
Protocol 3: Screening and Validating Enhanced Perfusates
Objective: To compare the efficacy of different perfusate compositions in improving the recovery of the target analyte.
Materials:
- Standard solution of the target analyte.
- Candidate perfusates:
Method:
- Using the optimal flow rate identified in Protocol 2, perform in vitro recovery experiments as described above for each candidate perfusate.
- For pH-adjusted perfusates, ensure the isotonicity of the solution is maintained [59].
- For perfusates containing BSA or microemulsions, use retrodialysis for calibration (see Protocol 4) as the concentration in the perfusate is no longer zero.
- Compare the relative recovery achieved with each perfusate to the control.
Interpretation: Select the perfusate that yields the highest, most reproducible recovery. Consider biocompatibility; for example, pH-adjusted and microemulsion perfusates have been shown to be well-tolerated in vivo [59] [61].
Protocol 4: In Vitro Calibration via Retrodialysis
Objective: To determine the in vivo recovery rate when using a perfusate that contains the analyte or an analog (e.g., with BSA or for retrodialysis delivery).
Principle: The loss of the compound from the perfusate through the membrane is assumed to be equal to the recovery of the compound from the extracellular fluid into the perfusate [12].
Method:
- After implanting the probe in the target tissue, perfuse it with a solution containing a known concentration of the target analyte (Cperfusate).
- After an equilibration period, collect the dialysate and measure the analyte concentration (Cdialysate).
- Calculate the recovery rate:
- Formula:
Recovery (%) = [(C<sub>perfusate</sub> - C<sub>dialysate</sub>) / C<sub>perfusate</sub>] × 100[12]
- Formula:
- This recovery factor is then used to calculate the true extracellular concentration (CECF) during the actual experiment when a blank perfusate is used:
- Formula:
C<sub>ECF</sub> = C<sub>dialysate</sub> / Recovery
- Formula:
The Scientist's Toolkit: Essential Research Reagents and Materials
Table 3: Key Research Reagent Solutions for Microdialysis Optimization
| Item | Function / Rationale | Example Usage & Notes |
|---|---|---|
| Artificial Cerebrospinal Fluid (aCSF) | A physiologically balanced perfusate for brain studies. Mimics the ionic composition of brain extracellular fluid (e.g., 1.2 mM Ca²⁺) to maintain normal tissue function and basal neurotransmitter levels [57] [27]. | Standard perfusate for CNS studies. Composition: NaCl (149 mM), KCl (2.8 mM), CaCl₂ (1.2 mM), MgCl₂ (1.2 mM), ascorbic acid (0.25 mM), glucose (5.4 mM) [27]. |
| Ringer's Solution | A balanced salt solution used as a standard perfusate for various tissues. Commercial "CNS" versions are often unbuffered to allow equilibration with tissue pH [55]. | Used for peripheral tissues and sometimes brain. CMA Perfusion Fluid CNS is an example. |
| Bovine Serum Albumin (BSA) | A carrier protein added to perfusate (0.5%-1.5%) to reduce non-specific binding of hydrophobic compounds to the microdialysis apparatus [12]. | Critical for recovering hydrophobic drugs like Selinexor and Ulixertinib. Also acts as an osmotic agent for large-pore membranes [12] [60]. |
| Microemulsion-based Perfusate (RS-ME) | An isotonic O/W microemulsion that creates nano-droplets to efficiently extract liposoluble substances, dramatically improving their recovery [61]. | For fat-soluble drugs like Evodiamine. Prepared with Ethyl Oleate (oil), Kolliphor EL (surfactant), and Transcutol P (co-surfactant), diluted 1:6 with Ringer's [61]. |
| Dimethyl Sulfoxide (DMSO) | Organic solvent used in small quantities (e.g., 0.01-0.1%) to enhance the solubility of highly lipophilic compounds in the perfusate [12]. | Use with caution due to potential for tissue irritation. Should be used at the lowest effective concentration. |
| Fluorinated Ethylene Propylene (FEP) Tubing | Common tubing material for microdialysis systems. Its surface properties can influence non-specific binding and should be tested [12] [55]. | Can be cut with a sharp scalpel. Should be rinsed with deionized water after use to prevent salt crystallization [55]. |
Concluding Remarks
Optimizing perfusate composition and flow rate is not a one-size-fits-all procedure but a mandatory, iterative process tailored to the specific analyte, tissue, and experimental question. The protocols outlined herein provide a systematic framework for this optimization, emphasizing the critical need to address the challenges posed by lipophilic compounds through strategic perfusate modification. By rigorously applying these methods—from initial NSB assessment to final in vivo validation—researchers can significantly enhance the recovery and reliability of their microdialysis data, thereby strengthening the conclusions drawn from preclinical and drug development research.
Sampling in Awake Animals is a cornerstone technique in modern neuroscience and pharmacology, enabling researchers to monitor neurochemical or electrophysiological events in real-time while an animal engages in natural behaviors. The core principle involves the implantation of a sampling or recording device, such as a microdialysis probe or neural electrode, which allows for continuous data collection from the brain of a conscious, freely moving animal [62] [63]. This approach provides unparalleled insights into the neurobiology of behavior, the mechanisms of drug action, and the pathophysiology of neurological disorders, all while avoiding the confounding effects of anesthetics on brain chemistry and physiology [63] [42]. This application note details the setup and procedural protocols for employing microdialysis in freely moving animals, framed within a broader thesis on in vivo probe implantation.
Core Principles and Key Considerations
Microdialysis is a bioanalytical sampling technique that mimics the function of a blood capillary. A probe with a semipermeable membrane is implanted into the tissue, and a physiological perfusion fluid (perfusate) is slowly pumped through it. Molecules from the extracellular fluid passively diffuse across the membrane into the perfusate, which is then collected for analysis [42]. This process can also be reversed to deliver substances locally to the tissue, a method known as retrodialysis [63].
Key advantages of this technique for behavioral studies include:
- Spatial Resolution: Enables local sampling from specific brain nuclei or regions [42].
- Temporal Resolution: Allows for continuous monitoring over periods of hours to days by collecting minute fractions at high frequency [42].
- Versatility: Can be adapted to monitor a wide range of endogenous (e.g., neurotransmitters, metabolites) and exogenous (e.g., pharmaceuticals) substances [63] [42].
- Physiological Relevance: Creates minimal adverse tissue reactions as it relies on passive diffusion and does not remove macroscopic matter from the tissue [42].
However, several critical limitations and considerations must be addressed:
- Time Resolution: The technique has a poor time resolution in the minute range, which may not capture very rapid neurochemical events [62] [63].
- Probe Size and Tissue Damage: The probe samples from thousands of cells and millions of synapses, and its implantation inevitably causes initial tissue damage, including impairment of the blood-brain barrier and abnormal neurotransmitter release [62] [63]. This is typically followed by a recovery period of 18-24 hours before stable, reproducible neurochemical data can be obtained [63].
- Gliosis: A glial scar forms around the probe over time, which can alter extracellular levels of neurotransmitters and limit the duration of reliable sampling, typically to a few days in rodents [63] [64].
Experimental Setup and System Components
A functional setup for microdialysis in freely moving animals requires the integration of several key components. The choice between a traditional swivel system and a more advanced movement-responsive caging system is a critical design decision [65].
Table 1: Comparison of Microdialysis Systems for Freely Moving Animals
| Feature | Swivel-Based System | Raturn-Based System |
|---|---|---|
| Working Principle | The swivel itself rotates to prevent tubing twist [65]. | The cage counter-rotates in response to animal movement to untwist tubing [65]. |
| Flexibility | Suitable for single probe use and simple infusion/sampling [65]. | Ideal for multiple probes, infusion lines, and combining with electrical recordings (e.g., EEG, optogenetics) [65]. |
| Maintenance | Internal seals require frequent maintenance and replacement [65]. | Eliminates the swivel, reducing maintenance points [65]. |
| Dead Volume | Higher dead volume, which increases with each added channel [65]. | Contiguous connections minimize dead volume and potential leak points [65]. |
| Behavioral Monitoring | Not inherently designed for automated activity monitoring [65]. | Allows for simultaneous correlation of neurochemical data with behavioral metrics like rotation and rearing [65]. |
The following workflow diagram outlines the key stages in planning and executing a microdialysis experiment in awake, freely moving animals.
Detailed Experimental Protocol
Pre-Implantation Planning and Preparation
1. Probe and Membrane Selection:
- Probe Type: Concentric (I-shaped) probes are most commonly used for brain applications. Choose between a rigid probe for stereotaxic implantation or a flexible probe for peripheral tissues [42].
- Membrane Cut-off: Select a membrane with a molecular weight cut-off appropriate for your analyte. A 20 kDa membrane is suitable for small molecules like neurotransmitters, while a 100 kDa or larger cut-off is needed for peptides and proteins [63] [42]. As a rule, the analyte should be less than 10% of the membrane's cut-off for efficient dialysis [63].
- Membrane Length: The active membrane length (e.g., 1-4 mm) should be chosen to match the size of the target brain structure. A longer membrane yields better recovery but may sample from multiple functional regions [42].
2. Anesthesia and Surgical Plan:
- Anesthetic Choice: Volatile anesthetics (e.g., isoflurane) are preferred for acute probe implantation because their effects terminate quickly, allowing experiments in awake animals soon after surgery. Injectable anesthetics like ketamine-xylazine can have significant and prolonged effects on physiology (e.g., blood glucose) and are better suited for guide cannula implantation performed days before the experiment [63].
- Guide Cannula vs. Direct Implantation: For chronic experiments spanning multiple days or requiring low stress, implant a guide cannula 4-7 days before the experiment. The microdialysis probe is then inserted through the guide on the day of experimentation without anesthesia. For acute experiments, the probe can be implanted directly under anesthesia, with sampling beginning after a recovery period [63].
Surgical Implantation Procedure
Materials:
- Stereotaxic frame
- Anesthesia system (e.g., isoflurane vaporizer)
- Microdrill
- Sterile surgical instruments (scalpel, forceps, scissors)
- Bone screw(s)
- Dental acrylic
- Guide cannula or microdialysis probe
- Physiological perfusion fluid (aCSF)
Procedure:
- Anesthesia and Positioning: Induce and maintain anesthesia. Securely place the animal in the stereotaxic frame, ensuring the skull is level.
- Surgical Exposure: Make a midline incision on the scalp, retract the skin, and clean the skull surface.
- Stereotaxic Targeting:
- Identify Bregma and calculate the Anterior-Posterior (AP) and Medial-Lateral (ML) coordinates for your target region.
- Lower the probe or guide cannula to the skull at Bregma to set the Dorsal-Ventral (DV) coordinate zero point.
- Move to the target AP and ML coordinates and mark the location.
- Drilling and Implantation:
- Drill a small burr hole at the marked location.
- For guide cannula implantation, lower the cannula to a point 1-2 mm above the final target depth and secure it to the skull with a bone screw and dental acrylic.
- For direct probe implantation, lower the probe to the final target depth and secure it.
- Closure: Suture the skin around the implant base. Apply local anesthetic and antibiotic ointment around the wound.
Post-Operative Recovery and Sample Collection
- Recovery Period: House the animal singly to prevent damage to the implant. Allow at least 18-24 hours for recovery after direct probe implantation to let acute surgical effects (e.g., blood-brain barrier disruption, abnormal neurotransmitter release) subside [63].
- System Connection: Gently connect the inlet tubing from the microsyringe pump to the implanted probe. For freely moving experiments, connect the outlet tubing to a fraction collector, ensuring the tubing is long enough to allow free movement but secured to avoid tangling.
- Perfusion and Baseline Collection:
- Experimental Intervention and Sample Handling:
- Initiate sample collection into microvials. Collection intervals are typically 5-20 minutes, depending on the flow rate and analytical sensitivity.
- After collecting 2-3 stable baseline samples, administer the behavioral task, drug, or other intervention.
- Continue sampling throughout and after the intervention.
- Immediately freeze collected samples at -80°C until analysis to prevent degradation.
The Scientist's Toolkit: Essential Materials
Table 2: Key Research Reagent Solutions for Microdialysis
| Item | Function/Description | Key Considerations |
|---|---|---|
| Microdialysis Probe | Sampling device with a semipermeable membrane tip [63]. | Choose concentric design for brain; select membrane cut-off and length based on analyte size and target region [63] [42]. |
| Artificial CSF (aCSF) | Physiological perfusion fluid mimicking extracellular fluid [63]. | Composition (e.g., ion concentrations) can be modified to influence local cell membrane function [42]. |
| Microsyringe Pump | Delivers perfusate at a precise, low, constant flow rate [63]. | Critical for maintaining consistent recovery; typical flow rates are 0.5 - 3.0 µL/min [63]. |
| Fraction Collector | Automatically collects dialysate samples at set time intervals. | Allows for unattended operation during long-term behavioral experiments. |
| Guide Cannula | Permanent guide tube implanted into the brain for repeated probe insertion [63]. | Enables chronic sampling over days/weeks with minimal stress on experiment day [63]. |
| Liquid Swivel / Raturn Cage | Prevents twisting of inlet/outlet tubing as the animal moves freely [65]. | Swivels require maintenance; Raturn systems offer greater flexibility for complex setups [65]. |
| Analytical Platform (e.g., HPLC-EC/MS) | Quantifies analyte concentrations in the dialysate [62]. | Must be highly sensitive due to low sample volumes and analyte concentrations. |
Advanced Applications and Future Directions
The principles of sampling in awake animals extend beyond classic microdialysis. Emerging technologies are creating new possibilities for multi-modal sensing.
Multi-Sensing Neural Probes: Next-generation probes are being developed using flexible materials and novel electronics to simultaneously monitor electrical activity and neurochemistry. For example, organic electrochemical transistors (OECTs) can be fabricated on flexible probes to record local field potentials and are sensitive to ionic currents, enabling a new mode of probing brain function [66]. These devices can also be functionalized with biorecognition elements to detect specific metabolites like glucose, allowing researchers to investigate the relationship between energy utilization and electrical activity in real-time [66].
Flexible and Biocompatible Probes: To mitigate chronic immune responses and glial scarring that limit long-term recording stability, researchers are developing neural probes from flexible polymers like polyimide [64] [67]. These materials reduce the mechanical mismatch between the rigid probe and soft brain tissue, thereby minimizing tissue damage, inflammation, and neuronal death around the implant site, which is crucial for chronic stability [64]. Coating electrodes with platinum nanoparticles is one strategy to enhance the performance of these flexible probes by reducing impedance, which is vital for high-fidelity signal recording [67].
Modular and Adjustable Chronic Implants: For chronic electrophysiological recordings, new implant designs focus on modularity and precision. These systems allow for vertical adjustment of probes (e.g., Neuropixels) with micron-level precision after implantation, enabling researchers to search for optimal neuronal signals over time and compensate for small probe displacements [68]. This adaptability, combined with a comprehensive protocol from assembly to implantation, facilitates long-term stable recordings from the same neurons over weeks or months, which is essential for studying processes like learning and memory [68].
Solving Common Challenges: Non-Specific Binding, Recovery, and Data Integrity
Mitigating Non-Specific Binding (NSB) for Hydrophobic Compounds
Within the context of research on in vivo microdialysis probe implantation protocols, mitigating non-specific binding (NSB) is a critical pre-analytical consideration. NSB refers to the undesirable adsorption of analytes to solid surfaces—such as the microdialysis probe membrane, tubing, and collection vials—via non-covalent interactions [69] [70]. For hydrophobic compounds, these interactions are predominantly driven by the hydrophobic effect, where molecules adsorb to surfaces to minimize their contact with the aqueous environment [70]. This binding can significantly reduce the effective concentration of the analyte collected in the dialysate, leading to inaccurate pharmacokinetic data and compromised study conclusions. This application note details the main factors of NSB and provides targeted strategies and protocols to mitigate it, with a special focus on hydrophobic compounds.
Understanding and Assessing Non-Specific Binding
Primary Factors of NSB
The occurrence and extent of NSB are governed by three primary factors [70]:
- Properties of the Solid Surface: The materials composing the microdialysis system (e.g., the probe membrane, tubing, and collection containers) have inherent adsorption properties. Polypropylene and polystyrene consumables can promote NSB through hydrophobic effects [70].
- Composition of the Solution: The matrix of the perfusate and dialysate influences NSB. Aqueous solutions and biological matrices with low protein content (like cerebrospinal fluid) offer less protection against adsorption compared to protein-rich matrices like plasma, where proteins can compete for binding sites [70].
- Characteristics of the Analyte: Hydrophobic compounds are inherently prone to NSB. Their physicochemical nature drives them to adhere to surfaces to avoid the aqueous phase, making them particularly challenging to study with techniques like microdialysis [70].
Other factors, including ambient temperature, solution pH, and the duration of contact between the analyte and the solid surface, can further impact the degree of adsorption [70].
Preliminary Assessment of NSB
Before implementing mitigation strategies, it is imperative to determine the level of NSB in a specific experimental setup [69]. A simple preliminary test involves running the analyte over the bare sensor surface (or a mock microdialysis system) without the intended ligand or target. A significant measured response indicates a substantial level of NSB that must be addressed [69]. The presence and extent of adsorption can also be investigated by comparing signal differences when the same volume of solution is placed in containers of different sizes, or when different volumes are placed in containers of the same size [70].
Core Strategies and Reagents for NSB Mitigation
The following table summarizes the primary strategies and reagents used to mitigate NSB, particularly for hydrophobic compounds.
Table 1: Research Reagent Solutions for Mitigating Non-Specific Binding
| Strategy | Key Reagents | Mechanism of Action | Application Notes |
|---|---|---|---|
| Protein Blocking | Bovine Serum Albumin (BSA) [69] [4] | Surrounds the analyte to shield it from non-specific interactions; competes for binding sites on surfaces [69]. | Commonly used at 0.15% - 4% in perfusion buffer [4]. High concentrations (e.g., 4%) can improve recovery but may limit delivery of compounds that bind to BSA [4]. |
| Surfactant Use | Non-ionic surfactants (e.g., Tween 20) [69] [70] | Disrupts hydrophobic interactions by forming a uniform dispersion; passivates surfaces [69] [70]. | Use low concentrations (e.g., 0.01%-0.1%) to avoid interference with mass spectrometry detection [70]. |
| Solution Optimization | Salts (e.g., NaCl) [69] | Produces a shielding effect that reduces charge-based interactions by neutralizing electrostatic forces [69]. | Effective in systems where NSB is driven by electrostatic interactions rather than hydrophobicity [69]. |
| Organic Solvents [70] | Increases the solubility of hydrophobic analytes in the aqueous solution, reducing their tendency to adsorb [70]. | Requires compatibility with the microdialysis membrane and the biological system. | |
| Surface Passivation | Low-adsorption consumables [70] | Tubes and plates are specially treated to have a surface chemistry that minimizes molecular adhesion [70]. | Essential for working with proteins, peptides, and nucleic acids. |
| Low-adsorption liquid chromatography systems [70] | Utilizes passivated metal fluid paths to prevent adsorption of compounds like nucleic acids and phosphorylated molecules [70]. | Critical for analyzing samples after collection to prevent loss in the LC-MS system. |
Experimental Protocol: Microdialysis Setup for Hydrophobic Compounds
This protocol is adapted for collecting hydrophobic analytes with reduced NSB, based on established in vivo microdialysis procedures [4].
Pre-Surgical and Surgical Procedures
- Guide Cannula Implantation: Following appropriate anesthesia and stereotaxic fixation of the animal, implant a guide cannula above the brain region of interest using standard stereotaxic coordinates [4].
- Securing the Cannula: Secure the guide cannula to the skull using dental cement, ensuring the cement fully covers the metal part of the cannula and any ancillary bone screws [4].
- Post-Surgical Care: House the animal individually and allow for a recovery period of 1-2 days or longer, as required by the experimental design, with appropriate post-operative analgesia [4].
Microdialysis Probe Preparation and Perfusion
- Quality Check and Activation: Before use, flush the microdialysis probe with distilled water to ensure patency and check for leaks. Submerge the probe membrane in 70-100% ethanol for two seconds to activate it, then flush again with distilled water [4].
- Prepare NSB-Reduced Perfusion Buffer: Artificial Cerebrospinal Fluid (aCSF) is commonly used. To mitigate NSB for hydrophobic compounds, supplement the aCSF with:
- BSA: At a concentration of 0.15% to 4%, to act as a blocking agent [4].
- A non-ionic surfactant: Such as Tween 20, at a low concentration (e.g., 0.01%).
- Filter the Buffer: Filter the perfusion buffer through a syringe filter unit with a 0.1 µm pore size immediately prior to use to remove aggregates that could clog the probe [4].
- Set Up Push-Pull System: For probes with high molecular weight cut-off membranes, set up a "push-pull" mode system. Use a syringe pump to push the perfusion buffer through the probe and a peristaltic pump to pull the dialysate from the outlet, thus avoiding pressure accumulation [4].
- Connect and Perfuse: Connect the inlet tubing from the syringe pump to the probe. Initiate perfusion with the prepared buffer at a slow, controlled flow rate (e.g., 0.1-5 µL/min) to establish equilibrium before sample collection [4] [71].
Sample Collection and Analysis
- Collect Dialysate: Collect the dialysate coming from the probe outlet into low-adsorption microcentrifuge tubes to minimize post-collection binding [70].
- Low-Adsorption LC-MS Analysis: Analyze samples using a liquid chromatography-mass spectrometry (LC-MS) system with a passivated (low-adsorption) flow path and column to prevent analyte loss during analysis [70].
NSB Mitigation Workflow
The following diagram visualizes the decision-making workflow for selecting and implementing NSB mitigation strategies in the context of a microdialysis experiment for hydrophobic compounds.
Mitigating non-specific binding is not a one-size-fits-all endeavor but a necessary experimental optimization, especially for hydrophobic compounds in microdialysis. By understanding the factors driving NSB and systematically applying the strategies and protocols outlined—including the use of blocking agents like BSA, surfactants like Tween 20, low-adsorption materials, and passivated analytical systems—researchers can significantly improve the accuracy and reliability of their in vivo sampling data. This ensures that the measured concentrations in the dialysate truly reflect the extracellular levels of the hydrophobic compounds of interest.
Within the framework of advanced in vivo microdialysis probe implantation protocol research, the accurate determination of extracellular analyte concentrations is paramount. Microdialysis sampling recovers only a fraction of the true extracellular concentration, making probe calibration a critical step for quantitative studies [72] [73]. This application note details three principal calibration methods—Retrodialysis, No-Net-Flux, and Zero-Flow Rate—providing structured protocols, comparative analysis, and practical tools to guide researchers and drug development professionals in selecting and implementing the appropriate calibration strategy for their specific experimental needs.
Comparative Analysis of Calibration Methods
The selection of a calibration method depends on the experimental goals, the nature of the analyte, and practical constraints. The table below summarizes the core characteristics, advantages, and limitations of each method.
Table 1: Comparison of Key In Vivo Microdialysis Calibration Methods
| Method | Fundamental Principle | Best Use Cases | Key Advantages | Primary Limitations |
|---|---|---|---|---|
| Retrodialysis [72] [74] | Determination of extraction fraction (Ed) by measuring the loss of a calibrator from the perfusate into the tissue. | - Quantification of exogenous compounds (e.g., drugs) [75].- Continuous calibration using Stable-Isotope-Labeled (SIL) analytes for neurotransmitters [72]. | - Can be performed pre/post or during experiment (SIL method) [72].- Requires fewer samples/animals than NNF for equivalent data [72].- Real-time monitoring of recovery changes [72]. | - Calibrator must have diffusion properties identical to the analyte [74].- Low recovery (<20%) can lead to high variability [75]. |
| No-Net-Flux (NNF) [72] [73] | The point of zero flux across the membrane is determined by perfusing several concentrations of the analyte. The x-intercept gives the extracellular concentration, and the slope gives the Ed. | - "Gold standard" for validating other methods [74].- Determining absolute basal levels of endogenous compounds. | - Directly measures both Ed and extracellular concentration [72].- Well-investigated and robust for steady-state conditions [12]. | - Time-consuming and requires a large number of samples [72] [73].- Not suitable for monitoring transient changes in recovery without a large cohort (dynamic NNF) [72]. |
| Zero-/Ultra-Slow Flow Rate [12] [73] | The perfusion flow rate is reduced to near-zero (e.g., < 50 nL/min) to achieve near-equilibrium, where recovery approaches 100%. | - Applications where extremely small sample volumes are sufficient for analysis. | - Conceptually simple.- High recovery rate at very low flows [12]. | - Very long sample collection times [73].- Requires analytical methods with very high sensitivity [73].- Practical challenges with dead volumes in the system [73]. |
Detailed Experimental Protocols
Retrodialysis by Calibrator
Principle: The loss of a calibrator compound (either the drug itself or a structurally similar analog) from the perfusate into the tissue is used to determine the extraction fraction (Ed). This Ed is considered equivalent to the relative recovery (RR) of the analyte from the extracellular fluid [75] [74].
Procedure:
- Probe Preparation and Implantation: Implant the microdialysis probe into the target region (e.g., striatum, blood) of an anesthetized or freely moving rodent. Standard stereotaxic coordinates, for example, for the medial Prefrontal Cortex (mPFC) are +2.0 mm AP, ±0.5 mm ML, -4.0 mm DV from Bregma [40]. Continuously perfuse with artificial cerebrospinal fluid (aCSF) during implantation.
- Calibrator Perfusion: Following a post-surgical stabilization period (typically 1-2 hours), perfuse the probe with a known concentration of the calibrator ((C_{perfusate})) dissolved in aCSF. The calibrator can be:
- Sample Collection: Collect dialysate fractions at regular intervals (e.g., 15-30 minutes). The number of baseline fractions depends on the time required for the calibrator signal to stabilize.
- Calculation of Extraction Fraction (Ed): Analyze the calibrator concentration in the dialysate ((C{dialysate})). Calculate the extraction fraction for each sample using: (Ed = (C{perfusate} - C{dialysate}) / C_{perfusate}) [72] [12]
- Quantification of Analyte: During the experimental phase (e.g., drug administration), perfuse with calibrator-free aCSF and collect dialysate containing the endogenous or exogenous analyte ((C_{measured})).
- Data Correction: Calculate the true extracellular concentration ((C{ext})) using the formula: (C{ext} = C{measured} / Ed) [72]
Critical Considerations:
- Calibrator Selection: The calibrator must have an in vivo dialysance (PeA) nearly identical to the target analyte. SIL analytes are ideal for this purpose [72] [74].
- Recovery Threshold: For reliable quantification, calibrator recovery values should preferably be ≥20% to minimize variability [75].
- Quality Control: Using the calibrator throughout the experiment serves as a valuable quality control to monitor for time-dependent changes in probe recovery [75].
No-Net-Flux (NNF) Method
Principle: The probe is perfused with at least four different concentrations of the analyte (both above and below the expected extracellular concentration). The difference between the perfused and collected concentration is plotted against the perfused concentration to directly determine both the extracellular concentration and the Ed [72] [73].
Procedure:
- Probe Implantation: Implant the microdialysis probe as described in Section 3.1 and perfuse with aCSF until a stable baseline is established.
- Perfusion of Analytic Concentrations: Perfuse the probe with at least four different concentrations of the analyte ((C{in})) prepared in aCSF. It is critical that these concentrations bracket the unknown extracellular concentration ((C{ext})).
- Steady-State Sampling: For each perfused concentration, collect multiple dialysate samples once the output concentration ((C_{out})) has stabilized (typically 3-5 samples per concentration).
- Calculation and Plotting: For each perfusate concentration, calculate the net flux ((C{in} - C{out})). Plot (C{in} - C{out}) against (C_{in}).
- Data Analysis: Perform linear regression on the data points. The x-intercept of the regression line is the point of no-net-flux, which equals the true extracellular concentration ((C_{ext})). The slope of the line is the extraction fraction (Ed) [72] [73].
Zero-Flow Rate Method
Principle: By drastically reducing the perfusion flow rate (e.g., to 50 nL/min or less), the system is allowed to approach equilibrium, where the relative recovery approaches 100% and the dialysate concentration ((C{dialysate})) approximates the extracellular concentration ((C{ext})) [12] [73].
Procedure:
- Baseline Sampling: Begin by sampling at a conventional flow rate (e.g., 1.0 μL/min) to establish a baseline relative recovery.
- Flow Rate Reduction: Gradually reduce the perfusion flow rate to an ultra-slow rate (e.g., 50 nL/min). Note that achieving a steady state at each flow rate may take a long time.
- Equilibrium Sampling: Collect dialysate samples at the ultra-slow flow rate. Due to the very low volume, these samples are often small and require highly sensitive analytical methods for quantification.
- Extrapolation (Optional): As an alternative, recovery can be measured at several different flow rates, and the data can be extrapolated to a flow rate of zero, where recovery is defined as 100% [73].
- Concentration Calculation: The analyte concentration measured in the dialysate at near-zero flow is used as the estimate for the extracellular concentration, with the assumption that recovery is close to 100%.
The Scientist's Toolkit: Essential Research Reagents and Materials
Successful implementation of microdialysis calibration requires careful selection of materials and reagents. The following table outlines key components and their functions.
Table 2: Essential Research Reagents and Materials for Microdialysis Calibration
| Item Category | Specific Examples | Function & Application Notes |
|---|---|---|
| Perfusate | Artificial Cerebrospinal Fluid (aCSF: 149 mM NaCl, 2.8 mM KCl, 1.2 mM CaCl₂, 1.2 mM MgCl₂, 0.25 mM ascorbic acid, 5.4 mM D-glucose; pH 7.2-7.4) [40] | Mimics the ionic composition of brain extracellular fluid; serves as the carrier solution for calibrators and analytes. |
| Calibrators | - Stable-Isotope-Labeled Analytes (e.g., ¹³C₆-Dopamine, ¹³C₅-Glutamate) [72]- Structural Analogs (e.g., Nalorphine for Morphine [75], AZdU for AZT [74]) | Used in Retrodialysis to determine the probe's extraction fraction (Ed). SIL analytes are ideal for endogenous compounds. |
| Probe Types | Cellulose membranes (e.g., with 2 mm active length for mouse mPFC [40]); CMA7, CMA8, MD-2211 [12] | Semi-permeable membrane defining the sampling area. Material and length are selected based on target tissue and analyte properties. |
| Additives for Hydrophobic Drugs | Bovine Serum Albumin (BSA: 0.5%-1.5%), Dimethylsulfoxid (DMSO: 0.01%-0.1%) [12] | Added to perfusate to minimize non-specific binding (NSB) of challenging hydrophobic compounds to the microdialysis system. |
| Tubing Material | Fluorinated Ethylene Propylene (FEP), Polyetheretherketone (PEEK) [12] | Used for fluid connection. Low-NSB materials like FEP are preferred for hydrophobic drugs to prevent analyte loss. |
Experimental Workflow and Decision Pathway
The following diagram illustrates the logical decision process for selecting and applying the appropriate calibration method within an experimental workflow.
Diagram 1: Decision pathway for selecting a microdialysis calibration method.
Technical Workflow of Key Calibration Methods
The core technical procedures for the Retrodialysis and No-Net-Flux methods are detailed in the following workflow diagram.
Diagram 2: Technical workflows for Retrodialysis and No-Net-Flux calibration methods.
The rigorous calibration of microdialysis probes is a non-negotiable step in generating pharmacologically relevant quantitative data from in vivo studies. Retrodialysis, No-Net-Flux, and Zero-Flow Rate methods each offer distinct advantages tailored to specific experimental questions, whether for monitoring dynamic changes with stable isotopes, establishing absolute baseline concentrations as a gold standard, or maximizing recovery for low-analytical-sensitivity applications. By integrating these detailed protocols, comparisons, and decision-support tools into their research, scientists can ensure the accuracy, reliability, and interpretability of their microdialysis data, thereby strengthening the conclusions drawn in both preclinical and drug development research.
In vivo microdialysis is a cornerstone technique in neuroscience and pharmacology for sampling extracellular fluid in specific tissues of awake, freely behaving animals [22] [76]. The core principle involves implanting a probe with a semipermeable membrane, perfusing it with a physiological solution, and collecting diffusible molecules from the extracellular space into the dialysate [76]. The efficiency of this sampling process, quantified as recovery, is a critical determinant of data quality and reliability. Recovery is defined as the ratio of an analyte's concentration in the dialysate to its concentration in the surrounding extracellular fluid [12]. Low recovery can lead to false negatives, inaccurate pharmacokinetic parameters, and flawed conclusions, particularly for drugs with low extracellular concentrations.
This Application Note addresses the significant experimental challenge of low recovery in microdialysis. We focus on three fundamental, tunable physical parameters—flow rate, membrane length, and temperature—that profoundly impact recovery. Within the broader context of thesis research on probe implantation protocols, this document provides a structured, evidence-based guide featuring quantitative summaries and detailed protocols to help researchers systematically optimize these parameters, ensuring the collection of robust and meaningful data.
Quantitative Impact of Key Parameters on Recovery
The following tables synthesize experimental data from the literature, providing a clear reference for how flow rate, membrane length, and temperature influence analyte recovery.
Table 1: Impact of Flow Rate and Membrane Length on Relative Recovery
| Analyte | Probe Membrane Length | Flow Rate (μL/min) | Relative Recovery (%) | Citation & Context |
|---|---|---|---|---|
| General Small Molecules | 4 mm (Nanoporous Si) | 0.1 | 2 - 7 | [32] Microfabricated probe |
| Ethanol | 2 mm (PES, 6 kDa) | 1.0 | ~40 | [27] Commercial concentric probe |
| Ethanol | 2 mm (PES, 6 kDa) | 2.0 | ~25 | [27] Commercial concentric probe |
| Acetate | 2 mm (PES, 6 kDa) | 1.0 | ~32 | [27] Commercial concentric probe |
| Acetate | 2 mm (PES, 6 kDa) | 2.0 | ~20 | [27] Commercial concentric probe |
| Acetaldehyde | 2 mm (PES, 6 kDa) | 1.0 | ~38 | [27] Commercial concentric probe |
| Acetaldehyde | 2 mm (PES, 6 kDa) | 2.0 | ~24 | [27] Commercial concentric probe |
Table 2: Impact of Temperature on Recovery and Experimental Factors
| Parameter | Impact on Recovery | Experimental Considerations |
|---|---|---|
| In Vitro Temperature | Increasing bath temperature from 22°C to 37°C can significantly increase recovery due to increased diffusion coefficients [12]. | In vitro recovery calibration must be performed at the relevant physiological temperature (37°C) to be predictive of in vivo performance [12]. |
| Analyte Stability | Elevated temperatures (e.g., 37°C) can degrade thermolabile compounds during collection, artificially lowering measured concentrations [12]. | For unstable compounds, collect samples directly onto ice and store at -80°C immediately [12] [13]. Perform stability tests under collection conditions. |
| Body Temperature | Maintenance of core body temperature at ~37°C ensures consistent physiological diffusion and clearance rates in vivo [13]. | Use a heating pad or thermostatically controlled system during in vivo experiments to maintain stable body temperature [4]. |
Parameter Optimization: Mechanisms and Strategic Guidance
Flow Rate
The flow rate of the perfusion fluid exhibits an inverse logarithmic relationship with relative recovery [32] [27]. Lower flow rates (e.g., 0.1 - 0.5 μL/min) allow for longer contact time between the perfusate and the extracellular fluid, facilitating greater equilibration and thus higher relative recovery of analytes. Conversely, higher flow rates (e.g., 2.0 μL/min) reduce contact time, resulting in lower relative recovery but producing a larger total sample volume, which can be crucial for analytical sensitivity [27].
Strategic Application: Choose a flow rate based on the primary experimental constraint. Use low flow rates (0.1 - 0.5 μL/min) when dealing with low extracellular concentrations or when maximizing recovery is critical. Use higher flow rates (1.0 - 2.0 μL/min) when the analytical method requires a larger sample volume, with the understanding that recovery will be lower and may require more sensitive detection.
Membrane Length and Material
A longer membrane provides a greater surface area for diffusion, directly increasing the absolute mass of analyte recovered per unit time. Membrane material and Molecular Weight Cut-Off (MWCO) are also critical. Standard cuprophane membranes (6 kDa) are sufficient for small molecules like neurotransmitters [13], while high MWCO membranes (100 kDa to 3 MDa) are necessary for proteins and peptides [4] [77]. The choice of material (e.g., cuprophane, polyethersulfone) can also influence recovery, particularly for hydrophobic compounds prone to non-specific binding [12] [78].
Strategic Application: Select a longer membrane when targeting analytes with very low basal levels to maximize absolute recovery. For large molecules like proteins, a high MWCO "vent" probe operated in push-pull mode is essential to prevent fluid loss and pressure buildup [4] [77]. For hydrophobic drugs, consider surface-modified membranes or adding carriers like BSA to the perfusate to minimize binding [12].
Temperature
Temperature affects recovery through its influence on the diffusion coefficient of molecules; a higher temperature increases the rate of diffusion, thereby enhancing recovery [12]. Maintaining physiological temperature (37°C) during in vitro calibration is essential for obtaining a recovery value that is relevant to the in vivo environment.
Strategic Application: Always perform in vitro recovery calibration at 37°C to accurately simulate in vivo conditions. During in vivo experiments, actively maintain the animal's core body temperature. For the dialysate, collect samples directly onto ice to preserve the stability of labile analytes [13].
Detailed Experimental Protocols
Protocol: In Vitro Recovery Calibration via Retrodialysis
This protocol determines probe-specific recovery before in vivo implantation, which is critical for calculating true extracellular concentrations [12].
Research Reagent Solutions
- Artificial Cerebrospinal Fluid (aCSF): 145 mM NaCl, 2.68 mM KCl, 1.10 mM MgSO₄, 1.22 mM CaCl₂, 0.50 mM NaH₂PO₄, and 1.55 mM Na₂HPO₄, pH 7.4 [27]. Serves as the ionic and chemical baseline for perfusate.
- Perfusate/Drug Solution: A known concentration of the drug of interest (e.g., 100 ng/mL) dissolved in aCSF. For hydrophobic drugs, may require addition of 0.5%-1.5% Bovine Serum Albumin (BSA) or 0.01%-0.1% DMSO to reduce non-specific binding [12].
- Stirred Blank Ringer's Solution with BSA: Used as the external bath to simulate the extracellular environment during in vitro testing [12].
Step-by-Step Procedure
- Setup: Place the microdialysis probe in a beaker containing stirred blank Ringer's solution with 0.5%-1.5% BSA, maintained at 37°C using a heated water bath or hot plate.
- Perfusion: Connect the probe to a microsyringe pump and perfuse it with the drug solution prepared in aCSF (with additives if needed) at the intended in vivo flow rate (e.g., 0.5 - 1.0 μL/min).
- Equilibration: Allow the system to equilibrate for 60-90 minutes to establish a stable diffusion gradient.
- Sample Collection: Collect three consecutive dialysate samples at defined intervals (e.g., 1-hour intervals) into low-binding vials.
- Analysis and Calculation: Quantify the drug concentration in the collected dialysate (Cdialysate) and the original perfusate (Cperfusate) using UPLC-MS/MS or other sensitive analytical methods. Calculate relative recovery via retrodialysis: Recovery (%) = [(Cperfusate - Cdialysate) / C_perfusate] × 100 [12].
Protocol: Push-Pull Microdialysis for Large Molecules
This protocol is specialized for sampling high molecular-weight molecules, such as proteins, using probes with large MWCO membranes [4] [77].
Research Reagent Solutions
- Perfusion Buffer with BSA: Artificial CSF with 4% BSA. The BSA is added immediately prior to use to minimize aggregation and saturate non-specific binding sites on the tubing and membrane, thereby improving recovery of sticky proteins [4]. Note: Filter through a 0.1 μm syringe filter.
- Ethanol (70-100%): Used for brief activation (wetting) of the probe membrane prior to use [4].
Step-by-Step Procedure
- Probe Quality Check and Activation: Connect a syringe filled with distilled water to the probe outlet. Cover the vent holes, depress the plunger gently, and confirm water appears at the inlet with no leaks. Submerge the membrane in 70-100% ethanol for 2 seconds, then flush again with distilled water [4].
- System Setup: Prepare separate inlet (push) and outlet (pull) lines connected by a needle. Use a syringe pump to push the perfusion buffer and a roller/peristaltic pump to pull from the outlet, ensuring balanced flow and pressure neutralization via the probe's vent hole [4] [77].
- Perfusion and Collection: With the probe implanted in the target tissue, initiate the push-pull system. Collect dialysate fractions on ice over defined intervals.
- Sample Handling: Immediately freeze collected samples at -80°C to preserve protein integrity until analysis [4].
Integrated Optimization Strategy and Experimental Workflow
The following diagrams summarize the strategic relationships between parameters and the procedural workflow for an optimized experiment.
Optimization Parameter Relationships
In Vivo Microdialysis Workflow
The Scientist's Toolkit: Essential Materials
Table 3: Key Research Reagent Solutions and Materials
| Item | Function/Application | Example Specifications |
|---|---|---|
| Microdialysis Probes | Core sampling device with semipermeable membrane. | Concentric (CMA/11) or side-by-side designs; Cuprophane (6 kDa) for small molecules; Polyethersulfone (1 MDa) with vent for proteins [4] [27] [78]. |
| Artificial CSF (aCSF) | Physiological perfusate mimicking brain extracellular fluid. | 145 mM NaCl, 2.68 mM KCl, 1.2 mM CaCl₂, 1.2 mM MgSO₄, 5.4 mM Glucose, pH 7.4 [27]. |
| Bovine Serum Albumin (BSA) | Perfusate additive to reduce non-specific binding of hydrophobic compounds to the system. | Used at 0.5% - 4% (w/v) in aCSF [4] [12]. |
| Syringe Pump | Delivers perfusate at a precise, constant flow rate. | Capable of low flow rates (0.1 - 5.0 µL/min) [4]. |
| Fraction Collector | Automates collection of dialysate samples at set intervals. | Cools samples to 4°C or lower to maintain analyte stability [12]. |
Strategies to Minimize Tissue Damage and Blood-Brain Barrier Disruption
The blood-brain barrier (BBB) is a highly selective, semi-permeable membrane that critically protects the central nervous system (CNS) by separating the bloodstream from the brain parenchyma [79] [80]. Its integrity is maintained by a complex neurovascular unit (NVU) comprising endothelial cells connected by tight junctions, pericytes embedded in the basement membrane, and astrocytic endfeet [79] [81] [80]. BBB disruption is an early event in numerous neurological disorders and can also be a consequential artifact of invasive research techniques such as in vivo microdialysis probe implantation [81] [82]. This protocol details evidence-based strategies to minimize tissue damage and BBB disruption during such procedures, ensuring the collection of physiologically relevant data while upholding the principles of ethical animal research.
Background: Anatomy and Physiology of the BBB
A comprehensive understanding of the BBB's structure is fundamental to appreciating the mechanisms of its disruption and the rationale behind these minimization strategies.
Cellular Components of the Neurovascular Unit
- Endothelial Cells: Form the core barrier, characterized by continuous tight junctions, an absence of fenestrations, and a high density of mitochondria [79] [80]. They express specialized transporters and efflux pumps (e.g., P-glycoprotein) that actively regulate molecular passage [79] [80].
- Pericytes: Reside within the vascular basement membrane and are crucial for BBB development, maintenance, and regulation of endothelial tight junction formation [79] [80]. A reduction in pericyte coverage directly correlates with increased BBB permeability [79].
- Astrocytes: Their endfeet encapsulate over 99% of the abdominal capillary surface, secreting factors that promote BBB formation and integrity, and help maintain the ionic and metabolic homeostasis of the brain [79] [80].
- Tight Junctions (TJs): These multi-protein complexes, located near the apical side of endothelial cells, are the primary determinants of paracellular permeability [79]. Key transmembrane proteins include claudins (primary structural components), occludin (regulates permeability), and junctional adhesion molecules (JAMs), all anchored to the actin cytoskeleton by intracellular proteins like Zonula Occludens (ZO-1, ZO-2, ZO-3) [79].
Table 1: Key Tight Junction Proteins and Their Roles in BBB Integrity
| Junction Protein | Position | Primary Function |
|---|---|---|
| Claudin (e.g., -5) | TJ, Transmembrane | Structural integrity & permeability of TJ strands [79] |
| Occludin | TJ, Transmembrane | Regulation of paracellular permeability [79] |
| Zonula Occludens (ZO) | TJ, Intracellular | Scaffolding; anchors transmembrane proteins to actin cytoskeleton [79] |
| JAM | TJ, Transmembrane | Guides tight junction assembly and leukocyte adhesion [79] |
| VE-cadherin | AJ, Transmembrane | Forms adherens junctions for cell-cell adhesion [79] |
Protocol: Minimizing Damage During In Vivo Microdialysis
The following procedures are designed to be integrated into a standard microdialysis protocol to specifically preserve BBB and tissue integrity.
Pre-Implantation Planning and Probe Selection
Objective: To choose the optimal equipment and plan the implantation to minimize physical trauma.
- Probe Design Selection:
- For discrete brain regions in rodents, use concentric cannula probes with a small diameter (e.g., 250-350 µm for rats; smaller for mice) to maximize spatial resolution and reduce tissue displacement [83] [58].
- For sampling in more homogeneous tissues (e.g., muscle, tumor) or in awake-behaving animals, consider flexible linear probes which cause less tissue damage and are easier to secure without causing shear stress [83].
- Membrane Material and Cut-Off: Select a membrane with a molecular weight cut-off appropriate for your analyte to minimize non-specific binding and protein fouling, which can alter recovery rates and exacerbate local inflammation [12] [83]. Pre-treatment or coating of membranes may be necessary for hydrophobic compounds [12].
Surgical Implantation and Anesthesia
Objective: To perform the implantation with precision, minimizing acute physical injury and inflammatory response.
- Stereo-tactic Guidance: Use precise stereo-tactic coordinates and a slow, controlled descent rate for probe insertion to avoid tearing or stretching of the neuropil and vasculature.
- Guide Cannula: Implant a guide cannula anchored securely to the skull, through which the microdialysis probe can be inserted and removed. This allows for a single, more controlled penetration of the dura and brain tissue [17] [83].
- Anesthesia and Analgesia: Employ an anesthetic regimen that maintains stable cardiovascular parameters. Include peri-operative and post-operative analgesics to mitigate neuroinflammation triggered by surgical stress and pain.
Post-Implantation Recovery and Sampling
Objective: To allow the tissue to stabilize from the initial insertion trauma before collecting experimental data.
- Stabilization Period: After probe insertion, perfuse the probe with an artificial cerebrospinal fluid (aCSF) at a low flow rate (e.g., 0.5 µL/min) and allow for a recovery period of at least 60-90 minutes before baseline sample collection. This permits the acute effects of the insertion trauma, including localized BBB disruption and release of damage-associated molecules, to partially subside [58].
- Flow Rate Optimization: Use the slowest practicable flow rate that yields a sufficient sample volume for your analytical method. Slower flow rates increase relative recovery but require longer collection times; a balance must be struck to achieve adequate temporal resolution without causing significant fluid shifts in the tissue [12] [58].
The following workflow diagram summarizes the key stages of this protocol for minimizing damage.
Assessment and Validation of BBB Integrity
Objective: To confirm that the implemented strategies are effective in preserving BBB function during experiments.
- Dynamic Contrast-Enhanced MRI (DCE-MRI): The gold-standard for in vivo BBB permeability quantification. It involves intravenous injection of a Gadolinium-based contrast agent and calculating the transfer constant, Ktrans, where elevated Ktrans indicates BBB dysfunction [81] [82].
- Serum Biomarkers: Measure blood levels of endogenous proteins that indicate BBB injury or astrocyte activation.
- Post-hoc Histology: Upon conclusion of the experiment, brain tissue should be sectioned and stained for key TJ proteins (e.g., Claudin-5, ZO-1) to visualize the integrity of the junctional complexes adjacent to the probe tract compared to distal regions.
Table 2: Key Reagent Solutions for BBB Integrity and Microdialysis Research
| Research Reagent / Material | Function / Application | Key Considerations |
|---|---|---|
| Artificial Cerebrospinal Fluid (aCSF) | Perfusate for microdialysis; mimics ionic composition of brain ECF. | Must be isotonic and at physiological pH to prevent osmotic or ionic stress to cells [12]. |
| Bovine Serum Albumin (BSA) | Additive to perfusate/Ringer's solution. | Reduces non-specific binding (NSB) of hydrophobic drugs to microdialysis apparatus [12]. |
| Dimethyl Sulfoxide (DMSO) | Solvent for hydrophobic compounds. | Use at minimal concentrations (e.g., 0.01-0.1%) to dissolve drugs while minimizing cellular toxicity [12]. |
| Antibodies (Claudin-5, ZO-1, Occludin) | Immunohistochemistry for tight junction integrity. | Validate for specific staining in the target species to accurately assess TJ morphology post-implantation. |
| Gadolinium-Based Contrast Agents | Tracer for DCE-MRI to measure BBB permeability (Ktrans). | Requires specialized MRI equipment and pharmacokinetic modeling for analysis [81] [82]. |
Troubleshooting and Technical Notes
- Low Analytic Recovery: If recovery is persistently low, particularly for hydrophobic compounds, investigate non-specific binding to the tubing and membrane. Strategies include adding BSA (0.5-1.5%) to the perfusate, using DMSO as a co-solvent, or switching to fluorinated ethylene propylene (FEP) tubing which has lower protein binding than polyetheretherketone (PEEK) [12].
- High Inflammatory Background: Persistent elevation of inflammatory markers in dialysate may indicate excessive tissue trauma. Verify surgical aseptic technique, ensure analgesic efficacy, and confirm that an adequate post-implantation stabilization period is being observed.
- Probe Fouling: Long-term implantations risk accumulation of proteins on the dialysis membrane, blocking pores and reducing recovery. Pre-coating membranes or using materials resistant to biofouling can extend functional lifetime [83] [58].
Successful in vivo microdialysis relies on the collection of data that reflects the true neurochemical state of the brain, not the consequences of procedural trauma. The strategies outlined herein—from careful probe selection and refined surgical implantation to a mandated post-operative stabilization period—are critical for minimizing tissue damage and BBB disruption. Adherence to this protocol will enhance the validity, reliability, and translational relevance of data obtained from microdialysis studies in preclinical research.
In vivo microdialysis is a powerful technique for monitoring the chemical composition of the extracellular fluid in living tissues, but its effectiveness hinges on the integrity of the collected samples. Analyte degradation between sample collection and analysis can compromise data quality, leading to inaccurate conclusions in pharmacokinetic, pharmacodynamic, and neurochemical studies. This Application Note provides detailed protocols and evidence-based strategies for the collection, stabilization, and storage of microdialysate samples to preserve analyte integrity. Within the broader context of in vivo microdialysis probe implantation research, proper sample handling is as critical as the surgical procedure itself for obtaining physiologically relevant data.
The principal challenges in microdialysate management include chemical instability of target analytes, adsorption to surfaces of collection materials, enzymatic degradation, and temporal resolution loss due to sample dispersion. This note addresses these challenges through standardized protocols that are adaptable to a wide range of analyte classes, from small molecule neurotransmitters to larger proteins.
Critical Factors in Analyte Degradation
Mechanisms of Degradation
Multiple physical and chemical processes contribute to analyte loss or modification in microdialysate samples:
- Enzymatic Breakdown: Endogenous enzymes collected alongside the analyte can continue catalytic activity ex vivo [85].
- Oxidation: Catecholamines and other susceptible compounds may oxidize when exposed to air or light [22].
- Adsorption: Analytes, particularly hydrophobic molecules and peptides, may adhere to the surfaces of collection tubing and vials, reducing measurable concentrations [4] [85].
- Thermal Degradation: Elevated temperatures can accelerate both chemical and enzymatic degradation pathways [86].
- Temporal Dispersion: In continuous flow systems, Taylor dispersion can blur concentration changes that occur rapidly in vivo, effectively degrading temporal resolution [86].
Impact of Sample Volume and Collection Interval
The push for higher temporal resolution in microdialysis has led to increasingly smaller sample volumes collected over shorter intervals, which presents unique challenges for analyte stability:
Table 1: Collection Methods and Their Impact on Temporal Resolution
| Collection Method | Typical Volume | Temporal Resolution | Key Advantages | Primary Limitations |
|---|---|---|---|---|
| Traditional Discrete | 10-30 µL | 10-30 minutes | Simple implementation; Compatible with standard analyzers | Significant Taylor dispersion; Poor resolution of rapid events |
| Segmented Flow | 50-200 nL | 1-10 seconds | Minimal Taylor dispersion; Stable for frozen storage | Requires specialized equipment; More complex setup [86] |
| Tubing Storage | 1-5 µL/min | 30 seconds | Preserves temporal information; Clinically applicable | Requires validation of analyte stability [87] |
Stabilization Strategies and Protocols
Chemical Stabilization Methods
The appropriate choice of stabilization strategy depends on the analyte class and the intended analytical method:
Table 2: Research Reagent Solutions for Analyte Stabilization
| Reagent | Concentration | Function | Applicable Analytes | Considerations |
|---|---|---|---|---|
| Bovine Serum Albumin (BSA) | 0.15-4% | Prevents adsorption; Osmotic agent for large molecules | Proteins (e.g., tau), peptides [4] [85] | May bind compounds with high BSA affinity; Can aggregate if agitated [4] |
| Antioxidants | Analyte-dependent | Prevents oxidation of susceptible compounds | Catecholamines, ascorbic acid | Must be compatible with analytical detection method |
| Enzyme Inhibitors | Analyte-dependent | Blocks specific enzymatic degradation pathways | Neuropeptides, neurotransmitters | Potential interference with analytical assays |
| Acidification | pH-dependent | Denatures degradative enzymes | Acid-stable analytes | May hydrolyze or degrade acid-labile compounds |
Protocol 1: Segmented Flow Collection for High Temporal Resolution
This protocol enables collection of microdialysate with minimal temporal dispersion, preserving rapid concentration changes that occur in vivo [86]:
Materials Required:
- Microdialysis probe with integrated guide cannula
- PDMS-based dialysis/plug sampler chip
- High-purity perfluoroalkoxy (HPFA) tubing
- Immiscible carrier fluid (FC-77)
- Syringe pumps for push-pull configuration
- Refrigerated fraction collector
Procedure:
- System Setup: Connect the microdialysis probe outlet to the plug sampler chip. Establish separate inlet lines for perfusion buffer, derivatization reagents (if needed), and carrier fluid.
- Probe Activation: Submerge the microdialysis membrane in 70-100% ethanol for 2 seconds, then flush with distilled water to condition the membrane and remove preservatives [4] [88].
- Perfusion Buffer Preparation: Prepare artificial cerebrospinal fluid (aCSF: 1.3 mM CaCl₂, 1.2 mM MgSO₄, 3 mM KCl, 0.4 mM KH₂PO₄, 25 mM NaHCO₃, 122 mM NaCl, pH 7.35). Add BSA at 0.15-4% concentration to prevent analyte adsorption to surfaces [4]. Filter through a 0.1 µm syringe filter to remove aggregates.
- Flow Rate Calibration: Start syringe pump (push) at 10 µL/min and roller pump (pull) at 9.5-9.8 µL/min to establish slight negative pressure and prevent ultrafiltration [4] [88].
- Sample Collection: After equilibrium period (≥1 hour), adjust flow rates to operational levels (50-100 nL/min for small probes). Collect segmented flow plugs into HPFA tubing maintained at 4°C.
- Storage Preparation: Place the collected tubing into hexane and freeze at -80°C to prevent plug coalescence during freezing. Slow, even warming prevents coalescence during thawing [86].
Diagram 1: Segmented flow collection and storage workflow
Protocol 2: Tubing Storage for Clinical Microdialysis Applications
This method enables delayed analysis with preserved temporal resolution, particularly valuable in clinical settings where online analysis is impractical [87]:
Materials Required:
- Portex fine-bore polyethylene tubing (0.4 mm inner diameter, 0.8 mm outer diameter)
- Tubing adapter (Microbiotech AB)
- Heated wax pen for sealing
- -80°C freezer for storage
Procedure:
- Tubing Preparation: Cut polyethylene tubing to appropriate length (1 m stores ~1 hour of dialysate at 2 µL/min flow rate). Prime with physiological solution (e.g., T1 solution: 2.3 mM calcium chloride, 147 mM sodium chloride, 4 mM potassium chloride).
- Connection: Connect the microdialysis probe outlet to the storage tubing using a tubing adapter.
- Sample Collection: Allow dialysate to flow directly into storage tubing at the physiological flow rate (0.1-2.0 µL/min).
- Sealing: Once filled, melt each end of the storage tube with a heated wax pen and compress to create a secure seal, keeping ends level to avoid sample loss.
- Storage: Label tubing with flow direction and store at -80°C. Samples have demonstrated stability for up to 72 days under these conditions [87].
- Analysis: Thaw samples and pump directly through analysis system, effectively recreating the original temporal stream.
Protocol 3: Stabilization of Large Molecules and Proteins
Collection of large extracellular proteins (e.g., tau, α-synuclein) requires specialized handling to prevent adsorption and degradation [4] [88]:
Materials Required:
- High molecular weight cut-off probes (1,000 kDa-3 MDa)
- Push-pull pump system
- Protease inhibitor cocktails
- High-purity BSA (low protease grade)
Procedure:
- Probe Selection: Use probes with high molecular weight cut-off membranes (1,000 kDa or greater) to ensure adequate recovery of large proteins.
- Perfusion Buffer: Prepare aCSF with 4% BSA immediately before use. BSA serves as both an osmotic agent to limit fluid loss through large-pore membranes and a blocking agent to prevent non-specific adsorption of proteins to surfaces [4] [85].
- Push-Pull Configuration: Operate syringe pump (push) at a flow rate 20% faster than the roller pump (pull) to prevent pressure buildup that could cause ultrafiltration fluid loss [4] [88].
- Inhibitor Addition: Add appropriate protease or phosphatase inhibitors to the collection vial if the target protein is susceptible to enzymatic cleavage or modification.
- Immediate Processing: Keep samples at 4°C during collection and proceed to analysis or stabilization promptly. For delayed analysis, flash-freeze in liquid nitrogen and store at -80°C.
Analytical Considerations
Integration with Analytical Methods
The choice of stabilization method must be compatible with subsequent analytical techniques:
- Liquid Chromatography: Acid stabilization may interfere with separation; BSA must be removed prior to injection.
- Capillary Electrophoresis: Segmented flow plugs can be directly injected onto separation capillaries for high-throughput analysis [86].
- Immunoassays: BSA stabilization is generally compatible with most ELISA formats.
- Mass Spectrometry: Avoid non-volatile stabilizers that may cause ion suppression.
Quality Control Measures
Implement these QC procedures to verify sample integrity:
- Recovery Validation: Use internal standards (e.g., retrodialysis) to determine relative recovery and correct for adsorption losses [89].
- Stability Testing: Perform freeze-thaw cycle experiments and bench-top stability studies to establish acceptable handling parameters.
- Process Blanks: Include blank samples processed identically to dialysate to identify background contamination or interference.
Effective prevention of analyte degradation in microdialysis requires a comprehensive approach addressing collection, stabilization, and storage. The protocols detailed in this Application Note provide validated methodologies for maintaining sample integrity across various analyte classes and experimental scenarios. Implementation of these standardized procedures will enhance data quality and reliability in microdialysis studies, particularly when integrated with proper in vivo probe implantation protocols. As analytical technologies advance toward higher sensitivity and temporal resolution, corresponding improvements in sample handling practices will be essential for accurate interpretation of in vivo biochemistry.
Advanced Validation and Integrated Techniques for Translational Data
Combining Microdialysis with PET Imaging for Pharmacodynamic Endpoints
The integration of positron emission tomography (PET) and cerebral microdialysis provides a powerful platform for advanced pharmacodynamic (PD) endpoint analysis in preclinical drug development. PET enables non-invasive, in vivo visualization and quantification of target engagement and pharmacokinetic (PK) profiles using selective radioligands [90] [91]. Concurrently, cerebral microdialysis allows direct measurement of unbound drug concentrations at the target site, providing critical data on the pharmacologically active fraction [12] [92]. This combination is particularly valuable for central nervous system (CNS) drug development, where understanding blood-brain barrier (BBB) penetration and target site PK/PD relationships is crucial [12]. When framed within a thesis investigating in vivo microdialysis probe implantation protocols, this combined approach validates the surgical technique's success by correlating local chemical measurements with functional molecular imaging.
Background and Principles
Positron Emission Tomography (PET) in Drug Development
PET is a non-invasive functional imaging modality with unrivalled sensitivity for monitoring the pharmacokinetics and pharmacodynamics of drugs radiolabelled with short-lived positron-emitting radioisotopes [91]. Its fundamental principle involves detecting two annihilated photons produced when a positron from a radiotracer collides with an electron, generating images that map the radiotracer's location and concentration in the body [90]. PET is exceptionally sensitive, capable of detecting tracer quantities of radioligand in picomolar to nanomolar concentrations—far below the threshold for pharmacological activity—while exposing subjects to minimal radiation [90].
In drug development, PET provides critical information on:
- Target Engagement: Confirming a drug reaches its intended biological target [90]
- Proof of Mechanism: Demonstrating interaction with the target produces the expected biological effect [90]
- Receptor Occupancy: Quantifying the fraction of receptors bound by the drug [90]
- Pharmacokinetic Profiles: Visualizing and measuring the rates of physiological processes such as glucose metabolism, neurotransmitter activity, and blood flow [90]
Common radiotracers used in PET imaging include fluorine-18 and carbon-11 labeled compounds such as:
- 18F-fluorodeoxyglucose (18F-FDG) for glucose metabolism
- 18F-fluorodopa for dopamine neuronal densities
- 11C-raclopride for dopamine receptor densities
- 11C-PK11195 for neuronal microglial activation [90]
Cerebral Microdialysis for Target Site Pharmacokinetics
Cerebral microdialysis is a catheter-based technique for continuous sampling of unbound, pharmacologically active drug fractions in the brain's extracellular fluid (ECF) [12] [92]. The method involves implanting a probe with a semipermeable membrane into the brain region of interest. A perfusate is pumped through the probe, allowing unbound molecules in the ECF to diffuse across the membrane into the dialysate, which is collected for analysis [12].
A critical parameter is the unbound plasma-to-brain partition coefficient (Kp,uu), calculated from simultaneous measurements of unbound drug concentrations in plasma and brain ECF [12]. This coefficient is instrumental for:
- Elucidating BBB transport mechanisms
- Distinguishing between active influx/efflux processes and passive diffusion
- Estimating unbound brain drug concentrations based on plasma measurements [12]
However, applying microdialysis to hydrophobic compounds presents challenges due to non-specific binding to system components, potentially leading to low recovery rates and substantial carry-over effects [12].
Synergistic Potential of Combined PET and Microdialysis
Integrating PET imaging with microdialysis creates a complementary system where:
- PET provides longitudinal, non-invasive data on target engagement, receptor occupancy, and whole-body distribution [90] [91]
- Microdialysis offers direct chemical measurement of unbound drug concentrations at the target site with high temporal resolution [92]
- Combined data enables robust PK/PD modeling that correlates drug exposure with pharmacological effect at the molecular level [93]
This approach is particularly valuable for validating microdialysis probe placement and function within a thesis research framework, as PET can verify the anatomical location and physiological environment of the implanted probe.
Key Applications and Experimental Data
Quantitative Analysis of Target Site Drug Exposure
The combination of PET and microdialysis enables comprehensive quantification of drug exposure at the target site, which is crucial for CNS drug development. Recent research has demonstrated successful quantitative analysis of major anesthetics (ketamine, midazolam, and propofol) in human cerebral microdialysis samples, achieving detection limits below 100 ng/L for all analytes [92]. These methods showed high precision (below 4% RSD intraday) and excellent linearity, proving the feasibility of measuring ultralow drug concentrations in minute sample volumes [92].
Table 1: Representative Pharmacokinetic Parameters from Combined PET-Microdialysis Studies
| Drug/Analyte | Matrix | Key PK Parameter | Value | Notes |
|---|---|---|---|---|
| Vancomycin | Plasma (Standard) | AUC₀–₈h (mg·h/L) | 115.4 ± 24.1 | Porcine model [94] |
| Plasma (IV MD) | AUC₀–₈h (mg·h/L) | 86.0 ± 18.5 | Relative recovery: 41-64% [94] | |
| Meropenem | Plasma (Standard) | AUC₀–₈h (mg·h/L) | 70.9 ± 12.5 | Porcine model [94] |
| Plasma (IV MD) | AUC₀–₈h (mg·h/L) | 44.3 ± 13.6 | Relative recovery: 55-77% [94] | |
| Levofloxacin | Subcutaneous ISF | fAUC₀–₂₄ (mg·h/L) | 32.1-48.9 | Human microdialysis; varied by analysis method [95] |
Challenges and Methodological Considerations
Combining these techniques requires addressing several methodological challenges:
Non-Specific Binding: Hydrophobic compounds like actinomycin D, selinexor, and ulixertinib exhibit pronounced non-specific binding to microdialysis system components, leading to low recovery rates and carry-over effects [12]. Mitigation strategies include surface coatings, optimized materials, and adding carriers like bovine serum albumin (BSA) or low concentrations of dimethylsulfoxid (DMSO) to the perfusate [12].
Data Analysis Methods: The approach for analyzing microdialysis data significantly impacts PK parameter estimation:
- Midpoint-NCA/Midpoint-CA: Corrects microdialysate concentrations by relative recovery prior to analysis, potentially losing variability information [95]
- Integral-CA: Integrates all collected concentration data simultaneously in one comprehensive model-based analysis, providing better separation of PK variability from recovery-related variability [95]
Studies with levofloxacin showed that Integral-CA provided less variable AUCISF estimates (≤32.9%CV) compared to midpoint approaches (≥52.3%CV), demonstrating its superiority for characterizing clinical PK- and microdialysis-related variability [95].
Recovery Calibration: Proper calibration is essential for accurate concentration measurements. Various calibration methods offer different advantages and limitations:
Table 2: Microdialysis Probe Recovery Calibration Methods
| Method | Principle | Advantages | Limitations |
|---|---|---|---|
| In vitro Dialysis | Probes placed in drug solution of known concentration | Simple; no animals needed | May not reflect in vivo conditions [12] |
| Retrodialysis | Drug added to perfusate; loss measured | Accounts for mass transfer resistance | Requires drug-free brain tissue [12] [95] |
| No-Net-Flux | Multiple concentrations perfused; flux measured | Well-investigated; accurate | Requires steady state; time-consuming [12] |
| Zero/Ultra Slow Flow Rate | Very low flow rates used | Increased recovery rate | Small sample volume [12] |
Experimental Protocols
Integrated PET-Microdialysis Study Design
The following protocol outlines the combined approach for collecting pharmacodynamic endpoints in rodent models, adaptable for thesis research on microdialysis probe implantation.
Phase 1: Presurgical Planning (Day 1)
- Radiotracer Selection: Choose appropriate positron-emitting radiotracer (e.g., carbon-11 or fluorine-18 labeled compound) based on target of interest [90].
- Probe Placement Planning: Using stereotaxic coordinates, identify target region for microdialysis probe implantation (e.g., NAc: AP +1.7; ML ±1.7; DV −5.8 mm with 6° angle) [41].
- Experimental Timeline: Establish sampling schedule aligned with PK profile of investigational drug.
Phase 2: Guide Cannula Implantation (Day 1)
- Anesthetize animal using appropriate anesthetic (e.g., ketamine/xylazine or isoflurane).
- Secure animal in stereotaxic frame and expose skull.
- Drill burr holes at calculated coordinates.
- Implant guide cannulae (e.g., CMA Microdialysis AB, Solna, Sweden) targeting region of interest [41].
- Secure cannulae with dental acrylic and cement.
- Allow 7 days for surgical recovery and blood-brain barrier restoration [41].
Phase 3: Probe Insertion and Baseline (Day 8)
- Insert microdialysis probe through guide cannula 12 hours before experiments begin [41].
- Connect to microdialysis pump system with appropriate tubing (FEP or PEEK).
- Begin perfusion with dialysis buffer (e.g., artificial cerebrospinal fluid or Ringer's solution) at optimal flow rate (e.g., 0.5-2.0 μL/min) [12] [41].
- For hydrophobic compounds, add carrier agents to perfusate (e.g., 0.5%-1.5% BSA) to minimize non-specific binding [12].
- Collect baseline dialysate samples for 2 hours (e.g., 20-min intervals) into vials containing stabilizer if needed (e.g., 10 μL of 0.1 M perchloric acid for dopamine) [41].
- Immediately freeze samples at -80°C until analysis.
Phase 4: PET Imaging and Drug Administration (Day 9)
- Administer investigational drug at predetermined dose (e.g., systemic administration or local perfusion).
- For systemic drug administration: Collect dialysate samples continuously at predetermined intervals (e.g., every 20 min for 2h baseline, then after drug administration) [41].
- For local drug perfusion: Administer increasing concentrations of drug directly through microdialysis probe [41].
- Conduct PET imaging sessions at predetermined timepoints post-drug administration:
- Continue simultaneous microdialysis sampling throughout imaging session.
Phase 5: Sample Processing and Data Analysis
- Analyze dialysate samples using highly sensitive analytical techniques (e.g., UPLC-MS/MS or HPLC with electrochemical detection) [12] [41] [92].
- Reconstruct and process PET data:
- Apply motion correction and spatial normalization
- Co-register PET with anatomical MRI
- Generate regions of interest (ROI) and apply partial volume correction [90]
- For static PET data: Calculate standardized uptake values (SUV) [90]
- For dynamic PET data: Determine pharmacokinetic parameters (volume of distribution, binding potential) using compartmental analysis [90]
- Correlate PET-derived parameters with microdialysis drug concentration measurements for integrated PK/PD modeling.
Protocol for In Vivo Microdialysis Recovery Determination
Accurate recovery determination is essential for valid concentration measurements. The retrodialysis method is recommended for in vivo recovery assessment:
- Preparation: Following probe insertion and stabilization, prepare a solution of the investigational drug in perfusate at a known concentration (C~retroperfusate~) [95].
- Retrodialysis: Perfuse the drug solution through the probe for a stabilization period (e.g., 30-60 minutes).
- Sample Collection: Collect retrodialysate samples (C~retrodialysate~) at the same flow rate used during experimental sampling.
- Recovery Calculation: Calculate relative recovery (RR) using the formula: [ RR = 1 - \frac{C{\text{retrodialysate}}}{C{\text{retroperfusate}}} ] [95]
- Conversion to ISF Concentration: Use the determined RR to convert measured dialysate concentrations (C~dialysate~) to actual interstitial fluid concentrations (C~ISF~): [ C{\text{ISF}} = \frac{C{\text{dialysate}}}{RR} ] [95]
This method assumes equal permeation processes in both directions across the microdialysis membrane [95].
Visualization of Experimental Workflow
The following diagram illustrates the integrated PET-microdialysis experimental workflow and how data from both techniques converge to provide comprehensive pharmacodynamic endpoints:
The Scientist's Toolkit: Essential Research Reagents and Materials
Table 3: Essential Materials for Combined PET-Microdialysis Studies
| Category | Specific Items | Function/Purpose | Technical Notes |
|---|---|---|---|
| Microdialysis Equipment | Guide cannulae (e.g., CMA Microdialysis) | Permanent guide for probe insertion into brain tissue | Material should be biocompatible [41] |
| Microdialysis probes (e.g., MD-2211, CMA7/8) | Semi-permeable membrane for molecular sampling | Membrane length, material affect recovery [12] | |
| Microdialysis pump | Delivers perfusate at precise, low flow rates | Capable of 0.3-2.0 μL/min flow rates [12] | |
| FEP or PEEK tubing | Connects pump to probe and probe to collector | Minimizes non-specific binding [12] | |
| Fraction collector | Collects dialysate in small volumes over timed intervals | Maintains sample integrity [12] | |
| PET Imaging Materials | Carbon-11 or Fluorine-18 radiotracers | Selective radioligands for target engagement | Must meet criteria: log D 1-3, MW <500 Da, Kd <10 nM [90] |
| Cyclotron | Produces positron-emitting radionuclides | On-site or nearby production needed for short half-lives [90] | |
| Automated synthesis modules | Radiochemical synthesis under cGMP compliance | Required for human applications [90] | |
| PET-CT or PET-MRI scanner | Multimodality imaging for functional & anatomical data | PET provides functional, CT/MRI provides anatomical data [90] | |
| Perfusates & Analytical Supplies | Artificial cerebrospinal fluid (aCSF) or Ringer's solution | Physiological perfusion fluid | Carrier proteins (BSA) may be added for hydrophobic drugs [12] |
| Stabilizing agents (e.g., perchloric acid) | Prevents degradation of labile analytes | Added to collection vials for neurotransmitters [41] | |
| UPLC-MS/MS system | Highly sensitive quantification of dialysate analytes | Detection limits <100 ng/L achievable [92] |
Data Integration and Analysis Approaches
Advanced Analytical Methods for Combined Data
The integration of PET and microdialysis data requires sophisticated analytical approaches:
Compartmental Analysis Integration: Both PET and microdialysis data can be analyzed using compartmental models that describe the transfer of drugs between physiological compartments [95]. For microdialysis data, the integral compartmental analysis (Integral-CA) approach integrates all collected concentration data simultaneously in one comprehensive model, providing better separation of PK variability from recovery-related variability compared to traditional midpoint correction methods [95].
Recovery Correction Methods: For accurate quantification of unbound drug concentrations, several recovery calibration methods can be employed:
PK/PD Modeling for Pharmacodynamic Endpoints
Combining PET and microdialysis data enables sophisticated PK/PD modeling that correlates drug exposure with pharmacological effects:
Mechanism-Based Biomarker Selection: Biomarkers should reflect the mechanism of action for the intervention, providing predictive value in early drug development even if they don't become surrogate endpoints [96]. PD biomarkers are particularly valuable for demonstrating biosimilarity in biological drug development [97].
PK/PD Model Validation: Successful PK/PD modeling requires validation through:
- Bioanalytical Method Validation: Reliable and selective assays under GLP-like environments for quantitative methods [96]
- Model-Based Validation: Using knowledge of mechanism from discovery and preclinical studies to plan clinical study designs [96]
Application to Therapeutic Decision-Making: For antibiotics like levofloxacin, PK/PD analysis based on target-site concentrations can determine the probability of target attainment (PTA), with different analytical approaches potentially affecting dosing regimen decisions [95].
The integration of PET imaging and cerebral microdialysis provides a powerful methodological framework for obtaining sophisticated pharmacodynamic endpoints in drug development research. This combined approach enables researchers to simultaneously monitor target engagement, receptor occupancy, and drug distribution non-invasively (via PET) while directly measuring unbound drug concentrations at the target site (via microdialysis). Within a thesis investigating in vivo microdialysis probe implantation protocols, this combination serves to validate surgical success through functional correlation of local chemical measurements with molecular imaging findings. The protocols and methodologies outlined herein provide a robust foundation for implementing this integrated approach in preclinical drug development, particularly for CNS-targeted therapeutics where understanding blood-brain barrier penetration and target site pharmacokinetics is paramount.
Ultra-Performance Liquid Chromatography coupled to Tandem Mass Spectrometry (UPLC-MS/MS) has become a cornerstone technique in bioanalytical chemistry, enabling the highly sensitive and selective quantification of endogenous neuropeptides and xenobiotic drugs in complex biological matrices. This capability is paramount for advanced neuroscience research and CNS drug development, particularly when integrated with in vivo sampling techniques like cerebral microdialysis [98] [12]. Neuropeptides function as critical signaling molecules in numerous physiological processes, including neurotransmission, pain perception, and appetite regulation [98]. However, their analysis presents significant challenges due to low endogenous concentrations (often in the picomolar range), susceptibility to degradation, and complex post-translational modifications [98] [99]. Similarly, quantifying pharmacologically active, unbound drug fractions in the brain requires exceptional sensitivity to overcome limitations like low recovery and non-specific binding [12]. This application note delineates robust UPLC-MS/MS protocols for quantifying these analytes, framed within a comprehensive thesis on in vivo microdialysis, to provide researchers with detailed methodologies for obtaining reliable in vivo data.
The Integrated Workflow: FromIn VivoSampling to UPLC-MS/MS Analysis
The journey from a living brain to quantitative data involves a meticulously coordinated series of steps, from surgical implantation of a microdialysis probe to the final data processing. The following workflow diagram synthesizes this complex, multi-stage process into a clear, visual representation.
Diagram 1: Integrated workflow for in vivo microdialysis and UPLC-MS/MS analysis.
This integrated workflow ensures the preservation of sample integrity from the living organism to the final analytical result, which is especially critical for labile compounds like neuropeptides [98] [12]. The subsequent sections provide detailed protocols for each key stage of this process.
Experimental Protocols
In VivoMicrodialysis Probe Implantation
The validity of any microdialysis study hinges on precise and surgically sound probe implantation [12] [40].
Materials:
- Animals: Adult male and female Wistar rats (280-350 g) or equivalent model [35].
- Anesthesia: Isoflurane (4% for induction, 2-3% for maintenance) [35].
- Apparatus: Stereotaxic instrument, heating pad, custom-made I-shaped microdialysis probe (e.g., 20 kDa molecular cut-off, 2 mm active membrane) [35].
- Solutions: Artificial Cerebrospinal Fluid (aCSF): 149 mM NaCl, 2.8 mM KCl, 1.2 mM CaCl₂, 1.2 mM MgCl₂, 0.25 mM ascorbic acid, 5.4 mM d-glucose (pH 7.2-7.4) [40] [35].
- Surgical Supplies: Harvard cement, anchoring screws [35].
Procedure:
- Anesthesia and Positioning: Deeply anesthetize the animal and securely mount it in the stereotaxic instrument. Maintain body temperature with a heating pad [35].
- Surgical Exposure: Make a sagittal incision to expose the skull. Clean and dry the surface [35].
- Drilling and Probe Placement:
- Drill a hole above the target brain region (e.g., Nucleus Accumbens: A/P +1.85, M/L -1.4, D/V -7.8 mm relative to bregma [35]).
- Drill additional holes for anchoring screws.
- Lower the microdialysis probe slowly into the target coordinates. For prefrontal cortex, alternative coordinates may be used: +2.0 mm AP, ±0.5 mm ML, -4.0 mm DV from the skull surface [40].
- Continuously perfuse the probe with aCSF during implantation to prevent clogging [40].
- Fixation: Secure the probe and anchoring screws to the skull using Harvard cement [35].
- Post-operative Care: House the animal individually and allow for a 48-hour recovery period before commencing microdialysis experiments [35].
UPLC-MS/MS Method for Neuropeptide Quantification
This protocol, adapted from Feickert & Burckhardt, details the highly sensitive quantification of Substance P (SP) and human Hemokinin-1 (hHK-1) in plasma, demonstrating principles applicable to microdialysates [99].
Materials:
- Analytes: Substance P (SP), human Hemokinin-1 (hHK-1), (Sar9)-SP (Internal Standard) [99].
- Solvents: LC-MS grade water, acetonitrile (ACN), Dimethyl sulfoxide (DMSO) [99].
- Equipment: UPLC system coupled to a tandem mass spectrometer (e.g., Waters TQD), Acquity UPLC BEH C18 column (e.g., 1.7 µm, 2.1 x 50 mm) [100].
Method Parameters and Workflow: Table 1: UPLC-MS/MS Parameters for Neuropeptide Analysis [99].
| Parameter | Specification |
|---|---|
| Sample Preparation | Immunoextraction in 96-well plates, followed by solid-phase extraction (SPE) |
| Column | C18 (e.g., 1.7 µm, 2.1 x 100 mm) |
| Mobile Phase A | 0.1% Formic Acid in Water |
| Mobile Phase B | Acetonitrile |
| Gradient | Optimized via DoE (e.g., 10% to 90% B over several minutes) |
| Flow Rate | 0.15 - 0.40 mL/min |
| Injection Volume | 2 - 10 µL |
| Ionization Mode | Positive Electrospray Ionization (ESI+) |
| Mass Analyzer Mode | Multiple Reaction Monitoring (MRM) |
| LLOQ | ~0.03 - 0.16 pM (for NPY metabolites [101]) |
Detailed Procedure:
- Sample Preparation: For plasma, use a multi-step preparation involving immunoextraction and SPE to achieve the required sensitivity [99] [101]. For microdialysates, protein precipitation with cold acetonitrile (1:3 sample:ACN ratio) may be sufficient. Add a stable isotope-labeled internal standard (e.g., (Sar9)-SP for SP analysis) to all samples [99].
- Chromatographic Separation: Inject the prepared sample onto the UPLC system. Use a gradient elution program optimized for peptide separation, typically starting with a high percentage of aqueous phase and increasing the organic modifier. A representative gradient is: 0-0.5 min at 10% B, 0.5-1.0 min from 10% to 90% B, 1.0-2.0 min at 90% B, followed by re-equilibration [100].
- Mass Spectrometric Detection: Analyze the eluting peptides using ESI in positive ion mode. Monitor specific precursor-to-product ion transitions in MRM mode for optimal sensitivity and selectivity. For example, for Safinamide (a drug), the transition is m/z 303.3→215.0 [100].
- Data Analysis: Quantify analytes by comparing the peak area ratio of the analyte to the internal standard against a linear calibration curve, constructed in the relevant biological matrix [99] [100].
A Generic Protocol for Drug Quantification in Microdialysates
This protocol outlines a general method for quantifying small molecule drugs, such as Safinamide, in rat plasma or microdialysates [100].
Materials:
- Analytes: Drug of interest (e.g., Safinamide), internal standard (e.g., Diazepam) [100].
- Solvents: LC-MS grade water, ACN, methanol, formic acid [100].
- Equipment: UPLC-MS/MS system, Acquity UPLC BEH C18 column (1.7 µm, 2.1 x 50 mm) [100].
Method Parameters and Workflow: Table 2: UPLC-MS/MS Parameters for Drug Analysis (e.g., Safinamide) [100].
| Parameter | Specification |
|---|---|
| Sample Preparation | Protein Precipitation (ACN, 1:3 ratio) |
| Column | C18 (1.7 µm, 2.1 x 50 mm) |
| Mobile Phase A | 0.1% Formic Acid in Water |
| Mobile Phase B | Acetonitrile |
| Gradient | 0.5 min, 10% B → 1.0 min, 90% B → Hold → Re-equilibrate |
| Flow Rate | 0.4 mL/min |
| Injection Volume | 2 µL |
| Ionization Mode | ESI+ |
| Mass Analyzer Mode | MRM |
| LLOQ | 1.0 ng/mL (for Safinamide [100]) |
Detailed Procedure:
- Sample Preparation: Thaw dialysate or plasma samples on ice. Add internal standard working solution (e.g., 20 µL of 500 ng/mL Diazepam in methanol) to 100 µL of sample. Precipitate proteins by adding 300 µL of ice-cold ACN. Vortex mix for 2 minutes and centrifuge at 13,000 rpm for 15 minutes. Transfer the supernatant for analysis [100].
- UPLC-MS/MS Analysis: Follow steps 2-4 from the neuropeptide protocol (Section 3.2), using the specific parameters outlined in Table 2.
Performance and Application Data
The following table compiles quantitative performance data from recent studies, showcasing the exceptional sensitivity achievable with modern UPLC-MS/MS setups.
Table 3: Quantitative Performance of UPLC-MS/MS Assays for Various Analytes.
| Analyte | Biological Matrix | LLOQ | Linear Range | Key Application |
|---|---|---|---|---|
| Neuropeptide Y (NPY) & Metabolites [101] | Human Plasma | 0.03 - 0.16 pM | Not specified | Reference intervals in healthy volunteers; NPY3-36 identified as main circulating peptide. |
| Substance P (SP) & hHK-1 [99] | Human Plasma | 7.8 pg/mL | 7.8 - 2000 pg/mL | Method developed to avoid immunoassay cross-reactivity; quantified SP(COOH) in plasma. |
| Safinamide [100] | Rat Plasma | 1.0 ng/mL | 1.0 - 2000 ng/mL | Pharmacokinetic studies of an anti-Parkinson's drug. |
| Capmatinib [102] | Human Liver Microsomes | 0.94 ng/mL | 1 - 3000 ng/mL | Evaluation of metabolic stability (half-life: 13.11 min). |
| Metformin [103] | Cell Pellets | 0.05 ng/mL | 0.05 - 50 ng/mL | Cellular uptake and inhibition assays for Organic Cation Transporters (OCTs). |
The Scientist's Toolkit: Key Reagents and Materials
Successful implementation of these protocols requires carefully selected reagents and materials. The following table lists essential components for the integrated microdialysis and UPLC-MS/MS workflow.
Table 4: Essential Research Reagents and Materials.
| Item | Function/Application | Example/Note |
|---|---|---|
| Microdialysis Probe [35] | Semi-permeable membrane for in vivo sampling of unbound analytes. | Custom I-shaped, 20 kDa cut-off, 2 mm active membrane. |
| aCSF / Ringer's Solution [40] [35] | Perfusate mimicking cerebrospinal fluid; minimizes physiological disturbance. | 149 mM NaCl, 2.8 mM KCl, 1.2 mM CaCl₂, 1.2 mM MgCl₂, 5.4 mM d-glucose. |
| Stable Isotope-Labeled Internal Standard (IS) [103] [99] | Corrects for analyte loss during preparation and ion suppression/enhancement during MS analysis. | e.g., (Sar9)-SP for SP analysis; D6-Metformin for Metformin analysis. |
| Ion-Pairing Reagent [103] | Improves chromatographic retention of highly polar ions. | Heptafluorobutyric Acid (HFBA). |
| Protease/Peptidase Inhibitors [98] | Prevents degradation of labile peptides during sample collection and storage. | Added to collection vials or perfusate. |
| Protein Precipitation Solvent [100] | Removes proteins from samples (e.g., dialysate, plasma). | Ice-cold acetonitrile or methanol (typically 3:1 v/v solvent to sample). |
| Solid-Phase Extraction (SPE) Cartridges [99] [101] | Pre-concentrates analytes and removes matrix interferences for ultra-sensitive peptide assays. | Used in multi-step sample preparation for neuropeptides. |
Critical Considerations for Method Success
Mitigating Challenges in Neuropeptide and Hydrophobic Drug Analysis
- Combatting Low Abundance and Degradation: Neuropeptides are present at low concentrations and are highly susceptible to proteolytic degradation. The use of protease inhibitors, rapid sample processing, and heat stabilization during tissue harvest is critical [98]. For MS analysis, skipping enzymatic digestion allows for the direct detection of naturally occurring peptides, preserving their native state [98].
- Managing Matrix Effects and Non-Specific Binding: Biological matrices can cause ion suppression or enhancement. This is mitigated by using isotopically labeled internal standards, efficient sample clean-up (e.g., SPE, protein precipitation), and careful chromatographic optimization to separate analytes from interfering compounds [98] [12]. Hydrophobic drugs are prone to non-specific binding to microdialysis system components. Strategies to minimize this include surface coating of tubing, adding carriers like BSA (0.5-1.5%) or DMSO (0.01-0.1%) to the perfusate, and using materials like polyetheretherketone (PEEK) tubing which exhibits lower binding than fluorinated ethylene propylene (FEP) [12].
- Optimizing Sensitivity via Design of Experiments (DoE): A DoE approach systematically evaluates multiple method parameters (e.g., extraction conditions, LC gradient, MS source settings) to find the optimal robust setpoints for maximum sensitivity. This is highly recommended for developing ultra-sensitive assays for neuropeptides, as it efficiently manages the complexity of interacting variables [99].
Data Interpretation and Calculation of Key Parameters
For microdialysis studies, the primary goal is often to determine the unbound brain concentration (Cu, brain) and the unbound partition coefficient (Kp,uu). The following diagram illustrates the logical pathway and formulas used to calculate these critical pharmacokinetic parameters.
Diagram 2: Logical workflow for calculating key neuropharmacokinetic parameters from microdialysis data.
The unbound brain concentration is calculated by correcting the measured dialysate concentration for the probe's recovery: Cu, brain = Cdialysate / R [12]. The unbound partition coefficient, which describes the extent of drug distribution across the BBB, is then calculated as: Kp,uu = Cu, brain / Cu, plasma [12]. A Kp,uu value near 1 indicates passive diffusion, while values significantly different from 1 suggest the involvement of active transport mechanisms at the BBB.
In contemporary central nervous system (CNS) drug discovery and development, the unbound brain-to-plasma partition coefficient (Kp,uu,brain) has emerged as a pivotal pharmacokinetic parameter for evaluating the extent of drug transport across the blood-brain barrier (BBB) [104]. This parameter exclusively describes the unbound drug concentration in the brain relative to blood at equilibrium and is determined solely by net influx and efflux clearances [104]. The adoption of the Kp,uu,brain concept represents a paradigm shift from historical reliance on total drug concentration measurements, enabling more accurate prediction of pharmacologically relevant CNS exposure [104]. This Application Note details the theoretical foundation, experimental methodologies, and practical protocols for reliable Kp,uu,brain determination, with particular emphasis on in vivo microdialysis as the gold standard approach [105].
Theoretical Foundation of Kp,uu,brain
Definition and Pharmacokinetic Basis
Kp,uu,brain is defined as the ratio of the unbound drug concentration in the brain interstitial fluid (Cu,brain,ss) to the unbound drug concentration in plasma (Cu,plasma,ss) at steady state [104]. The parameter can be mathematically represented by several equivalent equations:
[ Kp,uu,brain = \frac{CL{in}}{CL{out}} = \frac{AUC{u,brain}}{AUC{u,plasma}} = \frac{C{u,brain,ss}}{C{u,plasma,ss}} ]
where CLin and CLout represent the clearances into and out of the brain, respectively, and AUC denotes the area under the concentration-time curve for unbound drug [104].
The parameter provides critical insights into the dominant transport mechanisms at the BBB:
- Kp,uu,brain ≈ 1: Indicates predominantly passive diffusion
- Kp,uu,brain < 1: Suggests net active efflux transport
- Kp,uu,brain > 1: Implies net active influx transport [105]
Significance in CNS Drug Development
The scientific and pharmaceutical community has widely embraced the free drug hypothesis, which posits that only unbound drug molecules can engage pharmacological targets to elicit a response [104]. Implementation of Kp,uu,brain has been described as "game-changing" by 79% of surveyed pharmaceutical companies, fundamentally improving decision-making in CNS drug discovery programs [104]. This parameter enables accurate quantification of target site exposure, facilitates translation between preclinical species and humans, and supports rational design of compounds with optimized brain penetration properties.
Experimental Methodologies for Kp,uu,brain Assessment
Method Comparison and Selection
Multiple experimental approaches exist for determining Kp,uu,brain, each with distinct advantages, limitations, and appropriate applications.
Table 1: Comparison of Methodologies for Kp,uu,brain Assessment
| Method | Key Principle | Throughput | Physiological Relevance | Key Limitations |
|---|---|---|---|---|
| In Vivo Microdialysis | Direct sampling of unbound drug in brain interstitial fluid [4] [76] | Low | High (considered gold standard) [105] | Technically challenging; limited to compounds with appropriate physicochemical properties [105] |
| Brain Homogenate Binding | Estimation of unbound fraction (fu,brain) in homogenized brain tissue [106] | High | Moderate | Disrupts cellular compartments; fails for compounds with pH-dependent partitioning or active cellular uptake [107] |
| Brain Slice Uptake | Measurement of unbound volume of distribution (Vu,brain) in intact brain slices [106] | Medium | High | Requires specialized expertise; longer incubation times [106] |
| Combinatory Mapping Approach (CMA) | Combines in vivo neuroPK with in vitro binding/distribution data [108] | Medium | High | Multiple experiments required; complex data integration |
| Quantitative MSI for Unbound Drug (qMSI-uD) | Merges in vivo and in vitro neuroPK with mass spectrometry imaging [108] | Low | High | Specialized instrumentation needed; method validation required |
Emerging Computational Approaches
Machine learning-based quantitative structure-property relationship (QSPR) models have recently been developed to predict Kp,uu,BBB values, offering significant potential for rapid screening of candidate compounds [105] [109]. These models utilize various algorithms including random forest, support vector machines, and gradient boosting machines, with reported accuracies up to 85.1% in classifying compounds as having high or low unbound brain bioavailability [109]. Such in silico approaches are particularly valuable in early discovery phases to prioritize compounds for experimental evaluation.
Detailed Experimental Protocols
In Vivo Microdialysis for Kp,uu,brain Determination
Pre-surgical Procedures
- Anesthesia and Animal Preparation: Anesthetize rodents (e.g., rats or mice) by intraperitoneal injection of chloral hydrate (400 mg/kg). Confirm anesthetic depth by absence of response to toe pinch. Administer perioperative analgesics such as meloxicam SR at induction and buprenorphine upon recovery [4].
- Stereotaxic Setup: Secure the anesthetized animal in a stereotaxic frame using ear bars and a nose clamp. Ensure the head is firmly positioned without lateral movement. Apply veterinary ophthalmic ointment to prevent corneal drying during surgery [4].
Guide Cannula Implantation Surgery
- Surgical Exposure: Make a sagittal incision through the skin over the skull. Gently retract tissue and clear the skull surface of blood and connective tissue using damp cotton swabs [4].
- Skull Leveling: Level the skull in both anterior-posterior and medial-lateral dimensions using a drill attached to the stereotaxic manipulator. Precisely align bregma and lambda to the same horizontal plane [4].
- Coordinate Determination and Drilling: Identify target coordinates (e.g., hippocampus: A/P -3.1 mm, M/L -2.5 mm, D/V -1.2 mm at 12 degrees) using a standard brain atlas. Drill a burr hole at the determined coordinates, ensuring the diameter accommodates the guide cannula [4].
- Cannula Placement and Fixation: Position the guide cannula using a stereotaxic adaptor and slowly lower it into the brain to the target depth. Apply dental acrylic cement around the cannula and an auxiliary bone screw to create a stable, anchored assembly [4].
- Post-surgical Recovery: House animals individually with appropriate thermal support and monitoring until fully recovered. Administer postoperative analgesics as needed. Allow a minimum 1-2 day recovery period before microdialysis experiments, extending to 2 weeks for sleep-wake studies [4].
Microdialysis System Setup and Operation
- Probe Preparation and Activation:
- Perfusion Buffer Preparation: Prepare artificial cerebrospinal fluid (aCSF) containing 1.3 mM CaCl₂, 1.2 mM MgSO₄, 3 mM KCl, 0.4 mM KH₂PO₄, 25 mM NaHCO₃, and 122 mM NaCl (pH 7.35). Add 4% bovine serum albumin (BSA) immediately before use to minimize analyte adhesion to tubing, then filter through a 0.1 µm syringe filter [4].
- System Assembly: Connect inlet tubing to a syringe pump and outlet tubing to a peristaltic or roller pump operating in "push-pull" mode. Carefully lower the microdialysis probe through the guide cannula into the target brain region [4].
- Sample Collection: Perfuse aCSF at a flow rate of 1.8-2.2 µL/min. Begin collection after an equilibration period (typically 60-90 minutes). Collect dialysate samples at predetermined intervals into low-binding microcentrifuge tubes [4] [76].
- Recovery Determination: Determine relative recovery using retrodialysis method: perfuse with a known drug concentration before or after the experiment and calculate recovery based on concentration difference between perfusate and dialysate [105].
Bioanalysis and Data Calculation
- Sample Analysis: Analyze dialysate and plasma samples using appropriate analytical methods (typically LC-MS/MS). Ensure calibration standards cover the expected concentration range [108].
Kp,uu,brain Calculation: Calculate Kp,uu,brain using steady-state concentrations or AUC values:
[ Kp,uu,brain = \frac{C{u,brain,ss}}{C{u,plasma,ss}} \quad \text{or} \quad Kp,uu,brain = \frac{AUC{u,brain}}{AUC{u,plasma}} ]
Apply appropriate recovery corrections to dialysate concentrations [104] [105].
Brain Slice Method for Vu,brain Determination
Brain Slice Preparation
- Tissue Collection: Rapidly remove brains from freshly euthanized animals and place in oxygenated (95% O₂/5% CO₂) physiological buffer.
- Slice Sectioning: Section brains into 100-300 µm thick slices using a vibratome. Maintain slices in oxygenated buffer at 37°C [106].
Uptake Experiment
- Drug Incubation: Transfer slices to buffer containing the test compound at relevant concentrations. Maintain oxygenation throughout incubation.
- Sampling and Processing: At predetermined time points, remove slices, blot lightly, and homogenize. Determine drug concentration in homogenates using LC-MS/MS [106].
- Vu,brain Calculation: Calculate Vu,brain as the ratio of total drug concentration in the slice to the buffer concentration at steady state [106].
Brain Homogenate Binding Method
- Homogenate Preparation: Homogenize brain tissue in buffer (typically 1:4 weight:volume) [106].
- Equilibrium Dialysis: Place brain homogenate in one chamber and buffer in the other chamber of an equilibrium dialysis device separated by a semi-permeable membrane. Allow system to reach equilibrium (typically 4-6 hours at 37°C) [106].
- fu,brain Calculation: Measure drug concentrations in both chambers and calculate fu,brain as the ratio of buffer concentration to homogenate concentration [106].
The Scientist's Toolkit
Table 2: Essential Research Reagents and Materials
| Item | Specification | Function/Application |
|---|---|---|
| Microdialysis Probes | 1,000 kDa molecular weight cut-off membrane [4] | Sampling of unbound drug from brain interstitial fluid |
| Artificial CSF | 1.3 mM CaCl₂, 1.2 mM MgSO₄, 3 mM KCl, 0.4 mM KH₂PO₄, 25 mM NaHCO₃, 122 mM NaCl, pH 7.35 [4] | Physiological perfusion fluid mimicking brain extracellular fluid |
| BSA | 4% in aCSF, low aggregation [4] | Reduces adhesion of analytes to tubing and apparatus |
| Stereotaxic Apparatus | Precision manipulator with rodent adaptors [4] | Precise positioning of guide cannulas in target brain regions |
| Guide Cannulas and Dummy Probes | Material: stainless steel or polyether ether ketone [4] | Permanent guide for temporary insertion of microdialysis probes |
| Dental Acrylic Cement | Self-curing, low exotherm [4] | Secures guide cannula assembly to the skull |
| Syringe and Peristaltic Pumps | Push-pull configuration, low flow rate capability (0.1-5 µL/min) [4] | Controlled perfusion and collection of microdialysis samples |
| LC-MS/MS System | High sensitivity, appropriate for small sample volumes [108] | Quantification of drug concentrations in dialysate, plasma, and tissue |
Methodological Visualizations
Kp,uu,brain Determination Workflow
Determining Kp,uu,brain via In Vivo Microdialysis: This workflow illustrates the sequential steps for reliable Kp,uu,brain determination using in vivo microdialysis, from surgical preparation through data interpretation.
Interrelationship of Key NeuroPK Parameters
NeuroPK Parameter Relationships: This diagram illustrates how Kp,uu,brain integrates information from both total drug measurements (Kp,brain) and protein binding parameters (fu,plasma and fu,brain) to provide a physiologically relevant measure of BBB transport.
Data Interpretation and Troubleshooting
Method-Specific Considerations
- Microdialysis: Ensure recovery determinations are performed under identical conditions to experimental samples. Consider potential tissue disruption around the probe membrane [76].
- Brain Slice Method: Validate steady-state achievement through time course studies. Monitor slice viability throughout experiments [106].
- Brain Homogenate Method: Interpret results with caution for compounds with significant intracellular accumulation or pH-dependent partitioning [107].
Inter-species Translation
Recent evidence supports the utility of Kp,uu,brain values for translational predictions, with 71% of compounds showing within 2-fold agreement between minipig and rat [110]. However, transporter substrates may exhibit more pronounced species differences, necessitating careful consideration when extrapolating human CNS exposure [110].
Accurate determination of Kp,uu,brain is essential for modern CNS drug discovery and development. While multiple methodological approaches exist, in vivo microdialysis remains the gold standard for direct measurement of unbound drug concentrations in the brain. The detailed protocols provided in this Application Note, particularly for microdialysis probe implantation and operation, provide researchers with robust methodologies for reliable Kp,uu,brain assessment. Proper implementation of these techniques enables meaningful interpretation of brain exposure data and enhances the probability of success in developing effective CNS therapeutics.
Push-Pull Microdialysis for Sampling Large Molecules like Proteins and Antibodies
Push-pull microdialysis represents an advanced sampling technique designed to enhance the recovery of macromolecules, including proteins and antibodies, from biological systems. This method builds upon conventional microdialysis principles but incorporates a dual-pump system that actively "pushes" perfusate into the probe while simultaneously "pulling" dialysate out [111]. This fluid dynamic configuration reduces pressure buildup across the semi-permeable membrane, thereby minimizing ultrafiltration and significantly improving the recovery efficiency for large biomolecules that typically demonstrate poor diffusion characteristics in standard microdialysis setups [111] [112]. The technique is particularly valuable for neurochemical monitoring and pharmacokinetic studies where accurate determination of unbound drug concentrations in the brain is essential for calculating critical parameters like the unbound plasma-to-brain partition coefficient (Kp,uu) [12].
The fundamental distinction between push-pull microdialysis and conventional microdialysis lies in the pressure management system. In conventional microdialysis, a single pump pushes perfusate through the system, creating positive pressure that can limit the diffusion of large molecules across the membrane. In contrast, the push-pull configuration incorporates a second pump that actively pulls dialysate from the outlet side, creating a pressure balance that facilitates improved recovery of macromolecules [111] [113]. This technical innovation makes push-pull microdialysis particularly suited for sampling challenging hydrophobic compounds and large biomolecules that exhibit pronounced non-specific binding to microdialysis system components [12].
Technical Foundations and Principles
Theoretical Basis for Macromolecule Sampling
The recovery of large molecules in microdialysis systems is governed by complex interactions between diffusion kinetics, membrane characteristics, and fluid dynamics. Traditional microdialysis membranes possess defined molecular weight cut-offs (MWCO) that theoretically determine the size exclusion limit; however, in practice, the recovery of macromolecules approaching this limit is often inefficient due to their slow diffusion rates and increased susceptibility to adsorption on system components [114] [115]. Push-pull microdialysis addresses these limitations through its balanced flow mechanism, which reduces the effective concentration polarization at the membrane interface and creates a more favorable environment for macromolecular diffusion.
The diffusion of molecules across microdialysis membranes follows Fick's law, where the rate of diffusion is directly proportional to the concentration gradient and the surface area of the membrane, while being inversely proportional to the membrane thickness [115]. For large molecules like proteins and antibodies, this relationship becomes problematic because their size significantly reduces diffusion coefficients. Furthermore, hydrophobic compounds tend to exhibit pronounced non-specific binding to microdialysis system components, leading to low recovery rates and substantial carry-over effects [12]. The push-pull configuration mitigates these issues by maintaining a consistent concentration gradient across the membrane and reducing the residence time of molecules within the probe, thereby limiting interaction with system components.
Comparative Advantages Over Conventional Techniques
Push-pull microdialysis offers several distinct advantages over conventional microdialysis for macromolecular sampling:
Enhanced Recovery Efficiency: The balanced push-pull flow creates minimal pressure differential across the dialysis membrane, reducing ultrafiltration and improving the recovery of large molecules [111] [112]. When compared directly with conventional microdialysis, push-pull systems demonstrate significantly higher extraction fractions for proteins across a molecular weight range from 5.7 to 67 kDa [112].
Reduced Non-Specific Binding: The continuous flow dynamics minimize the contact time between susceptible compounds and system surfaces, thereby decreasing adsorptive losses [12]. This is particularly beneficial for hydrophobic drugs and antibodies that strongly interact with conventional microdialysis components.
Adaptability to Different Probes: The technique can be implemented with various probe configurations, including standard microdialysis probes requiring pressure release [111] and specialized AtmosLM probes designed for enhanced large molecule recovery [111].
Compatibility with Osmotic Agents: Push-pull systems maintain better fluid balance when using perfusion fluids supplemented with osmotic agents like dextran, which are necessary for high MWCO membranes to prevent fluid loss [114].
Despite these advantages, push-pull microdialysis introduces additional technical complexity, particularly regarding flow rate calibration and matching between the push and pull pumps. Imbalanced flows can lead to either fluid accumulation in the surrounding tissue (if push > pull) or tissue damage due to suction (if pull > push) [116] [113].
Experimental Protocols and Methodologies
System Setup and Calibration
Materials and Equipment:
- CMA 402 syringe pump or equivalent (push pump) [111]
- Harvard peristaltic pump P-70 or equivalent (pull pump) [111]
- 2.5 mL microsyringe [111]
- Fluorinated ethylene propylene (FEP) tubing (Cat. # BFEP-T22Q) [111]
- 3-Stop PVC tubing for peristaltic pump (Cat. # 72–0654) [111]
- 0.015 inch silicone tubing connectors (Cat. # MC015/10) [111]
- AtmosLM microdialysis probe or equivalent [111]
- Artificial cerebrospinal fluid (aCSF): 150 mM sodium, 3 mM potassium, 1.4 mM calcium, 0.8 mM magnesium, 155 mM chloride, and 0.15% BSA [111]
Setup Procedure:
- Connect the microsyringe to the syringe pump (push pump) using FEP tubing.
- Connect the syringe pump to the inlet of the microdialysis probe using additional FEP tubing secured with silicone connectors.
- Connect the outlet of the microdialysis probe to the peristaltic pump (pull pump) using the 3-Stop PVC tubing.
- Ensure all connections are secure to prevent leaks or disconnections during operation.
System Calibration:
- Calibrate the syringe pump and set the initial flow rate to 1 µL/min [111].
- Calibrate the peristaltic pump by measuring the output volume of microdialysate over a defined time period.
- Condition the probe with ethanol and flush with aCSF to remove air bubbles [111].
- Measure the in vitro fluid recovery as the ratio of collected microdialysate volume to perfused volume from the syringe pump [111].
- Adjust the pull pump flow rate until the fluid recovery is between 97-103% [111]. This balance is critical for proper system operation.
- Validate system stability by confirming that three consecutive 10-minute microdialysis sample collections show consistent volumes [111].
In Vitro Recovery Assessment for Antibodies
Materials:
- Standard solution of 1000 ng/mL rat serum IgG (Cat. # I4131, Sigma, USA) [111]
- aCSF with 0.15% BSA [111]
- Calibrated push-pull microdialysis system
Procedure:
- Prepare a standard solution of 1000 ng/mL rat serum IgG in aCSF [111].
- Immerse the microdialysis probe in the standard solution with continuous stirring.
- Initiate push-pull perfusion with calibrated flow rates.
- After equilibration, collect multiple consecutive samples at defined intervals (e.g., 10-60 minutes depending on flow rate) [111].
- Analyze the IgG concentration in the dialysate using appropriate analytical methods (e.g., UPLC-MS/MS) [12].
- Calculate the in vitro recovery for the microdialysis probe using the formula: Recovery (%) = (Cdial / Cext) × 100 where Cdial is the concentration in the dialysate and Cext is the concentration in the external standard solution [111].
Assessment of Non-Specific Binding
Materials:
- Test compounds (e.g., selinexor, ulixertinib) [12]
- Polypropylene reaction tubes, plastic microdialysis reaction tubes, and glass tubes [12]
- Ringer's solution with 0.5%-1.5% BSA [12]
- 1 mL microdialysis glass syringe [12]
- FEP or PEEK tubing [12]
Procedure:
- Prepare solutions with known drug concentration (e.g., 100 ng/mL) in Ringer's solution [12].
- Transfer the solution to three different types of vials: polypropylene, plastic microdialysis, and glass tubes [12].
- Measure drug concentrations after each transfer and calculate recovery to assess surface adsorption [12].
- For tubing adsorption tests, load the drug solution into a 1 mL glass syringe and pump through a 1-meter long tubing system (FEP or PEEK) [12].
- Collect samples at multiple time points during perfusion and analyze drug concentrations [12].
- Calculate recovery rates to quantify non-specific binding to different system components [12].
Performance Data and Quantitative Recovery
Recovery of Standard Molecules
Table 1: Comparative Recovery of Various Molecules Using Push-Pull vs. Conventional Microdialysis
| Molecule | Molecular Weight | Push-Pull Recovery (%) | Conventional Microdialysis Recovery (%) | Experimental Conditions |
|---|---|---|---|---|
| Glucose | 180 Da | >90% [114] | >90% [114] | 100 kDa catheter, 0.3 µL/min |
| Lactate | 89 Da | >90% [114] | >90% [114] | 100 kDa catheter, 0.3 µL/min |
| Pyruvate | 88 Da | >90% [114] | >90% [114] | 100 kDa catheter, 0.3 µL/min |
| Proteins | 5.7-67 kDa | Significantly higher [112] | Lower [112] | Gradient elution, 21-min cycle |
| Human IgG | 150 kDa | 0.9-1.6% [114] | Below LLOQ [114] | 100 kDa catheter, push-pull method |
| Serum Albumin | 65 kDa | 0.9-1.6% [114] | Below LLOQ [114] | 100 kDa catheter, push-pull method |
| Hemoglobin | 64 kDa | 0.9-1.6% [114] | Below LLOQ [114] | 100 kDa catheter, push-pull method |
Table 2: Effect of Flow Rate on Recovery in Push-Pull Microdialysis
| Flow Rate (µL/min) | Relative Recovery (%) | Sample Volume | Application Notes |
|---|---|---|---|
| 0.3 [114] | >90% (small molecules) [114] | 2 µL | Optimal for high-temporal resolution sampling |
| 0.5 [12] | Varies by compound [12] | ~1 µL | Used for hydrophobic drug recovery assessment |
| 1.0 [111] | Not specified | Varies | Standard flow rate for antibody recovery studies |
| 10-50 nL/min [116] | 70-80% [116] | 0.5 µL every 12 min | Ultralow flow for high spatial resolution |
Technical Considerations for Macromolecule Recovery
The quantitative data demonstrates that while push-pull microdialysis significantly improves macromolecule recovery compared to conventional techniques, absolute recovery rates for proteins and antibodies remain relatively low, typically below 2% for molecules approaching or exceeding the membrane MWCO [114]. This limitation underscores the importance of several technical considerations:
Membrane Characteristics: The molecular weight cut-off specification is not absolute, with recovery declining significantly as molecule size approaches the nominal MWCO [114] [115]. A 100 kDa membrane shows negligible recovery of 150 kDa IgG under standard conditions [114].
Flow Rate Optimization: Lower flow rates generally improve relative recovery but reduce absolute sample amount, requiring careful balancing based on analytical sensitivity requirements [116].
Perfusate Composition: The addition of osmotic agents like 3% 500-kDa dextran is necessary when using high MWCO membranes to prevent fluid loss, but does not significantly impact small molecule recovery [114].
Surface Interactions: The material composition of the entire fluid path significantly impacts recovery of hydrophobic compounds through non-specific binding [12].
Visualization of Push-Pull Microdialysis Workflow
The diagram illustrates the fundamental components and flow paths in a push-pull microdialysis system. The critical balance between push and pull pumps maintains fluid equilibrium across the semi-permeable membrane, facilitating efficient macromolecular exchange while minimizing tissue disruption.
Research Reagent Solutions and Materials
Table 3: Essential Research Reagents and Materials for Push-Pull Microdialysis
| Category | Specific Product/Description | Function/Application | Reference |
|---|---|---|---|
| Pump Systems | CMA 402 syringe pump | Push pump for precise perfusate delivery | [111] |
| Harvard peristaltic pump P-70 | Pull pump for dialysate collection | [111] | |
| Tubing Materials | Fluorinated ethylene propylene (FEP) tubing (BFEP-T22Q) | Connection tubing with low protein binding | [111] |
| 3-Stop PVC tubing (72-0654) | Specific compatibility with peristaltic pumps | [111] | |
| Connectors | 0.015 inch silicone tubing connectors (MC015/10) | Secure leak-free connections between components | [111] |
| Probes | AtmosLM microdialysis probe | Specialized design requiring push-pull configuration | [111] |
| CMA7, CMA8, MD-2211 probes | Alternative probe options for different applications | [12] | |
| Perfusion Fluids | Artificial cerebrospinal fluid (aCSF) with 0.15% BSA | Standard perfusion fluid for neurological applications | [111] |
| Ringer's solution with 0.5%-1.5% BSA | Alternative with optimized oncotic pressure | [12] | |
| aCSF with 3% 500-kDa dextran | Prevents fluid loss in high MWCO membranes | [114] | |
| Calibration Standards | Rat serum IgG (I4131, Sigma) | Standard for antibody recovery assessment | [111] |
Troubleshooting and Technical Recommendations
Common Challenges and Solutions
Fluid Recovery Imbalance:
- Problem: Fluid recovery consistently exceeds 103% or falls below 97% [111].
- Solution: Adjust the pull pump flow rate incrementally until the recovery stabilizes within the acceptable range (97-103%) [111]. Consistently high recovery suggests insufficient pull flow, while low recovery indicates excessive pull flow.
Low Macromolecule Recovery:
- Problem: Recovery of target proteins or antibodies remains unacceptably low despite system optimization.
- Solution: Implement surface coating strategies or use optimized materials to minimize non-specific binding [12]. For hydrophobic compounds like ulixertinib, consider adding small concentrations of DMSO (0.01-0.1%) to the perfusate to improve solubility and recovery [12].
System Clogging or Occlusion:
- Problem: Reduced or interrupted flow due to partial occlusion of tubing or probe.
- Solution: Carefully prepare cannula and tubing assemblies to prevent suction of tissue fragments and debris [113]. Regular system flushing and proper implantation techniques minimize this risk.
Optimization Strategies for Specific Applications
Hydrophobic Compounds:
- Conduct preliminary adsorption tests with different tubing materials (FEP vs. PEEK) to identify optimal configuration [12].
- Include appropriate additives in perfusate (BSA, DMSO) to reduce non-specific binding [12].
- Validate recovery using retrodialysis methods with the specific compound of interest [12].
Large Protein Sampling:
- Select membrane MWCO significantly larger than the target protein to maximize recovery potential [114].
- Utilize perfusion fluids with dextran supplementation when using high MWCO membranes to maintain fluid balance [114].
- Employ push-pull method rather than push-only configuration to enhance recovery of macromolecules [114].
In Vivo Applications:
- Allow sufficient post-implantation stabilization time (minimum 2-3 days for primates) before beginning experimental sampling [113].
- Maintain strict sterile techniques during probe implantation to minimize tissue inflammation [113].
- Verify probe placement and function through preliminary sampling before initiating experimental protocols.
Push-pull microdialysis represents a significant technical advancement for sampling large molecules like proteins and antibodies from biological systems. While the method demonstrates clear advantages over conventional microdialysis, particularly for macromolecular recovery, its successful implementation requires careful attention to system calibration, component selection, and methodological optimization. The technique's ability to provide enhanced recovery of biologically relevant macromolecules makes it particularly valuable for pharmacokinetic studies, biomarker discovery, and neurochemical monitoring applications where accurate assessment of large molecule dynamics is essential.
Establishing Robust In Vitro-In Vivo Correlation (IVIVC) for Drug Development
In vitro–in vivo correlation (IVIVC) is defined by the U.S. Food and Drug Administration (FDA) as a predictive mathematical model describing the relationship between an in vitro property of an oral dosage form and a relevant in vivo response [117]. Generally, the in vitro property is the rate or extent of drug dissolution or release, while the in vivo response is the plasma drug concentration or amount of drug absorbed [117] [118]. The establishment of a robust IVIVC has profound implications for pharmaceutical product development, quality control, and regulatory compliance, as it enables the prediction of in vivo performance based on in vitro dissolution profiles, potentially reducing the need for costly and time-consuming bioequivalence studies [117] [119].
This application note provides a comprehensive framework for establishing robust IVIVC models, with particular emphasis on their intersection with in vivo microdialysis techniques for determining unbound drug concentrations at specific target sites. We detail critical physicochemical, biopharmaceutical, and physiological considerations, present step-by-step protocols for model development and validation, and illustrate practical applications through case studies.
Theoretical Foundations of IVIVC
Key Properties Influencing IVIVC Development
Successful IVIVC development requires careful consideration of multiple drug and formulation properties that influence both dissolution and absorption. These factors can be categorized into three main groups, as summarized in the table below.
Table 1: Key Properties Influencing IVIVC Development
| Category | Property | Impact on IVIVC |
|---|---|---|
| Physicochemical | Solubility & pH Dependency | Determines dissolution rate under different GI pH conditions; critical for BCS Class II and IV drugs [117]. |
| pKa | Influences ionization state, solubility, and membrane permeability across physiological pH gradients [117]. | |
| Salt Form | Can significantly alter dissolution rate compared to free acid or base forms [117]. | |
| Particle Size | Affects surface area and dissolution rate, particularly for low-solubility drugs [117]. | |
| Biopharmaceutical | Drug Permeability | Major determinant of absorption rate; can be predicted from logP, PSA, or measured in models like Caco-2 [117] [120]. |
| Octanol-Water Partition Coefficient (logP) | Indicator of lipophilicity; compounds with logP between 0 and 3 generally exhibit high permeability [117]. | |
| Absorption Potential (AP) | A composite parameter (AP = log(P × Fun/D0)) that correlates with fraction absorbed [117]. | |
| Physiological | GI pH Gradient | Affects drug solubility, dissolution, stability, and permeability (stomach pH 1-2 to colon pH 7-8) [117]. |
| GI Transit Time | Determines the duration available for drug release and absorption; differs for liquids and solids [117]. |
Levels of IVIVC Correlation
The FDA guidance recognizes different levels of correlation, with Level A being the most informative for regulatory purposes [118] [119].
Table 2: Levels of IVIVC as Defined by FDA Guidance
| Level | Definition | Predictive Value | Regulatory Utility |
|---|---|---|---|
| Level A | A point-to-point relationship between in vitro dissolution and in vivo absorption [119]. | High - Predicts the entire plasma concentration-time profile [119]. | Most preferred; can support biowaivers for major formulation changes [118] [119]. |
| Level B | Uses statistical moment analysis (e.g., compares mean in vitro dissolution time to mean in vivo residence time) [119]. | Moderate - Does not reflect the actual shape of the PK profile [119]. | Limited; not suitable for setting dissolution specifications [119]. |
| Level C | Relates a single dissolution time point (e.g., t50%) to a single PK parameter (e.g., Cmax or AUC) [118] [119]. | Low - Does not predict the full PK profile [119]. | Useful for early development; multiple Level C (relating several time points to several PK parameters) is more informative [118]. |
IVIVC Development Workflow
The process of establishing a predictive IVIVC involves a sequential, iterative workflow from formulation design through to regulatory application. The following diagram outlines the key stages and decision points.
Protocol: Formulation Design and In Vitro Dissolution
Objective: To develop formulations with differing release rates to define the relationship between in vitro dissolution and in vivo absorption [119].
Materials:
- Active Pharmaceutical Ingredient (API)
- Excipients for extended-release mechanism (e.g., matrix polymers, coating materials)
- Dissolution apparatus (USP Apparatus I (Basket) or II (Paddle))
- Dissolution media (e.g., 0.1 N HCl, phosphate buffers at various pH levels)
- Analytical instrument (e.g., HPLC or UPLC with UV detection)
Procedure:
- Formulate Dosage Forms: Develop at least two, preferably three, formulations with distinct release rates (e.g., slow, medium, fast). The release mechanism must be the same across all formulations [119].
- Perform Dissolution Testing: Conduct dissolution testing on each formulation (n=12 units) using an appropriate, biorelevant method. Include multiple time points to fully characterize the profile.
- Analyze Samples: Withdraw dissolution samples at predetermined time points, filter, and analyze using a validated analytical method.
- Calculate Mean Dissolution Profile: Calculate and plot the mean percentage of drug dissolved versus time for each formulation.
Protocol: In Vivo Pharmacokinetic Study and Deconvolution
Objective: To obtain the in vivo absorption profile for correlation with in vitro data.
Materials:
- Animal model (e.g., rabbit, dog) or human subjects (for clinical studies)
- Approved clinical or preclinical study protocol
- Equipment for blood sample collection and processing
- LC-MS/MS system for bioanalysis
Procedure:
- Conduct PK Study: Administer the formulations from Protocol 3.1 in a crossover or parallel study design. Collect serial blood samples over a sufficient time period to fully define the plasma concentration-time profile.
- Determine Plasma Concentrations: Analyze plasma samples to determine drug concentration at each time point.
- Calculate In Vivo Absorption Profile: Use a mathematical deconvolution method (e.g., Wagner-Nelson or numerical deconvolution) to calculate the fraction of drug absorbed (or dissolved in vivo) over time [117].
Protocol: Model Development and Validation
Objective: To establish and validate a predictive mathematical model linking the in vitro and in vivo data.
Procedure:
- Plot Correlation: Plot the fraction of drug dissolved in vitro against the fraction of drug absorbed in vivo for each corresponding time point. This forms the basis of a Level A correlation [117].
- Develop Mathematical Model: Fit a linear or non-linear function to the data. The model could be direct (e.g., linear regression) or more complex, accounting for time-scaling factors [117].
- Internal Validation: Use the established model to predict the in vivo profiles of the formulations used to build the model. Compare the predicted vs. observed PK profiles. The prediction error for AUC and Cmax should be ≤ 10% for each formulation and ≤ 15% for all formulations combined to be considered acceptable [118].
- External Validation (if applicable): If a new formulation is developed, use the IVIVC model to predict its in vivo performance based on its dissolution profile. Validate the prediction with an in vivo study. This step strengthens the robustness of the model.
The Scientist's Toolkit: Essential Reagents and Materials
Table 3: Key Research Reagent Solutions for IVIVC Development
| Item | Function/Application | Example & Notes |
|---|---|---|
| Biorelevant Dissolution Media | Simulates gastrointestinal fluids (e.g., FaSSGF, FaSSIF, FeSSIF) to provide more physiologically relevant dissolution data [119]. | Commercially available powders or prepared in-house. |
| Permeability Assessment Kits | Determine apparent permeability (Papp) for BCS classification and absorption potential estimation [117] [120]. | Caco-2 cell culture systems, artificial membranes. |
| Extended-Release Excipients | To create formulations with varying, controlled release rates for model development [119]. | Hydrophobic polymers, hydrophilic matrices, coating agents. |
| Analytical Standards | For accurate quantification of drug concentrations in dissolution and biological matrices. | Certified reference standards from reputable suppliers. |
| Microdialysis Probes & Perfusates | To measure unbound, pharmacologically active drug concentrations at the target site (e.g., brain) for refined PK/PD modeling [12] [121]. | CMA probes; Artificial Cerebrospinal Fluid (aCSF) or Ringer's solution, with BSA to reduce NSB for hydrophobic drugs [12] [40]. |
Integrating IVIVC with Microdialysis for Enhanced PK/PD Insights
Microdialysis is a powerful technique that allows for continuous sampling of unbound drug from the interstitial fluid of specific tissues, such as the brain [121] [10]. This provides direct measurement of the pharmacologically active concentration at the site of action, which is invaluable for developing more meaningful IVIVC and PK/PD models, especially for CNS-targeted therapeutics.
The relationship between systemic pharmacokinetics, microdialysis measurements, and IVIVC can be visualized as follows.
Protocol: Cerebral Microdialysis for Unbound Brain Concentration
Objective: To determine the unbound drug concentration in the brain extracellular fluid (ECF) for calculation of the unbound brain-to-plasma partition coefficient (Kp,uu), a critical parameter for CNS drug development [12] [121].
Materials:
- Stereotaxic surgical setup
- Guide cannula and microdialysis probe (e.g., CMA 7 or CMA 8 for rats)
- Microinfusion pump
- Artificial Cerebrospinal Fluid (aCSF: 149 mM NaCl, 2.8 mM KCl, 1.2 mM CaCl2, 1.2 mM MgCl2, 0.25 mM ascorbic acid, 5.4 mM d-glucose, pH 7.2–7.4) [40]
- Fraction collector
- LC-MS/MS system for sensitive analyte quantification
Procedure:
- Probe Implantation: Anesthetize the animal and implant a guide cannula stereotaxically into the target brain region (e.g., prefrontal cortex). Secure the cannula to the skull with dental cement. Allow the animal to recover for a sufficient period (typically 24-48 hours) to restore blood-brain barrier integrity and normalize neurochemistry [12] [10].
- Probe Insertion and Perfusion: On the experimental day, insert the microdialysis probe through the guide cannula. Perfuse the probe with aCSF at a low, constant flow rate (e.g., 0.5 - 2.0 µL/min). For hydrophobic drugs, add agents like Bovine Serum Albumin (BSA, 0.5-1.5%) to the perfusate to minimize non-specific binding to the tubing and membrane [12].
- Equilibration: Allow the system to equilibrate for 1-2 hours after probe insertion to establish stable baseline conditions.
- Determine In Vivo Recovery: Use retrodialysis (or no-net-flux) to calibrate the probe. Perfuse with a known concentration of the drug and calculate recovery as:
Recovery = (C_perfusate - C_dialysate) / C_perfusate[12]. - Administer Drug and Collect Samples: Administer the drug formulation systemically. Collect dialysate fractions serially over defined intervals. Simultaneously, collect blood samples to determine plasma PK.
- Analysis and Calculation:
- Analyze dialysate and plasma samples using LC-MS/MS.
- Correct the dialysate drug concentration using the recovery factor to determine the true unbound brain ECF concentration:
C_brain,u = C_dialysate / Recovery. - Calculate the unbound brain-to-plasma partition coefficient:
Kp,uu = AUC_brain,u / AUC_plasma,u[12] [121].
Case Study: Application in Generic Drug Development
A generic sponsor submitted an Abbreviated New Drug Application (ANDA) for an extended-release (ER) tablet of a BCS Class I drug. The formulation was not proportionally similar in inactive ingredients to the highest strength RLD, which typically requires a new in vivo bioequivalence (BE) study [118].
Application of IVIVC:
- The sponsor developed a Level A IVIVC using two other formulations with different release rates, in addition to the to-be-marketed formulation.
- The model was internally validated, showing prediction errors for AUC and Cmax of less than 10%.
- The sponsor requested a waiver of the in vivo BE study for the lower strength based on the validated IVIVC.
- The dissolution profiles of all strengths were similar in multiple media, and the manufacturing process was consistent.
Outcome: The IVIVC was found acceptable, and the BE waiver was granted, saving significant time and resources while ensuring therapeutic equivalence [118].
Establishing a robust IVIVC is a critical achievement in modern drug development. It transforms the dissolution test from a simple quality control tool into a powerful predictor of in vivo performance. By following the structured protocols for formulation design, in vitro/in vivo testing, and model validation outlined in this document, researchers can create predictive models that support formulation optimization, reduce regulatory burden, and accelerate drug development timelines. The integration of advanced techniques like microdialysis further refines these models by providing direct insights into target-site pharmacokinetics, ultimately leading to more effective and reliably delivered therapeutics.
Conclusion
In vivo microdialysis probe implantation is a powerful and versatile technique that provides unparalleled insight into the chemical events of the extracellular space. A successful experiment hinges on a robust implantation protocol, careful consideration of probe and membrane properties, and rigorous calibration to account for recovery. Overcoming challenges such as non-specific binding is critical for generating reliable data, particularly for hydrophobic drug candidates. The true power of microdialysis is realized when it is combined with other advanced technologies like PET and highly sensitive MS-based analytics, creating a comprehensive platform for assessing pharmacokinetics, pharmacodynamics, and endogenous neurochemistry. As the field advances, the continued refinement of protocols for sampling larger molecules and the expansion into complex disease models will further solidify microdialysis's role in bridging preclinical findings and clinical outcomes, accelerating the development of central nervous system therapeutics and beyond.
References
- 1. Extracellular fluid [https://en.wikipedia.org/wiki/Extracellular_fluid]
- 2. Transport of Small Molecules - The Cell - NCBI Bookshelf - NIH [https://www.ncbi.nlm.nih.gov/books/NBK9847/]
- 3. 3.5 Passive Transport – Concepts of Biology [https://opentextbc.ca/biology/chapter/3-5-passive-transport/]
- 4. In Vivo Microdialysis Method to Collect Large Extracellular ... [https://pmc.ncbi.nlm.nih.gov/articles/PMC6235288/]
- 5. Microdialysis - In Vivo System for Neurotransmitter Recovery [https://www.amuzainc.com/what-is-microdialysis/?srsltid=AfmBOoqi1ISSRf5lBRwpepe-AUgkOn7oX0rAsdQp-LYY_oD8qwTDPXcb]
- 6. Custom-made Microdialysis Probe Design - PMC [https://pmc.ncbi.nlm.nih.gov/articles/PMC4545111/]
- 7. CMA Probes & Guides for Microdialysis [https://microdialysis.com/products/probes-guides.html?limit=10&mode=list]
- 8. Microdialysis of dopamine interpreted with quantitative model ... [https://pmc.ncbi.nlm.nih.gov/articles/PMC2386091/]
- 9. The potential of microdialysis to monitor organic and ... [https://www.sciencedirect.com/science/article/abs/pii/S0038071711001167]
- 10. How can microdialysis benefit drug development? [https://www.news-medical.net/news/20240903/How-can-microdialysis-benefit-drug-development.aspx]
- 11. Microdialysis - an overview [https://www.sciencedirect.com/topics/agricultural-and-biological-sciences/microdialysis]
- 12. Experimental Insights and Recommendations for Successfully ... [https://pmc.ncbi.nlm.nih.gov/articles/PMC12033007/]
- 13. In vivo microdialysis for sample collection. [https://bio-protocol.org/exchange/minidetail?id=6984834&type=30]
- 14. In Vivo Microdialysis [https://hopecenter.wustl.edu/cores/in-vivo-microdialysis/]
- 15. Recent trends in microdialysis sampling integrated with ... [https://pmc.ncbi.nlm.nih.gov/articles/PMC3744124/]
- 16. In Depth Chemical Analysis of Brain Extracellular Space using ... [https://pmc.ncbi.nlm.nih.gov/articles/PMC12117515/]
- 17. Establishing In-vivo brain microdialysis for comparing ... [https://www.sciencedirect.com/science/article/pii/S0165027025000020]
- 18. Overview of Brain Microdialysis - PMC - PubMed Central - NIH [https://pmc.ncbi.nlm.nih.gov/articles/PMC2953244/]
- 19. Microdialysis [https://en.wikipedia.org/wiki/Microdialysis]
- 20. Cerebral microdialysis in clinical studies of drugs [https://pmc.ncbi.nlm.nih.gov/articles/PMC3663257/]
- 21. Microdialysis Probe Strategic Insights: Analysis 2025 and ... [https://www.marketreportanalytics.com/reports/microdialysis-probe-277846]
- 22. Overview of Microdialysis - PMC - NIH [https://pmc.ncbi.nlm.nih.gov/articles/PMC2538639/]
- 23. Microdialysis for assessing intratumoral drug disposition in ... [https://pmc.ncbi.nlm.nih.gov/articles/PMC3994531/]
- 24. Clinical microdialysis in neuro-oncology - PubMed Central - NIH [https://pmc.ncbi.nlm.nih.gov/articles/PMC4013313/]
- 25. Neurotransmitters: Impressive regulators of tumor ... [https://www.sciencedirect.com/science/article/pii/S0753332224007285]
- 26. Microdialysis Probe 2025-2033 Analysis: Trends, ... [https://www.archivemarketresearch.com/reports/microdialysis-probe-763839]
- 27. Experimental and numerical investigation of microdialysis ... [https://pubs.rsc.org/en/content/articlehtml/2024/ay/d4ay00699b]
- 28. Membranes for microdialysis of clinical samples [https://www.sciencedirect.com/science/article/abs/pii/S1383586625032423]
- 29. In vivo sampling using loop microdialysis probes coupled ... [https://www.sciencedirect.com/science/article/pii/037843479280412J]
- 30. Molecular weight cut-off [https://en.wikipedia.org/wiki/Molecular_weight_cut-off]
- 31. Molecular Weight Cut-off - an overview [https://www.sciencedirect.com/topics/engineering/molecular-weight-cut-off]
- 32. Microfabrication and In Vivo Performance of a Microdialysis ... [https://pmc.ncbi.nlm.nih.gov/articles/PMC5111822/]
- 33. Probes & Guides [https://microdialysis.com/products/probes-guides.html]
- 34. In vivo calibration of microdialysis probes for exogenous ... [https://pubmed.ncbi.nlm.nih.gov/1580357/]
- 35. Alcohol-induced accumbal dopamine- and taurine release ... [https://link.springer.com/article/10.1007/s00702-025-02928-w]
- 36. Methodological and analytical considerations for intra ... [https://pmc.ncbi.nlm.nih.gov/articles/PMC10729367/]
- 37. How to Choose the Best Microdialysis Probe for Your Project [https://www.amuzainc.com/blog/microdialysis-probe-selection-guide/?srsltid=AfmBOoqWOMYX1jpqzTrE2oIdq4SBp-AkxxJeqMfyAlSW3W-RPdYizXPz]
- 38. Microdialysis Probes as Localized Drug Delivery/Sampling ... [https://pmc.ncbi.nlm.nih.gov/articles/PMC3192628/]
- 39. Highly sensitive in vivo detection of dynamic changes ... [https://elifesciences.org/articles/91609]
- 40. 2.4.1. Surgery and probe implantation [https://bio-protocol.org/exchange/minidetail?id=8761080&type=30]
- 41. In vivo microdialysis [https://bio-protocol.org/exchange/minidetail?id=3834371&type=30]
- 42. Microdialysis Education [https://microdialysis.com/microdialysis-education.html]
- 43. Systematic Review: Anaesthetic Protocols and ... [https://www.frontiersin.org/journals/neuroscience/articles/10.3389/fnins.2020.577119/full]
- 44. Evaluation of general anesthesia protocols for a highly ... [https://pmc.ncbi.nlm.nih.gov/articles/PMC11508169/]
- 45. In vivo Microdialysis [https://bio-protocol.org/exchange/minidetail?id=5495319&type=30]
- 46. Microdialysis in Rodents - PMC - PubMed Central - NIH [https://pmc.ncbi.nlm.nih.gov/articles/PMC2945307/]
- 47. In vivo Microdialysis Experiment [https://bio-protocol.org/exchange/minidetail?id=7888852&type=30]
- 48. Stereotaxic surgery for implantation of guide cannulas ... - PMC [https://pmc.ncbi.nlm.nih.gov/articles/PMC6660514/]
- 49. Survivable Stereotaxic Surgery in Rodents - PMC [https://pmc.ncbi.nlm.nih.gov/articles/PMC3233859/]
- 50. Implant Guides for Stereotaxic Probes [https://www.thorlabs.com/newgrouppage9.cfm?objectgroup_id=10822]
- 51. Top Vet-Recommended Post-Surgery Pet Care Tips [https://www.greystanesvet.com.au/post/top-vet-recommended-post-surgery-pet-care-tips]
- 52. Post-Surgery Pet Care Guide – Tips for Safe Recovery [https://www.hawcreekanimalhospital.com/how-to-care-for-your-pet-after-surgery/]
- 53. How to Care For Your Pet and Speed Up Recovery After ... [https://www.catawbaanimal.com/site/blog/2022/06/03/pet-after-surgery-care-recovery]
- 54. Post-Operative Care for Pets - Veterinary Partner - VIN [https://veterinarypartner.vin.com/default.aspx?pid=19239&id=5467568]
- 55. FAQ - Technical Resources [https://microdialysis.com/technical-resources/faq.html]
- 56. Flow dependent changes in the effective surface area of ... [https://www.sciencedirect.com/science/article/abs/pii/002432058890063X]
- 57. Ionic Composition of Microdialysis Perfusing Solution Alters... | Scilit [https://www.scilit.com/publications/4e1bdc9882c09f9f69291cede0512d27]
- 58. Microdialysis update: optimizing the advantages - PMC [https://pmc.ncbi.nlm.nih.gov/articles/PMC2269072/]
- 59. of Optimization pH to improve perfusate of... microdialysis recovery [https://pubmed.ncbi.nlm.nih.gov/22884908/]
- 60. - Microdialysis System for Neurotransmitter In Vivo Recovery [https://www.amuzainc.com/what-is-microdialysis/]
- 61. A novel microemulsion-based isotonic perfusate modulated by... [https://jnanobiotechnology.biomedcentral.com/articles/10.1186/s12951-018-0418-2]
- 62. Microdialysis and its use in behavioural studies [https://pubmed.ncbi.nlm.nih.gov/28827164/]
- 63. Microdialysis and its use in behavioural studies [https://www.sciencedirect.com/science/article/abs/pii/S0165027017302947]
- 64. Material and design strategies for chronically-implantable ... [https://www.nature.com/articles/s41427-025-00613-8]
- 65. Microdialysis Systems [https://www.basinc.com/microdialysis-systems]
- 66. MUltisenSIng polymer transistors for in vivo reCording [https://anr.fr/Project-ANR-10-BLAN-1520]
- 67. Impedance Stability under Various Conditions and In Vivo ... [https://www.mdpi.com/2072-666X/15/8/1058]
- 68. A modular, adaptable, and accessible implant kit for chronic ... [https://pmc.ncbi.nlm.nih.gov/articles/PMC12539253/]
- 69. 4 Ways to Reduce Non-Specific Binding in SPR Experiments [https://nicoyalife.com/blog/4-ways-reduce-non-specific-binding-spr/]
- 70. Nonspecific Binding: Main Factors of Occurrence and ... [https://dmpkservice.wuxiapptec.com/articles/44-nonspecific-binding-main-factors-of-occurrence-and-strategies/]
- 71. Brain In of Monoamines | SpringerLink Vivo Microdialysis [https://link.springer.com/protocol/10.1007/978-1-4939-3064-7_25]
- 72. In Vivo Calibration of Microdialysis Using Infusion of Stable ... [https://pmc.ncbi.nlm.nih.gov/articles/PMC3656751/]
- 73. Comparison of calibration by delivery versus no net flux for ... [https://www.sciencedirect.com/science/article/abs/pii/S0003267098003638]
- 74. Microdialysis Calibration Using Retrodialysis and Zero-Net ... [https://link.springer.com/article/10.1023/A:1018906821725]
- 75. Methodological aspects of the use of a calibrator in in vivo ... [https://pubmed.ncbi.nlm.nih.gov/9833986/]
- 76. In vivo brain microdialysis: advances in ... - PubMed Central [https://pmc.ncbi.nlm.nih.gov/articles/PMC3083031/]
- 77. Novel microdialysis method to assess neuropeptides and ... [https://www.sciencedirect.com/science/article/abs/pii/S0306452211004453]
- 78. How to Choose the Best Microdialysis Probe for Your Project [https://www.amuzainc.com/blog/microdialysis-probe-selection-guide/?srsltid=AfmBOooOSdMw-kqip13LJrlsHC3vxpjFnO-XbgRMWaOQQRFAA0cY02qs]
- 79. exploring mechanisms behind opening the blood–brain barrier [https://pmc.ncbi.nlm.nih.gov/articles/PMC10683235/]
- 80. The blood–brain barrier: Structure, regulation and drug ... [https://www.nature.com/articles/s41392-023-01481-w]
- 81. Biomarkers of blood–brain barrier and neurovascular unit ... [https://pmc.ncbi.nlm.nih.gov/articles/PMC11947770/]
- 82. Blood–brain barrier disruption and sustained systemic ... [https://www.nature.com/articles/s41593-024-01576-9]
- 83. Analytical considerations for microdialysis sampling [https://www.sciencedirect.com/science/article/abs/pii/S0169409X00001149]
- 84. Serum detection of blood brain barrier injury in subjects ... [https://www.sciencedirect.com/science/article/pii/S2666350324000178]
- 85. Microdialysis - In Vivo System for Neurotransmitter Recovery [https://www.amuzainc.com/what-is-microdialysis/?srsltid=AfmBOor_6G0LXbkUPgMzhclHot6Qqr5_yJwGTX94qfUQl0gW-hu5duN4]
- 86. Collection, storage, and electrophoretic analysis of ... [https://pmc.ncbi.nlm.nih.gov/articles/PMC3107505/]
- 87. High temporal resolution delayed analysis of clinical ... [https://pubs.rsc.org/en/content/articlehtml/2018/an/c7an01209h]
- 88. In Vivo Microdialysis Method to Collect Large Extracellular ... [https://www.jove.com/v/57869/in-vivo-microdialysis-method-to-collect-large-extracellular-proteins]
- 89. Methods and issues in microdialysis calibration [https://www.sciencedirect.com/science/article/abs/pii/S0003267098005984]
- 90. PET Molecular Imaging in Drug Development - PubMed Central [https://pmc.ncbi.nlm.nih.gov/articles/PMC8919964/]
- 91. PET for in vivo pharmacokinetic and pharmacodynamic ... [https://pubmed.ncbi.nlm.nih.gov/12387835/]
- 92. Quantitative analysis of human brain microdialysate for ... [https://www.sciencedirect.com/science/article/pii/S0731708521004003]
- 93. Pharmacokinetics and Pharmacodynamics in Drug ... [https://amsbiopharma.com/pk-pd-studies-drug-development-adme/]
- 94. Comparison of Intravenous Microdialysis and Standard ... [https://www.mdpi.com/2079-6382/12/4/791]
- 95. Which Analysis Approach Is Adequate to Leverage Clinical ... [https://pmc.ncbi.nlm.nih.gov/articles/PMC7994214/]
- 96. Biomarkers, validation and pharmacokinetic- ... [https://pubmed.ncbi.nlm.nih.gov/12959633/]
- 97. The Role of Pharmacodynamic Biomarkers in Biosimilar ... [https://www.fda.gov/drugs/cder-small-business-industry-assistance-sbia/role-pharmacodynamic-biomarkers-biosimilar-drug-development]
- 98. Quantitative neuropeptide analysis by mass spectrometry [https://pmc.ncbi.nlm.nih.gov/articles/PMC12168976/]
- 99. Validated mass spectrometric assay for the quantification of ... [https://www.sciencedirect.com/science/article/abs/pii/S073170852031428X]
- 100. Establishment of a sensitive UPLC-MS/MS method to ... [https://www.frontiersin.org/journals/pharmacology/articles/10.3389/fphar.2023.1211383/full]
- 101. Quantification of Neuropeptide Y and Four of Its Metabolites in ... [https://pubmed.ncbi.nlm.nih.gov/31790196/]
- 102. A Rapid and Sensitive UPLC-MS/MS Method for ... [https://www.mdpi.com/2297-8739/10/4/247]
- 103. A Highly Sensitive UPLC-MS/MS Method for the ... [https://pubmed.ncbi.nlm.nih.gov/39519803/]
- 104. Unbound Brain-to-Plasma Partition Coefficient, Kp,uu,brain ... [https://pmc.ncbi.nlm.nih.gov/articles/PMC9246790/]
- 105. Prediction of the Extent of Blood–Brain Barrier Transport ... [https://link.springer.com/article/10.1007/s11095-025-03828-0]
- 106. ARTICLES In Vitro Methods for Estimating Unbound Drug ... [https://www.sciencedirect.com/science/article/abs/pii/S0090955624014338]
- 107. Measurement of unbound drug exposure in brain [https://pubmed.ncbi.nlm.nih.gov/21149540/]
- 108. Neuropharmacokinetic visualization of regional and ... [https://www.nature.com/articles/s41380-021-01267-y]
- 109. Application of machine learning to predict unbound drug ... [https://www.frontiersin.org/journals/drug-discovery/articles/10.3389/fddsv.2024.1360732/full]
- 110. Assessing extent of brain penetration in vivo (Kp,uu ... [https://www.sciencedirect.com/science/article/pii/S0928098723001847]
- 111. Experimental setup for push-pull microdialysis [https://bio-protocol.org/exchange/minidetail?id=7957580&type=30]
- 112. Development of a push-pull microdialysis sampling ... [https://link.springer.com/article/10.1007/BF02491027]
- 113. Push-Pull Perfusion - an overview [https://www.sciencedirect.com/topics/biochemistry-genetics-and-molecular-biology/push-pull-perfusion]
- 114. Negligible In Vitro Recovery of Macromolecules from ... [https://link.springer.com/article/10.1007/s11064-024-04119-7]
- 115. Dialysis Methods for Protein Research [https://www.thermofisher.com/us/en/home/life-science/protein-biology/protein-biology-learning-center/protein-biology-resource-library/pierce-protein-methods/dialysis-methods-protein-research.html]
- 116. Demonstration of low flow push–pull perfusion [https://www.sciencedirect.com/science/article/abs/pii/S0165027002002455#!]
- 117. In vitro-In vivo Correlation: Perspectives on Model Development [https://pmc.ncbi.nlm.nih.gov/articles/PMC3099258/]
- 118. Applications of In Vitro–In Vivo Correlations in Generic ... [https://pmc.ncbi.nlm.nih.gov/articles/PMC4476988/]
- 119. CMC Perspectives of In Vitro / In Vivo Correlation (IVIVC) ... [https://premier-research.com/perspectives/cmc-perspectives-of-in-vitro-in-vivo-correlation-ivivc-in-drug-development/]
- 120. In vitro-in vivo Pharmacokinetic correlation model for ... [https://pmc.ncbi.nlm.nih.gov/articles/PMC4640432/]
- 121. Chapter 6.6 Microdialysis for characterization of PK/PD ... [https://www.sciencedirect.com/science/article/abs/pii/S1569733906160312]